

8 Ways to Create Crowd-Pleasing Containers
These expert designers show that it’s not just what’s in the pots—it’s also how you use them
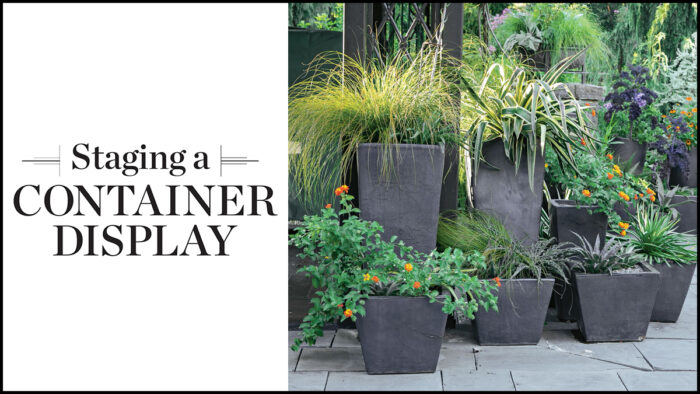
Containers open up a world of design possibilities for apartment dwellers, gardeners with limited time or space, and anyone who wants to add an instant focal point to their daily view. We decided to ask three professional gardeners to provide ideas for making container displays even better.
Chanticleer, a public garden in Wayne, Pennsylvania, is famous for its innovative horticultural spectacles. Lisa Roper, Dan Benarcik, and David Mattern, three of the horticulturists who design and tend sections of the garden, share here some of the key ideas and techniques behind their crowd-pleasing potted designs. Which of these tips will you employ when staging your next container display?
Plan more than one show per year
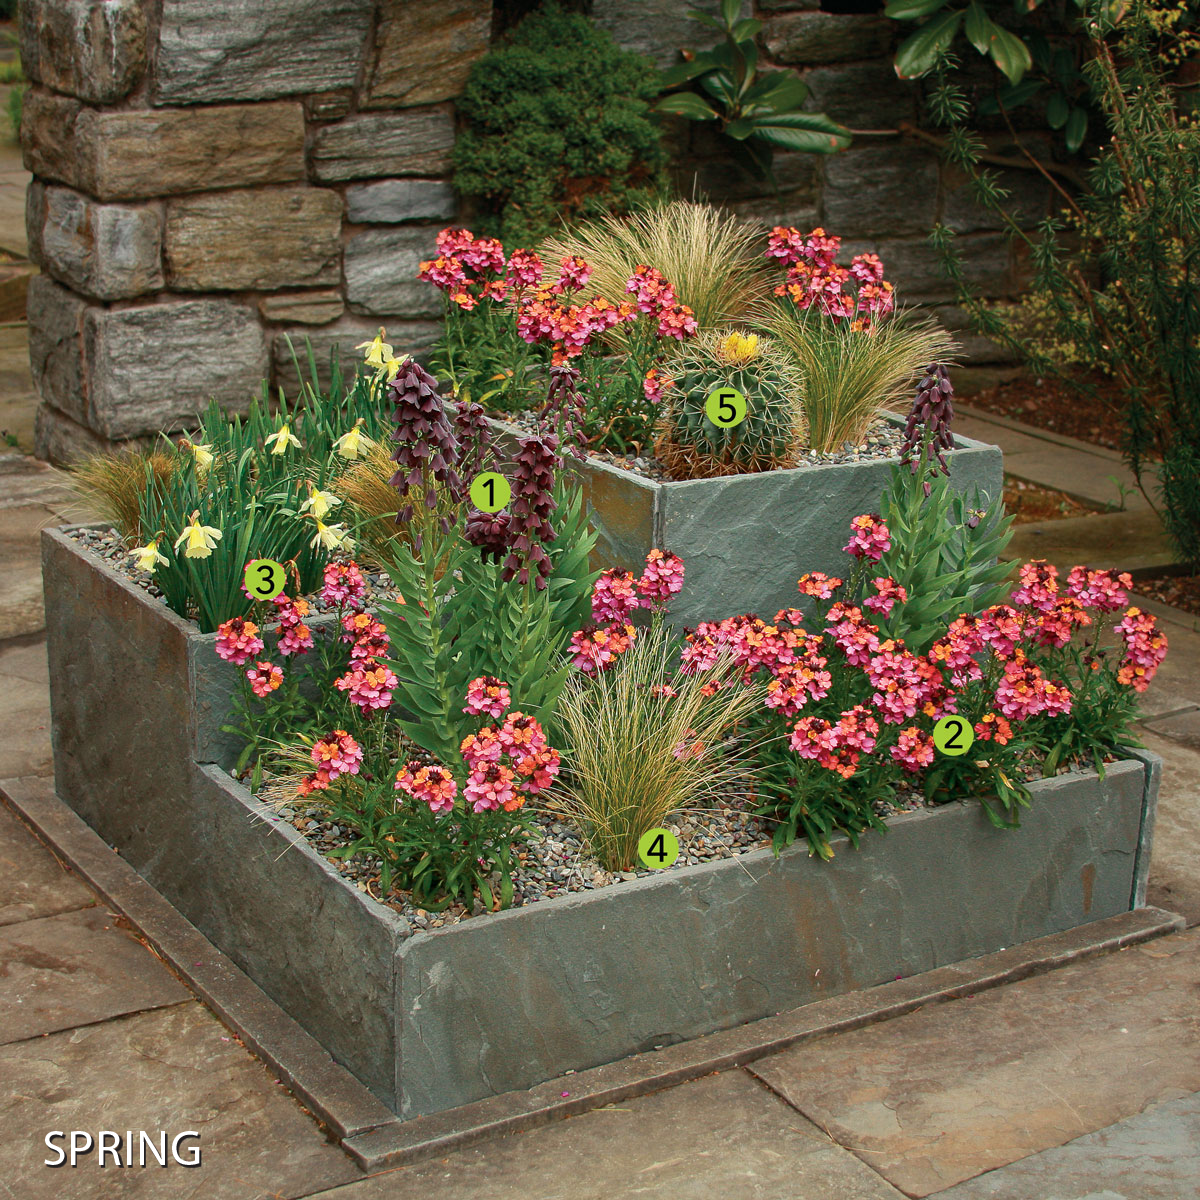
- Persian lily (Fritillaria persica, Zones 5–8)
- POEM™ Mirabelle Improved wallflower (Erysimum cv., Zones 8–9)
- ‘W. P. Milner’ daffodil (Narcissus ‘W. P. Milner’, Zones 3–9)
- Mexican feather grass (Nassella tenuissima, Zones 7–11)
- Barrel cactus (Ferocactus sp., Zone 11)
The plants in this multilayered bluestone container are changed out twice a year. In spring, the container features bulbs and early annuals or grasses. In late spring through fall, it is filled with succulents. It is in a full-sun location.
I plant small, early-flowering bulbs in autumn for the following spring, marking their locations with stakes laid on top of the soil. Marking them helps me plan where to plant annuals and grasses in early spring. Short daffodils such as ‘W. P. Milner’ bloom cheerfully alongside Persian lily, a tall elegant bulb with stalks of plum-colored bells and twisted gray-green leaves.
While those early bulbs are blooming I add cold-tolerant annuals, such as POEM™ Mirabelle Improved wallflower, for some extra color. The fine foliage of Mexican feather grass and a spiny barrel cactus add eye-catching textures to the mix. This display usually lasts until mid to late April, depending on the weather. Then all the plants are removed, and the summer-to-fall display is planted. The bulbs can be replanted in garden beds instead of being composted.

- Madagascar palm (Pachypodium geayi, Zones 10–13)
- Narrow-leaf chalksticks (Senecio vitalis, Zones 10–11)
- Parry’s agave (Agave parryi, Zones 7–10)
- Golden barrel cactus (Echinocactus grusonii, Zones 8–10)
- Prickly pear (Opuntia sp., Zones 5–11)
- Aeonium (Aeonium arboreum, Zones 9–11)
The summer succulents are planted as soon as the chance of frost has passed. I enjoy combining plants with contrasting forms like I did here, with the flat, Mickey Mouse ear pads of prickly pear mingling with the spiky rosettes of agave and the gracefully curved chalksticks.
Handmade elements add a creative touch
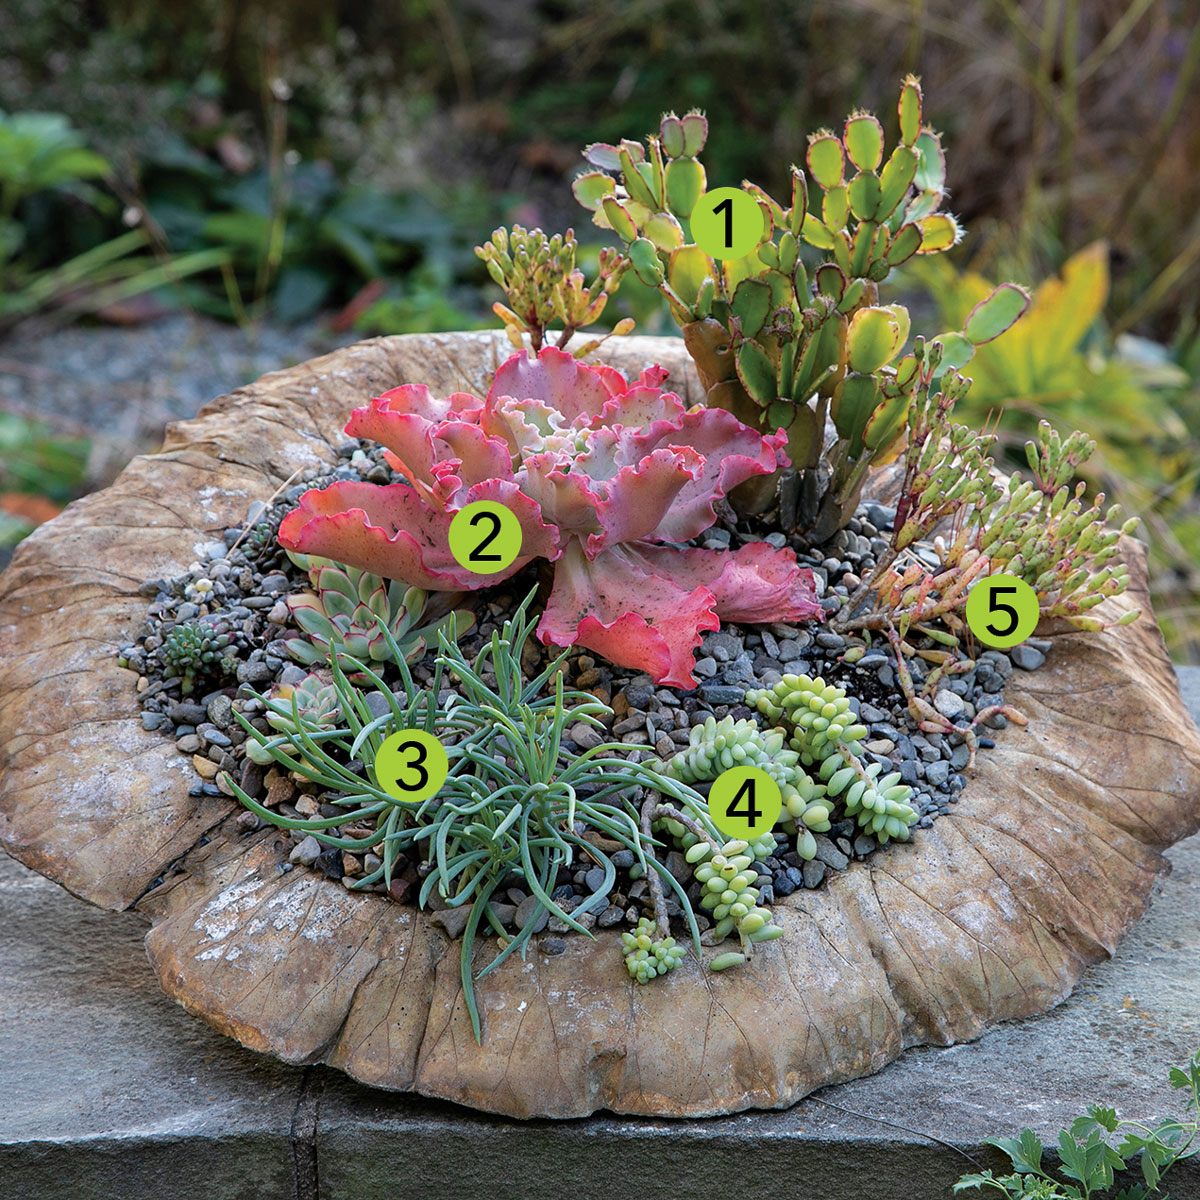
- Red mistletoe cactus (Pseudorhipsalis ramulosa, Zones 10–11)
- ‘Coral Reef Pink’ echeveria (Echeveria ‘Coral Reef Pink’, Zones 9–11)
- Narrow-leaf chalksticks (Senecio vitalis, Zones 10–11)
- Burro’s tail (Sedum morganianum, Zones 10–11)
- Dancing bones cactus (Hatiora salicornioides, Zones 10–11)
Cast leaves make artistic containers that are particularly well suited for drought-loving plants. Formed over a large, durable leaf with strong veins, the planter shown here was cast from a mixture of portland cement, builders’ sand, and a bonding agent. For step-by-step instructions on making your own leaf planter, check out Casting a Concrete Leaf Planter.
This shallow, well-drained container holds a collection of sculptural, shallow-rooted succulents. Chosen for their charming assortment of colors and textures, these plants look perfectly at home in the organic, sculptural form of the planter.
|
| Expert Tip | Give succulents great drainageSucculents do best in a very well-drained potting mix, such as Pro-Mix HP, or a lightweight product designed for green roofs, such as rooflite®. Once your succulents are planted, top-dress them with pea gravel. Water the container once or twice per week. |
|
|
Meet the expert Lisa Roper designs and manages displays in Chanticleer’s ruin garden, gravel garden, and prairie dropseed meadow. |

Repeat the pot color for continuity

- ‘Carnival’ mangave (Mangave ‘Carnival’, Zones 8–10)
- Prairie Fire sedge (Carex testacea ‘Indian Summer’, Zones 6–9)
- ‘Palo Pinto’ Texas lantana (Lantana urticoides ‘Palo Pinto’, Zones 8–11)
- Mangave (Mangave cv., Zones 9–11)
- ‘My Dog Spot’ mangave (Mangave ‘My Dog Spot’, Zones 9–11)
- Mangave (Mangave cv., Zones 9–11)
I lean heavily on the concept of repetition in all of my garden design work. Repetition soothes the eye, calms the mind, and reinforces the confidence of your aesthetic.
Grouping containers with a similar or identical finish is simple, elegant, and neat. It puts the emphasis on the plant combinations and takes a bit of the pressure off you, because the pot choice has already been determined. I particularly love working with black glazed containers. Their classic look never goes out of style.
When pots with matching finishes are grouped together, the subtleties of size, shape, and finish are diminished. They become a chorus of containers. Arrange your space using the empty containers before you give one thought to the plants you will use. If you need to reconfigure the pot arrangement after planting, you know that no matter which pots end up as neighbors, there will be no feuds.
|
| Expert Tip | Fill containers in layersFill the bottom half of your containers with compost and the top half with normal potting mix. Young roots will easily establish in the potting mix and then access the rich, micronutrient-laden compost in the middle of the season, when the moisture-holding capacity of the compost is most useful. |
Raise your game
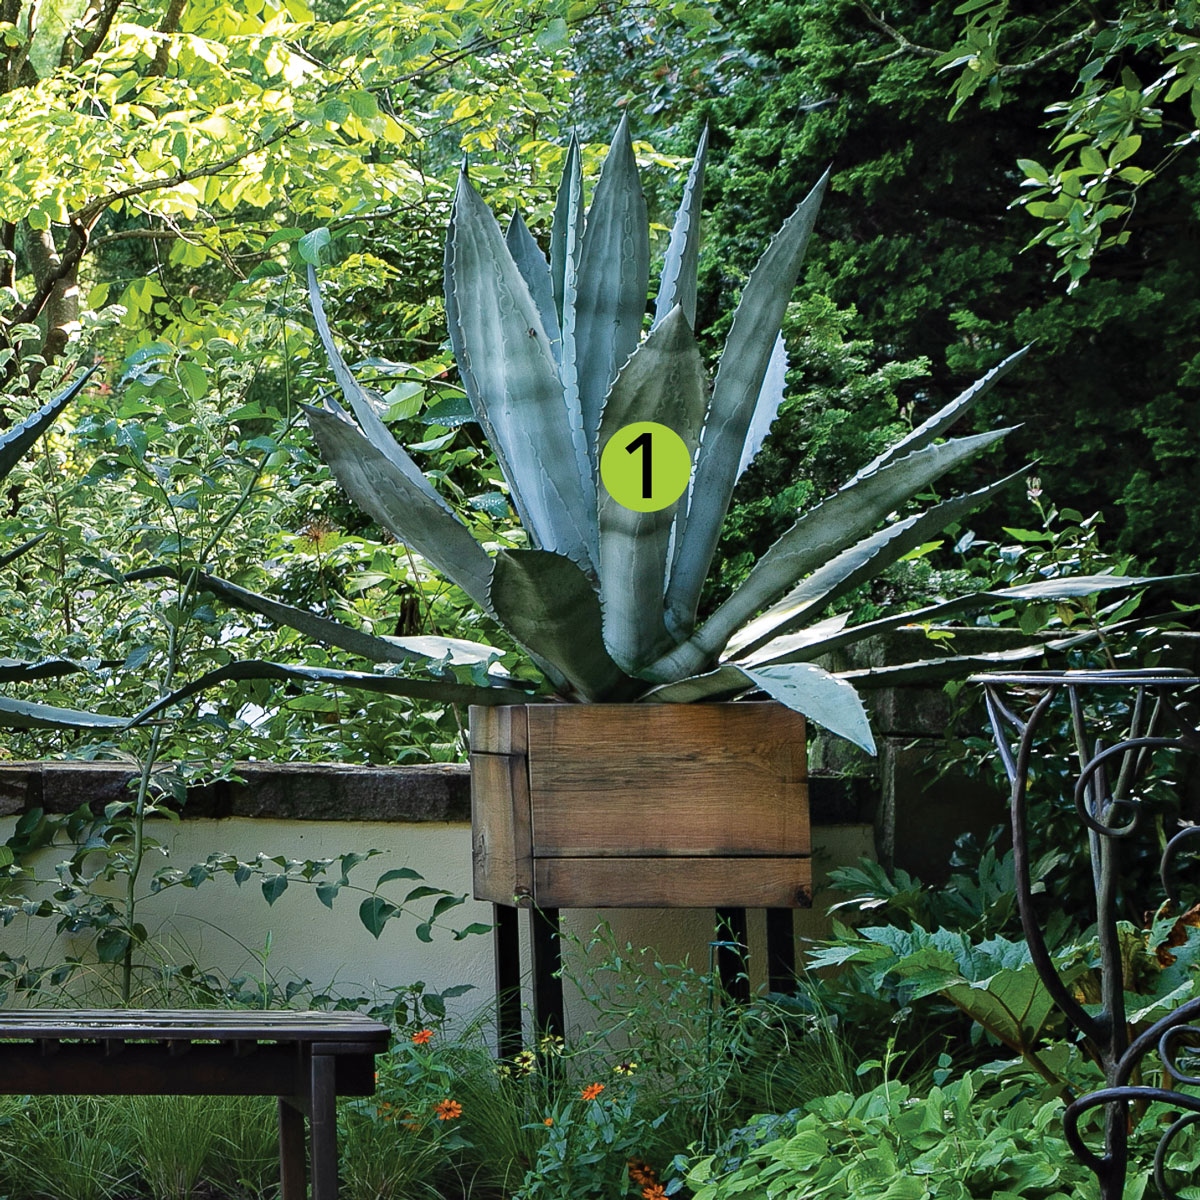
- Century plant (Agave americana, Zones 8-10)
Tall pots and sizable plants add instant drama to any garden space. So why do we usually relegate our master works to the terrace or the deck floor?
When we elevate a solo specimen or plant combination with a taller pot, our perspective changes immediately. Displays with plant stands, hanging baskets, window boxes, or on staircases can all be elegant solutions for putting plants at eye level. The more intimate viewing angle causes us to see each plant as more of an equal, and we gaze into the container rather than down on it.
Taller displays do come with a few challenges. First, it’s much more difficult to hide mistakes—but on the upside, you will quickly learn to make better plant choices. Second, stability comes into play. To keep a tall or stand-mounted container grounded, consider placing stones or cobbles in the bottom before adding potting mix. Plant stands or similar fixtures can also be discretely tethered or bracketed to something a bit more stationary, such as a wall or railing.
|
| Expert Tip | Protect surfaces with pot feetNo matter which style you prefer, pot feet improve drainage, provide additional stability on uneven surfaces, and prevent surface stains under your pots. Debris can easily be washed or blown out from under the containers during patio cleanup. |
Paired pots don’t need to match
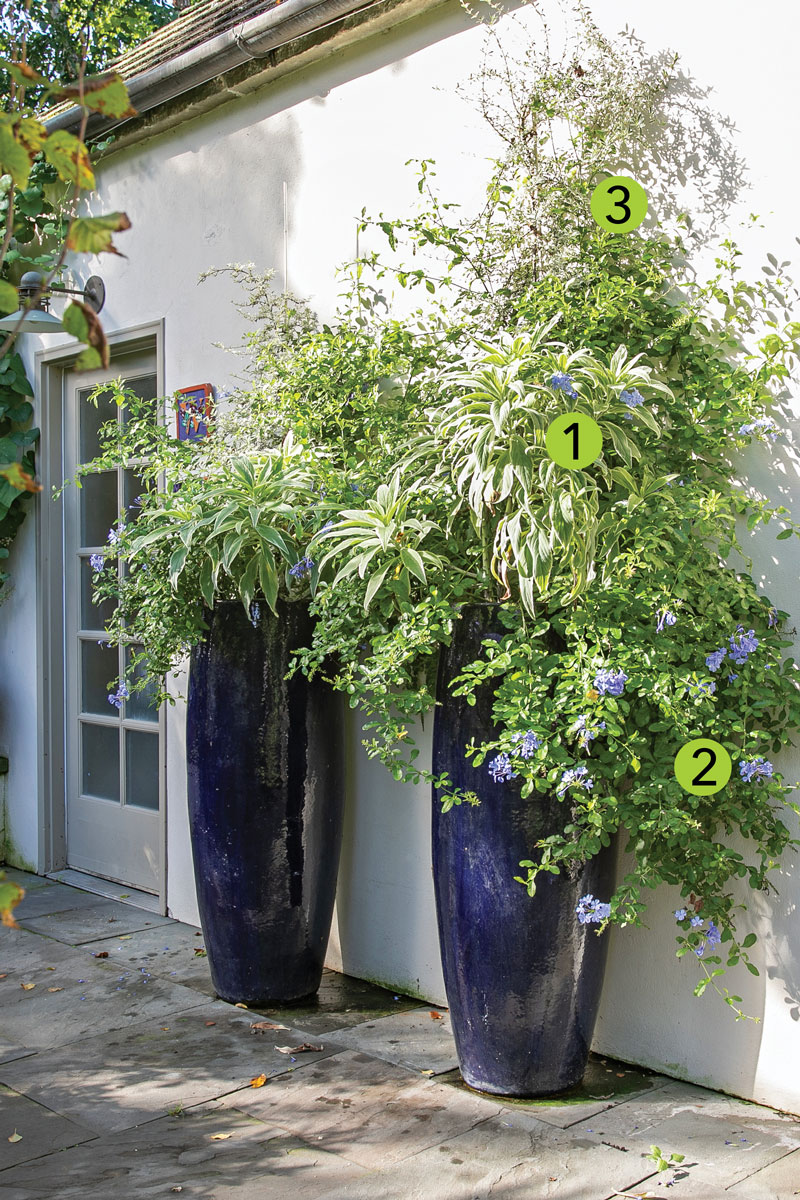
- ‘Star of Madeira’ pride of Madeira (Echium candicans ‘Star of Madeira’, Zones 9–10)
- Cape plumbago (Plumbago auriculata, Zones 8–11)
- Variegated creeping mirror plant (Coprosma kirkii ‘Variegata’, Zones 8–11)
Well-placed pairs of containers are perfect for marking an entrance, framing a view, and setting the stage. Symmetry is not necessary, but good plant choices are.
If the finish of the containers is the same, a level of symmetry has already been established. Even if the scale of the pots or the sizes of the plants are different, a thread of continuity carries through the design. This should give anyone permission to take a creative chance with the plant combinations they use to flank a door, a path, or a set of stairs.
I have always liked a bit of asymmetry in a paired planting, as long as there’s continuity between the pots. It helps create a sense of movement across the combination. Deuces are wild; execute two well-thought-out plant combinations in thematically connected containers, and you will have a winning hand!
|
|
Meet the expert Dan Benarcik designs and manages displays for Chanticleer’s teacup garden, welcome pavilion garden, and tennis court garden. |

Use containers to define a space
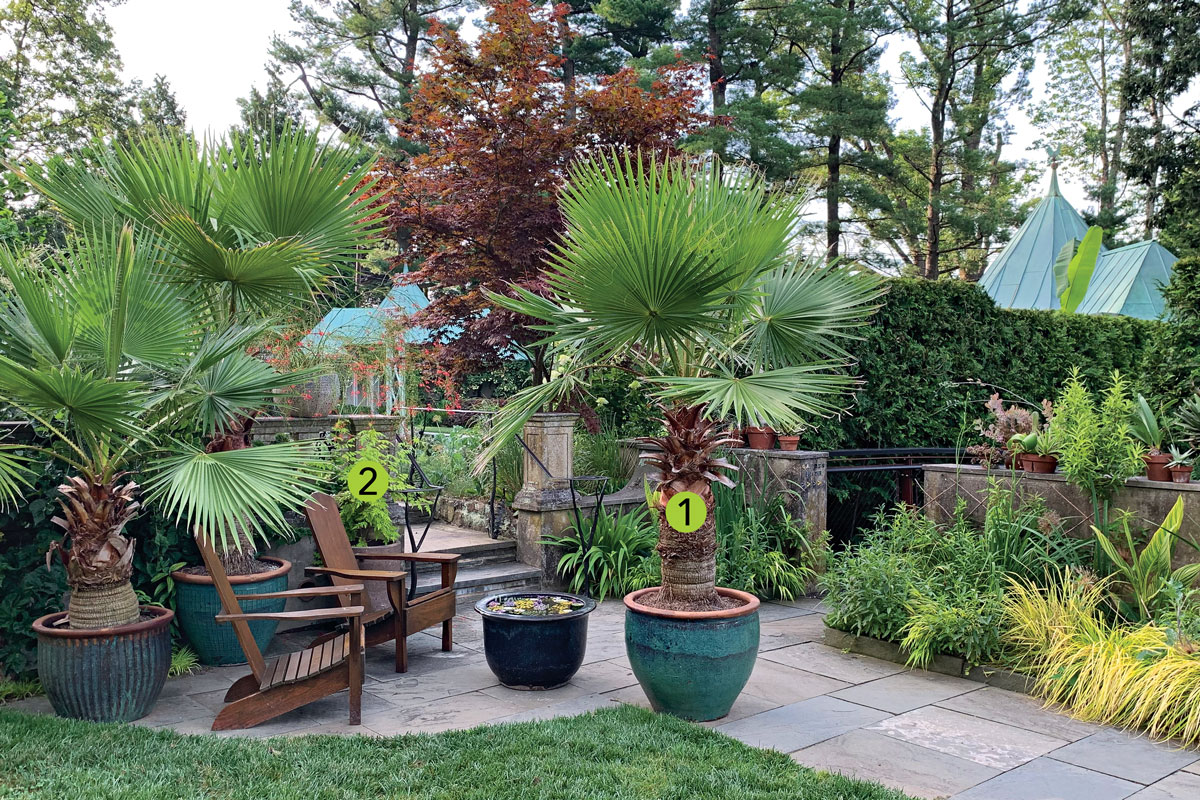
- Mexican fan palm (Washingtonia robusta, Zones 9–11)
- Fiona Sunrise jasmine (Jasminum officinale ‘Frojas’, Zones 7–9)
The first step in putting together a great container display is determining the right location. The containers should make an impact yet also appear as if they belong in the space. Well-designed arrangements greatly enhance key spots such as seating areas, places with attractive views, entrances, and exits.
Staging a cluster of containers is a nice solution around a seating or dining area, where the details can be enjoyed up close. Grouping containers in this way makes a space feel more intimate and defined. Clusters of containers are versatile and can be arranged and rearranged as needed.
Single stand-alone containers command attention. Think of them like exclamation points in the garden. If I am trying to make a statement with a single container, I try to keep the plants as simple and dramatic as possible. You don’t always need a lot of pots to make a statement.
The best part about containers is that they are mobile. They don’t always need to be permanent to create a moment. You can make the most of a space, and it doesn’t have to be the same year after year.
|
| Expert Tip | Set the stage before plantingMove containers out to the garden in late winter or early spring, before the garden comes to life. You will be able to see the bones of the landscape, and it will be easier to figure out how you want to define spaces. Container placement should look intentional. If empty containers look appropriate in the space, they will feel comfortable when everything is planted up and growing. |
Mix up your plant choices
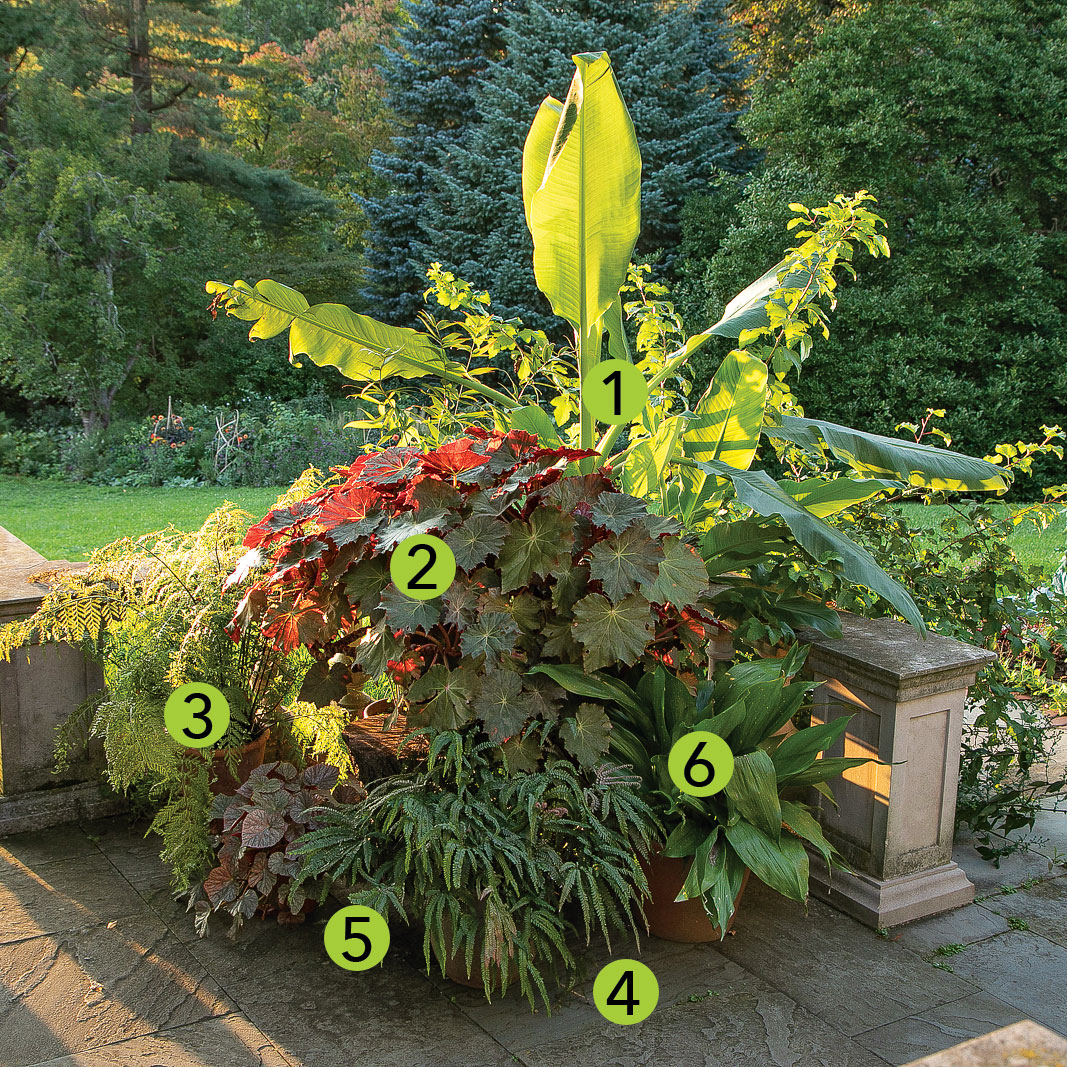
- Golden lotus banana (Musella lasiocarpa, Zones 7–10)
- ‘Selph’s Mahogany’ begonia (Begonia ‘Selph’s Mahogany’, Zones 10–12)
- Mother fern (Asplenium bulbiferum, Zones 9–11)
- Rough maidenhair fern (Adiantum hispidulum, Zones 8–10)
- ‘Mirage’ begonia (Begonia ‘Mirage’, Zones 12–13)
- Cast iron plant (Aspidistra elatior, Zones 8–10)
Containers allow you to take risks with plant combinations; planting can be fun and spur-of-the-moment. Don’t overthink it! Start by finding one plant that inspires you the most, then build the combination around that. Look for plants with exciting colors and textures that work well with your first plant. Feel free to mix annuals, tropicals, perennials, and even small woody trees and shrubs. Combinations are up to your own creativity. Challenge yourself to add different colors and textures to your usual palette. At season’s end, reflect back on how you would improve your combinations, and save those ideas for next year.
|
| Expert Tip | Screening should be subtleIf your container is meant to screen a view, make the plantings discrete and understated. Use foliage and texture to create a screen that is interesting but does not draw too much attention to itself. |
Branch out and bend the rules
|
|
|
|


Incorporating branches into your designs will give old containers a whole new look. Save cuttings from late winter and early spring pruning, particularly the colorful, flexible branches of species such as willow (Salix spp. and cvs., Zones 4–9; above left and right), smoketree (Cotinus spp. and cvs., Zones 4–9), and dogwood (Cornus spp. and cvs., Zones 3–9). You can also use branches from trees such as beech (Fagus spp. and cvs., Zones 3–9; above center) or maple (Acer spp. and cvs., Zones 3–9). Push cut branches into the soil around your plantings to add instant height and color, or to support an annual vine. Weave branches around a circular wire frame to create a basket-weave look. Wrap a container in branches to change its shape. Willow and dogwood whips are often pliable enough to bend into different shapes; twisting or weaving branches together will provide more stability. This is a great way to repurpose materials most gardeners have on hand.
|
|
Meet the expert David Mattern designs and manages displays for Chanticleer’s house and terraces as well as the vegetable garden. |


Comments
Log in or create an account to post a comment.
Sign up Log in