

How to Create a Pest-Proof Vegetable Garden
Design a space that keeps the pests out but doesn’t look like Fort Knox
When my husband, Andy, and I moved to our new home in rural Washington, we knew we wanted a large vegetable garden. However, with our new idyllic location came to a slew of forest creatures who called the nearby woods their home: deer, moles, voles, and rabbits, to name just a few. Wanting to grow the largest amount of fresh produce possible, we happily laid out the general footprint of our dream vegetable garden—which ended up being bigger than our modest single-story house (1,800 square feet of the veggie garden versus 1,750 square feet of a house). To add traditional 8- to 10-foot-tall deer fencing around the garden would have made it look like Fort Knox—and would have completely dominated the site (and it would look pretty ugly).
We needed to find a way to keep the garden and house in proportion. It also had to be beautiful since the garden is the main view from the back of the house. Thankfully, since I’m a landscape designer and Andy is a woodworker, we had the skills and determination to make this work. The solution was a series of tactics we developed to keep the garden safe from pests but maintain its good looks.
Use a custom fence to keep deer and bunnies out
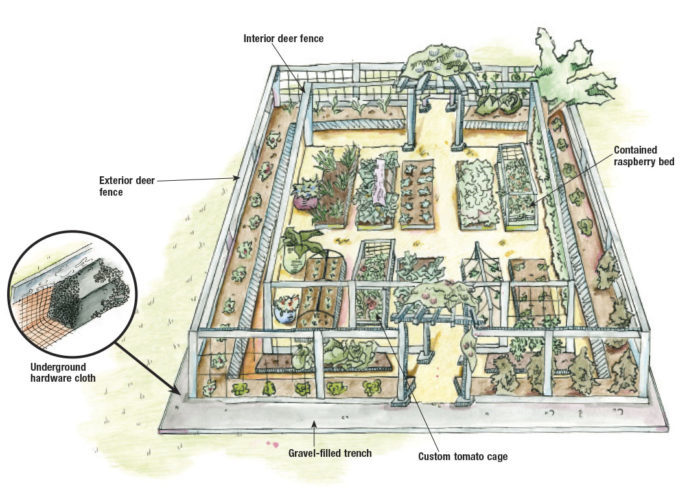
We based our design on the garden of our friends who battle with deer on a daily basis, but we adapted the concept to take smaller creatures to task, too. Rather than one very tall perimeter fence, we erected two 5-foot-tall fences, spaced 5 feet apart, with the thought that deer won’t jump if they aren’t sure where they can land. This has been nicknamed the “boing-boing fence” since deer will bound over an obstacle only once; they won’t jump into the 5-foot gap, then out again. To date, no deer have gained entry, although they frequently cruise the perimeter.
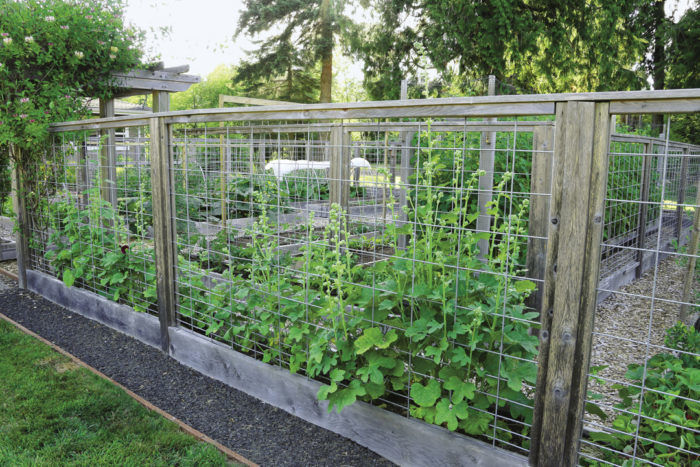
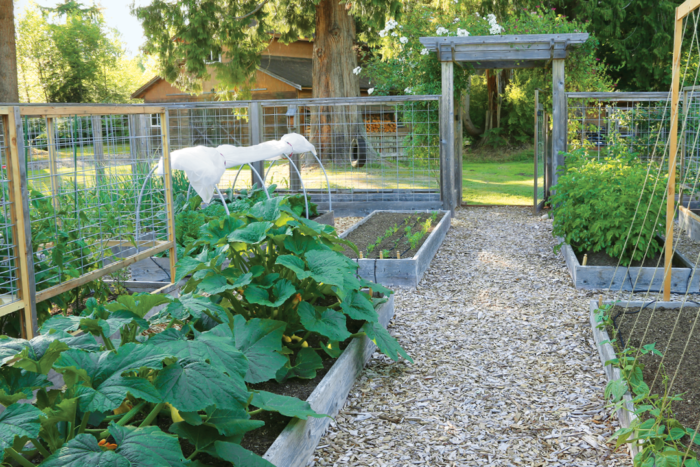
Andy built 8-foot-tall cedar pergolas over the two gates to gain the extra height needed to keep deer out at the entry points. The pergolas also provide support to growing vines, including our favorite Dutch honeysuckles ‘Serotina’ and ‘Belgica’ (Lonicera periclymenum ‘Serotina’ and ‘Belgica’, USDA Hardiness Zones 4–9). The fragrant flowers attract hummingbirds while the glossy red berries are a popular treat with cedar waxwings. This is one of the few places I can grow roses, too.
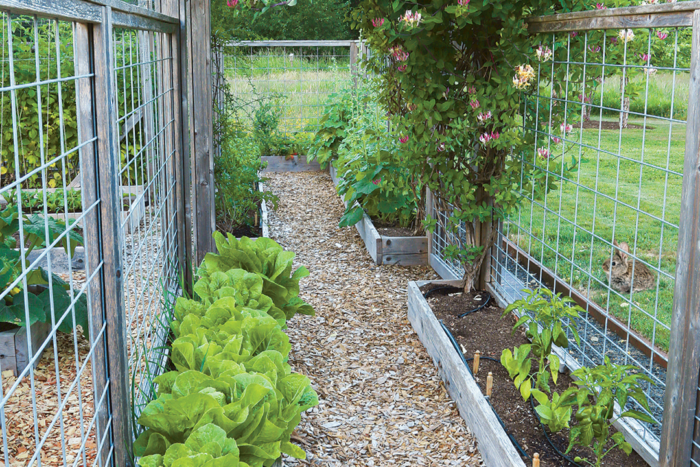
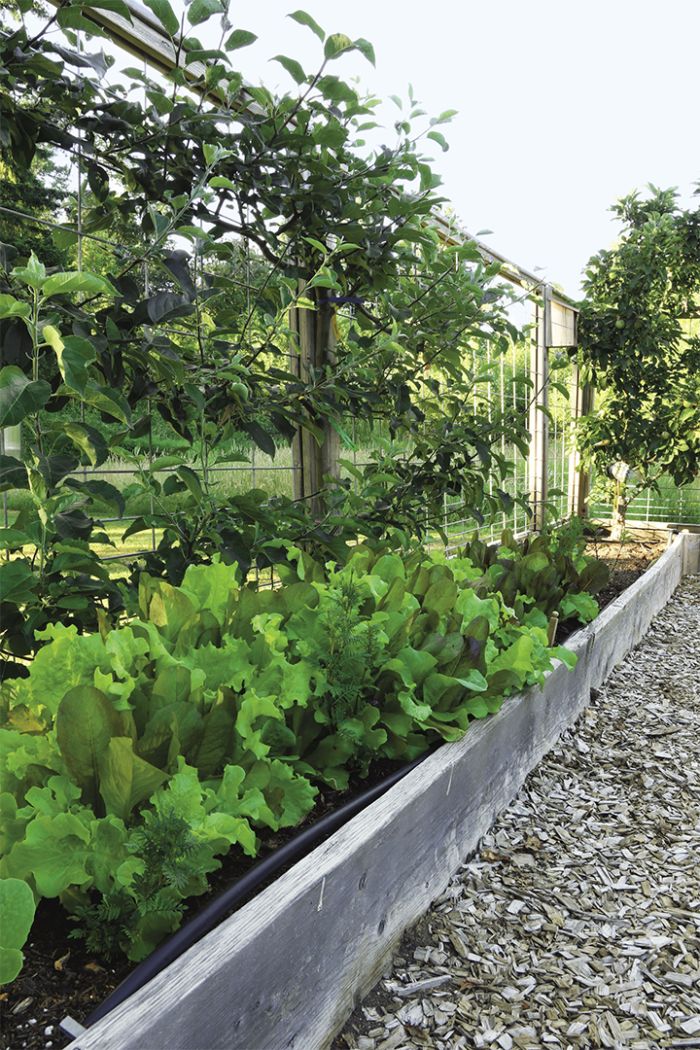
The fences are made from hog-wire panels framed in cedar. We chose graduated hog wire and made sure the smaller openings were at the base to keep rabbits out. These panels are attractive and double as trellises for espaliered apples and vining veggies.
Retrofit your beds to exclude moles and voles
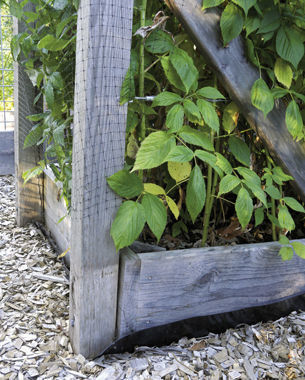
Having dealt with the deer and rabbits, it was time to address our parsnip-loving vole population. We dug a 3-foot-deep trench around the perimeter of the garden and inserted ¼-inch galvanized hardware cloth, stapling it to the 1-foot-tall fence baseboards (which also double as one side of a raised bed) as we went (inset illustration, below). Then we filled the trench with gravel. Although this worked well for several years, we noticed the wretched creatures had infiltrated our fortress last summer. It appears that while the steel mesh is keeping them from burrowing, they are able to scramble up the boards and hop into the garden through the hog wire. We are looking at various solutions for this, including extending the perimeter beds to a height of 18 inches.
To maximize our planting area, we customized the size of our raised beds to suit the available space. We used untreated pine boards to cut costs, screwing them together so that an individual board can be replaced easily as needed. Cedar would have offered greater rot resistance, but at a hefty price tag. Between the two fences, we added beds either 18 inches or 3 feet wide to accommodate different types of crops while also taking advantage of the vertical growing opportunity afforded by the fencing. This still allows us to have a 2-foot-wide pathway, too. In one area, we left enough room for container gardens to be nurtured out of harm’s way.
Two 4-foot-wide paths intersect the main garden to provide easy access for a wheelbarrow. In this area, all our raised beds are 3 feet wide and therefore easily accessible from either side whether kneeling or standing. It’s surprising the difference a few inches makes, but I found it uncomfortable to reach into the middle of a 4-foot-wide bed from a kneeling position. Most of these beds are 10 feet long and all are 1 foot high. Since we have good native soil, increasing the soil level by only a foot gave me all the advantages of raised beds, including warmer soil temperatures and additional planting depth for deeper-rooted crops, such as potatoes and parsnips. But the shallower depth helped keep costs in check as taller beds would have significantly increased the budget.
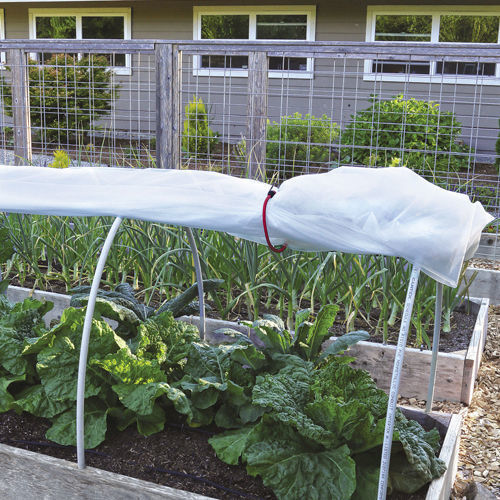
Our basic raised-bed design has been adapted to accept a simple hoop frame by drilling 7/8-inch holes into the tops of the boards into which bent lengths of schedule-40 pipe or similar (usually found in the electrical department of your local hardware store) are inserted. This allows us to attach a floating row cover as needed for insect exclusion or frost protection. And to corral the vigorous raspberry canes, we inserted a 2-foot-wide bamboo rhizome barrier to the outside of one bed. We also added tall braced corner posts on the raspberry bed and ran tension wires between them to create a frame. They are 3 feet wide, so we can easily reach in for harvesting, weeding, or pruning.
Consider browsing habits when drawing up a planting plan
While we are confident that the rabbits have been thwarted, we do still get deer munching on any apples or blueberries that protrude outside the fence. Since they can’t devastate the entire crop, we choose to accept that small sacrifice, but you may opt to plant more deer-resistant crops such as rhubarb or aromatic herbs in these outer beds.
Our two golden retrievers have created a new game, however. They have discovered how to insert a paw through the lowest part of the fence and pull the biggest, ripest strawberries toward them. It’s then just a matter of reaching in with their long snouts to delicately “harvest” these juicy fruits. It would appear that despite all our efforts, some “critters” have had the last laugh!
Plans
Build a custom tomato frame with your scraps

To make the most of our modest budget, we used leftover scraps of fencing to build tomato cages. The cages fit over the raised beds and can be screwed in place.
1. Trim the scraps and frame. Cut four-wire panels to size (which varies depending on the size of the raised bed), and frame each panel with cedar. Screw the frames together to form a box.
2. Make sure the right end is up. Keep the larger grid openings at the top so you can harvest easily, and leave a 10- to a 12-inch opening at the base of the cage to facilitate weeding and fertilizing.
3. Size the cage to the bed. The number of plants in the cage will depend on its size: We built two 5-foot-long cages for our 10-foot-long beds and plant two tomato plants in each.
4. Move as needed. The cages can easily be moved to accommodate crop rotation in successive years.
Plans
Organized and attractive
A series of orderly fences and retrofitted raised beds leaves plenty of room for overzealous edibles like strawberries, cabbage, and squash to play in a civilized manner. However, a system of subtle barriers, including double fences and underground hardware cloth (inset), prevents everything from bunnies to bears from spoiling the harvest.
Karen Chapman is a landscape designer who lives with her woodworker husband in Duvall, Washington.
Photos, except where noted: Danielle Sherry, Karen Chapman. Illustrations: Kate Gosselin


Comments
Log in or create an account to post a comment.
Sign up Log in