

Getting Big Vegetable Production From a Small Space
Well-timed transplants and inventive trellising keep plants healthy and yields high

I have lived—and gardened—in three countries: England, Barbados, and the United States. In the United States, I found myself settled on the eastern tip of New York’s Long Island, a grower’s paradise in USDA Hardiness Zone 7.
Deep, rich soils combined with a long growing season—and a ready market from local stores and restaurants—persuaded me to start growing commercial crops. A local nursery owner let me cultivate an unused portion of his leased land, which enabled me to set up dozens of 200-foot-long by 4-foot-wide beds in the incredible 11-foot-deep topsoil. It was there that I learned the advantages of drip irrigation and the disadvantages of white-tailed deer.
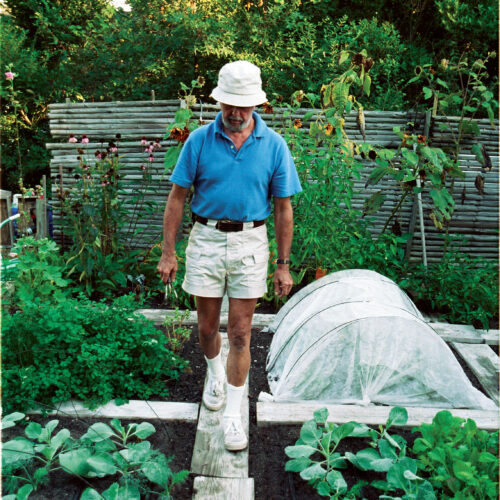
Perhaps as a reaction to the burden of that intensively planted 5 acres, my home garden is small. It is 14 feet wide by 36 feet long, a fenced rectangle of soil that I created from compost and green manures. Unlike the market garden, my home garden is built on sand that has a bare inch of topsoil. After 10 years of adding amendments, the soil was about where I wanted it: a pH of 6.5 and an organic content of 5 percent. Still sandy, it drains well.
With a market garden, tending it full time is what you do. But my home garden has to take its turn with the other priorities in my life, such as earning a living, running a small museum, volunteering as an emergency medical technician, and talking about gardening to garden clubs and extension classes. It is essential, therefore, that I have things sufficiently well organized so that the garden never gets away from me.
Transplants are the key to continuous production
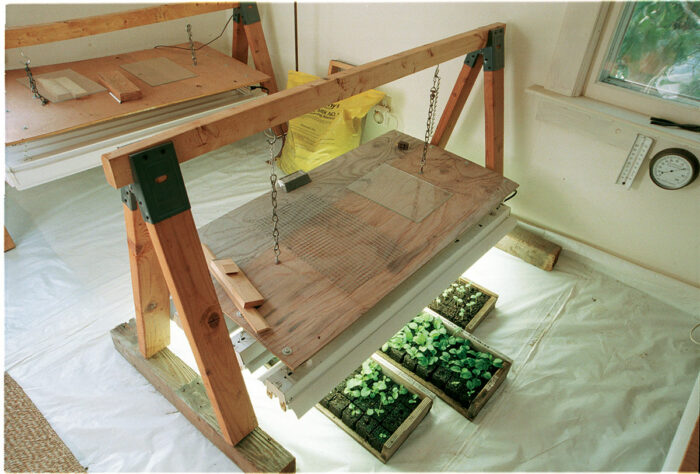
Like most gardeners, I suffer from late-winter catalog fever. I always buy too many seeds of more varieties than I can possibly grow. I can’t help it—I’m an addict. But thanks to indoor planting, most of my plants eventually find a home. All my early plantings are transplants that I start inside under lights. There is no better cure for the winter blahs than a roomful of seedlings. I’ve attached fluorescent fixtures (cheap bright-white tubes, not the expensive warm-white or wide-spectrum grow lights) to plywood boards and suspended the boards by chains from tall sawhorses. The chains allow me to raise the lights as seedlings get taller. Learn how to build your own seed starting stand.
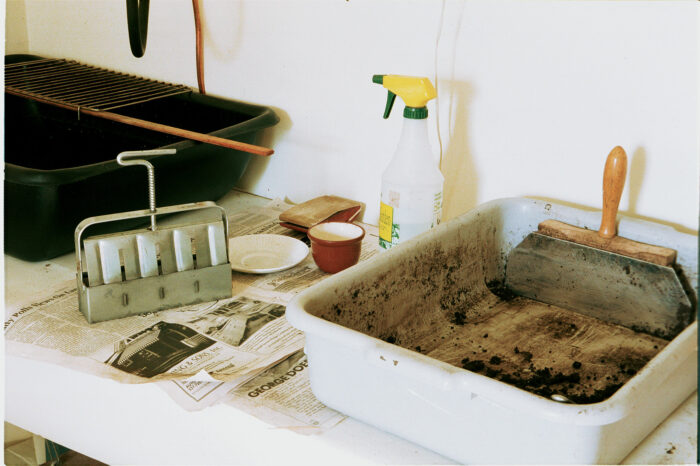
Two-inch-square soil cubes are my preference, rather than plastic pots or trays. Roots reach the edge of the soil block and stop; they don’t circle around, as they can with pots. With soil blocks, transplant shock is negligible or nonexistent. I use an organic soil mix. Mixed with water, it forms soil cubes that hold together, and it contains enough compost to eliminate the need for supplemental feeding. I place the blocks in flats made out of plywood and 1×2 lumber. The flats have three sides, with the fourth side left open to allow for drainage. I bottom-water by placing the flats in a large plastic pan containing about 3 inches of water. This keeps the leaves dry—an important way to avoid fungal diseases. After the soil cubes have absorbed enough water, I let the excess drain off.
|
|
|
|
I move the seedlings out into two cold frames as soon as daytime temperatures permit. One cold frame is in a shady spot; the other has old screen windows (with shade cloth replacing the screening) laid across the top to allow the seedlings to harden off gently. In early spring, this means carrying a lot of flats out in the morning and back in at night, but it is a small price to pay for inexpensive and healthy transplants.
|
|
|


Once the seedlings are hardened off, the soil cubes are easily transplanted into the garden. My three-finger-scoop method beats any tool I have found: Plunge three fingers into the soil, pull the soil back, and plop the soil cube into the space created. Fluff a little soil over the top of the cube (to prevent moisture from wicking out), firm the soil around it, and move on to the next spot.
When I’ve finished, I water everything in to remove any trapped air.
Transplants are essential to start the season early and to provide some succession plantings. I start first with up to 10 varieties of lettuce, three or four varieties each of tomatoes and peppers, and long-season crops, like leeks. The lettuces and leeks go out to cold frames early on, while tomatoes and peppers stay indoors under the warmth of the lights. This leaves room indoors for flats of herbs and several flowers. In late summer, I start winter crops—like cabbage, broccoli, and kale—and a final round of lettuce. By starting the fall lettuce inside under lights, the seedlings avoid the worst summer heat (some lettuces won’t even germinate in hot soil, and many more just bolt), and they are ready to transplant when the weather cools off a bit.
At the same time that early transplants go out into the garden, I direct-sow many salad crops for cut-and-come-again use. When the transplants have matured and been harvested, I replace them with later transplants, such as parsley, basil, sage, and thyme. I direct-sow peas and beans, then tear them out and replace them in mid- to late summer when they pass their peak, which gives me room for a fall crop.
Structures increase space efficiency
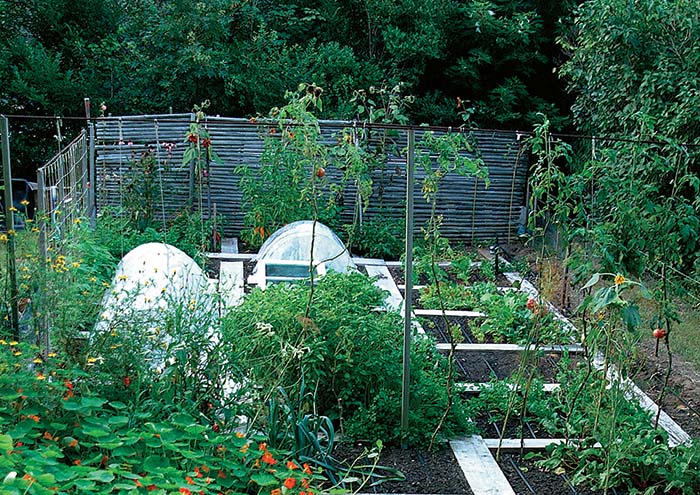
I place 4-foot-long 2×10 planks across the garden and longer pieces to run end to end.
These serve as walkways and enclose the 4-foot-square beds. I flip them over occasionally to expose pests, such as slugs and sowbugs, and to counteract cupping of the boards. My drip-irrigation lines run under the planks, which do not, as you might expect, interfere 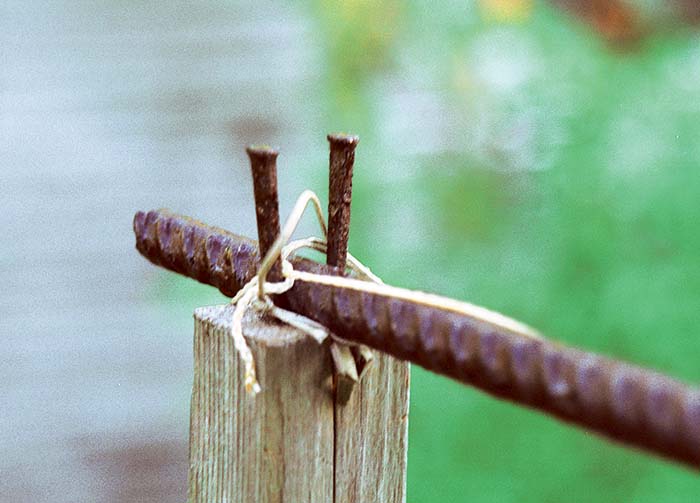 with the flow of water. In late December, I remove all the planks and store them, with narrow strips of wood between them to allow for air circulation.
I am convinced that drip irrigation is the only way to water a garden. In addition to putting water where plants need it and keeping it off the leaves, it is also economical—there’s almost no loss of water to evaporation. With a small fertilizer injector connected to the system, I can feed a little fish-seaweed fertilizer down the lines when needed. My hose layout is permanent; I drag it out of the way only in early spring to cultivate the whole garden, then I replace it. The lines have emitters every foot and are spaced about 2 feet apart.
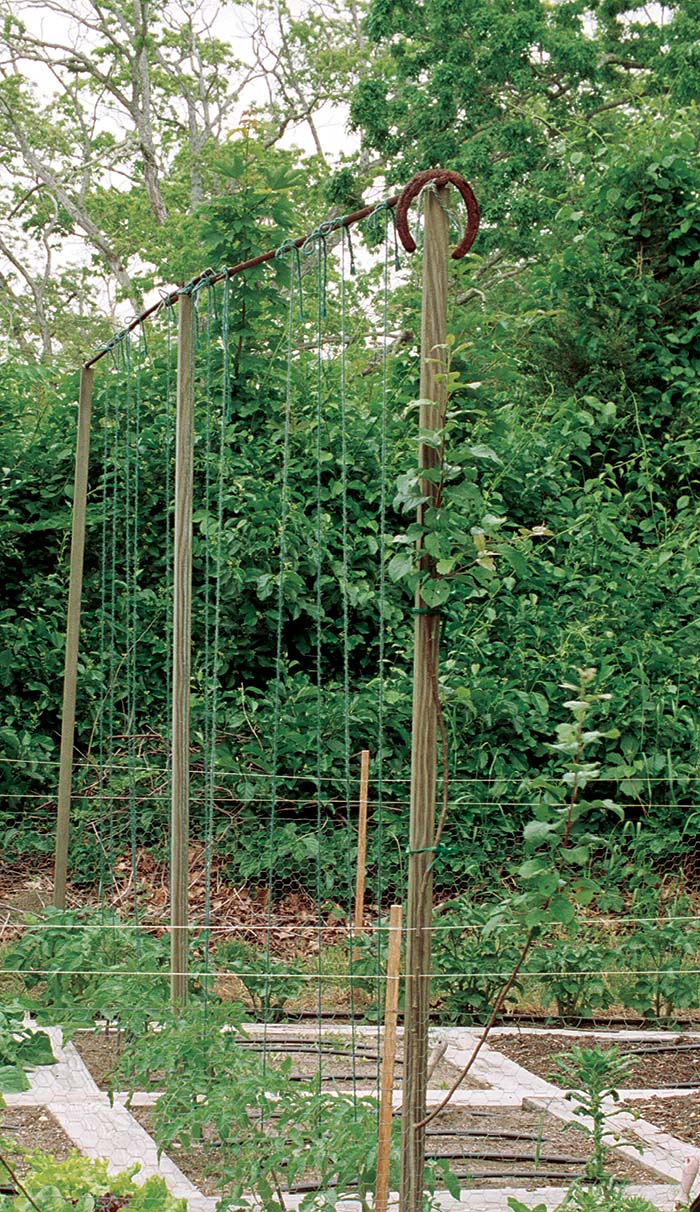
Four kinds of plants need support: squash, beans, peas, and tomatoes. All four get the same basic treatment to increase their production and to help me gain a bit more space. I hammer 8-foot-long 2×2 poles 2 feet into the ground, about 6 feet apart along the row. I then drive two nails, about ½ inch apart, into the tops of the poles. Eight-foot lengths of steel rebar rest between these nails (photo, bottom right). Their weight holds them in place, and they form the top support.
Squash, peas, and beans climb 6-inch-square nylon netting suspended from the rebar and stapled to the poles. For tomatoes, I tie biodegradable garden twine around the base of the plant, wind it around the stem, and secure it to the rebar overhead. As the tomato plant grows, I keep twirling the plant around the twine; I find that attending to this task once a week is enough. I prune off all side shoots, which allows me to plant tomatoes on 16-inch spacing. As the plants mature, I remove all lower leaves so that none touches the ground, minimizing the transference of soil-borne diseases.
Tunnels of floating row-cover fabric (supported on wire hoops) are my principal protection against insects. The only pesticide I use is Bt (Bacillus thuringiensis) against caterpillars. If you discover the life cycle of insect enemies, then you will know when to install and remove covers. The best way to acquire this knowledge is by observation and record-keeping. All my techniques might sound like a lot of work, but if you analyze them, you will see that they are, in fact, the reverse. I take time in the off-season—December through February—to set up equipment, order seeds, and prepare record sheets. Throughout the growing season, my garden gets attention when I can spare it from my other activities. Like most living creatures, it seems to do well with what one observer describes as “benevolent neglect.
The virtues of record-keeping

For tracking seed starts, I create record sheets on my computer and then fill them in by hand. They contain the seed-flat number (I paint numbers on all my flats with cotton-swab “paintbrushes”), the date something is seeded, the plant name, the date it emerged, and the hardening-off (cold frame) and transplant dates.
▶ Get the timing right. Recording the data takes seconds, and I have an invaluable guide for the following year. A brief note such as “Start two weeks later!” reminds me not to be so eager to seed tomatoes the following year. These notes help me rearrange seeding times so that slow starter, such as leeks, are started early enough to coincide with ideal transplant dates, and they also encourage me to plant more or less of some things. At the end of the year, I staple the sheets together for winter reading.
▶ Remember what went where. I have a frequently updated record sheet for the garden, too. A simple tic-tac-toe diagram shows what was planted in which bed, when it was planted, and whether it was a transplant or was direct-sown. This record allows me to rotate crops so that I don’t plant the same thing in the same place for two years running. When an insect pest appears, I note the date. I also keep a yearly list of seed varieties that I have bought, the year they were purchased, and sources, with notes about how well—or how poorly—a plant did. This is enough to keep me from wasting time planting three-year-old onion seeds, and it reminds me that seeds from a particular source, or of a certain variety, are not good performers.


Comments
Log in or create an account to post a comment.
Sign up Log in