

How to Grow Tasty Tomatoes From Seed
Get more variety by growing your own plants from seed

A long-standing myth among tomato lovers is that home-grown tomatoes taste the best. But it’s the variety of the tomatoes that actually influences the taste, not whether they’re grown on a farm or in a backyard. True, most farms grow varieties selected for their commercial qualities, which means tough skins that withstand shipping, bold colors for eye appeal, and uniform ripening for efficient harvest. Flavor, unfortunately, is secondary. That is why I go for the more flavorful varieties that typically aren’t available in the produce section. These varieties aren’t usually offered as transplants at the garden center, so you’ll have to grow your own plants from seed.
To find what tomatoes suit your palate, sample a lot of different ones from neighbors’ gardens, farmers’ markets, and produce stands. But don’t completely rule out the supermarket; you can get lucky sometimes and find the perfect tomato. For those you like (and be ruthless—there’s no reason not to grow anything but the best), find out the varietal name so that you can order seeds. Learn more: 5 Great New Tomato Varieties
Success with seeds
1. Sow them early
- Time it right. Tomatoes, fortunately, are easy and forgiving to grow from seed, but timing is important. Sow your seeds four to six weeks before the average date of your last killing frost (check with your local cooperative extension office) to have transplants ready to set in the ground about a week after that date.
- Nestle them in. Fill a small seedling flat with potting mix, and make furrows using a pencil or a furrow tool (below, left). Keeping to one variety per row, sprinkle the seeds closely in the furrows (below, center), and cover them firmly with the displaced soil (below, right). Be sure to label each row.
- Provide water, warmth, and light. Set the flat in a pan of warm water for about an hour. Remove the flat from the water, cover it with plastic or a pane of glass, and keep the temperature around 75°F. Don’t worry about providing light at this point as tomato seeds do not need light to germinate. As soon as sprouts poke through the surface, remove the cover and move the flat to bright light.
 |
 |
 |
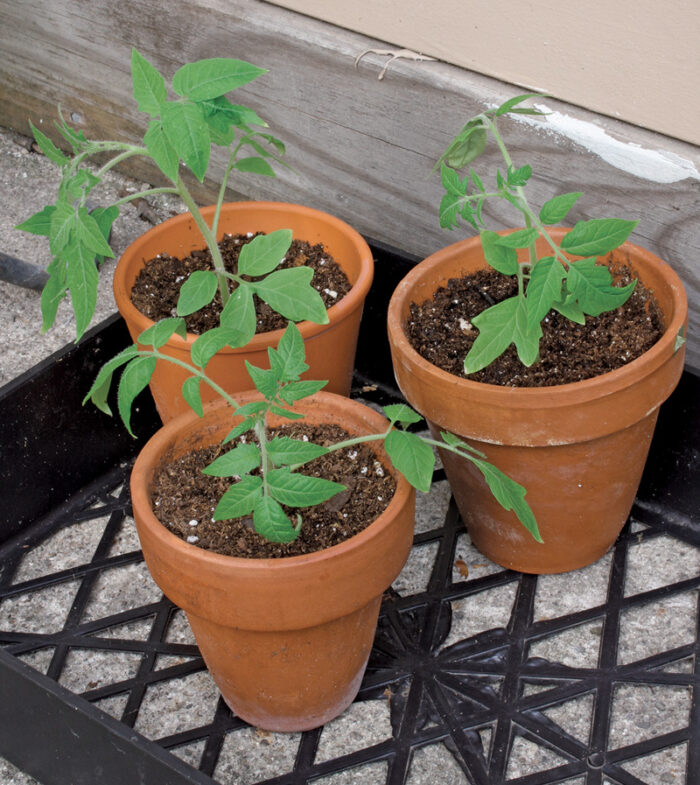
2. Transfer them to pots
 Prepare the pots. When sprouts have a pair of true leaves, it’s time to transplant them into individual cells or pots filled with potting soil. Fill the new containers with potting mix, and poke receiving holes in the soil using a small planting dibble or pencil.
- Gently lift the seedlings. In the sprouting flat, slide a knife beneath a clump of plants while gently lifting one plant by its leaves. Place the seedling in the waiting hole (up to its leaves), gently firm the soil, and water.
- Keep it cool and bright. Give plants cooler temperatures—ideally between 60°F and 70°F—and bright light. An unobstructed south-facing window should do the trick; a bank of fluorescent fixtures within a few inches of the leaves also works well. Brush the leaves or shake the plants daily to help keep the plants desirably stocky.
3. Toughen them up
- Harden off. About a week before you want to plant the seedlings outside, gradually acclimate them to the brighter sunlight, colder nights, and drying winds that occur in your garden. Start by setting the containers outdoors in a location sheltered from wind and the direct sun.
- Stay on the dry side. Keep the transplants slightly on the dry side, and bring them indoors if frost threatens. A week or two of hardening off should prepare them for garden conditions.
4. Give them something to climb on 
- Plant deep. Set each plant into a hole up to its bottom set of leaves. Gently and firmly pack soil around the plant. Water and mulch immediately.
- Provide support. Staked tomatoes bear larger and cleaner fruit than unstaked tomatoes. Pound a sturdy 6- to 7-foot-tall metal or wooden stake at least 18 inches into the ground, or place a tomato cage near each transplant at planting time.
- Prune suckers. As the plant grows, remove suckers that arise from leaf axils (where leaves and the stem meet) by giving them a sharp downward pull.
5. Keep an eye out for common culprits
- Prepare for blossom-end rot. True to its name, blossom-end rot results in dead, blackened areas at the end of the tomato fruit. This malady can be averted by liming the soil to keep the pH around 6.5, by mulching, and by watering when needed.
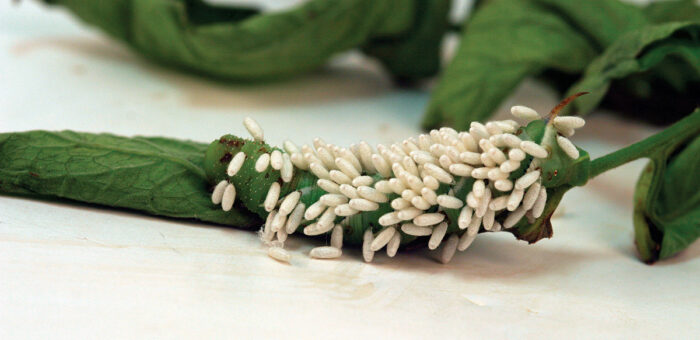
- Watch for tomato hornworm. The most infamous pest of tomatoes is the tomato hornworm. It’s usually well camouflaged, but stripped leaves are a dead giveaway to the presence of this large, voracious caterpillar. If you happen to find it and it has what looks like rice grains along its back, let it be; it will soon stop plaguing your plants, as this is a sign that a parasitic wasp has set in. Otherwise, spray the plants with the biological pesticide Bt (Bacillus thuringiensis), sold as Dipel or Thuricide.
Budget tip: Saving seeds saves money.
Instead of buying another packet of seeds next year, simply save the seeds from this year. In my experience, seeds from nonhybrid tomatoes grow truest, and these just so happen to constitute many of the finest-tasting tomatoes. “Hybrid” varieties are often labeled as such only to dissuade seed savers, so it may be worth saving their seeds, too.
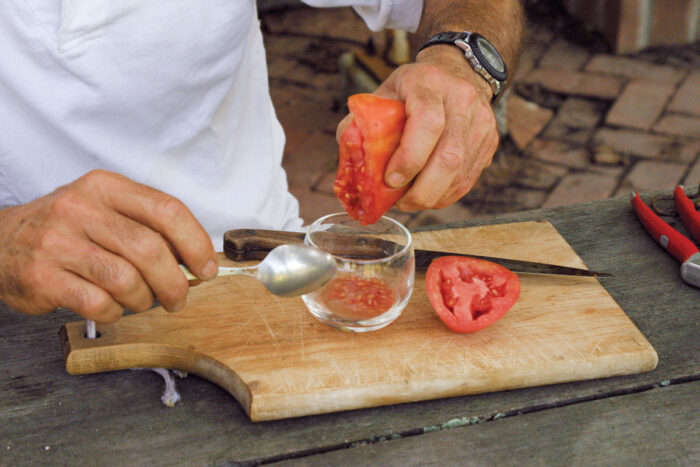
- Cut the fruit in half along its equator to give better access to all the seed-containing locules.
- Spoon and squeeze the seeds out of the locules into a glass. Do not to discard your tasty treat—you can still eat the tomato.
- Add water to the jellied mass of seeds in the glass. This will leach and ferment away sprouting inhibitors. After two to three days, pour the seeds into a fine sieve and rinse them with water.
- Pat them dry to prevent premature sprouting. Then shake them onto a paper towel, and set them in a bright, airy location to dry.
- Pack them for storage once they are completely dry. Use a resealable plastic bag or container. If you keep them under cool, dry conditions, tomato seeds can stay viable for up to four years.
—Lee Reich is a soil scientist in New Paltz, New York, and the author of numerous books, including The Pruning Book, Landscaping with Fruit, and Weedless Gardening.


Comments
Log in or create an account to post a comment.
Sign up Log in