
-
Photo/Illustration: Boyd Hagen
-
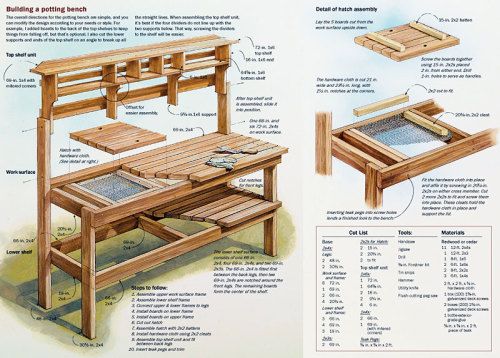
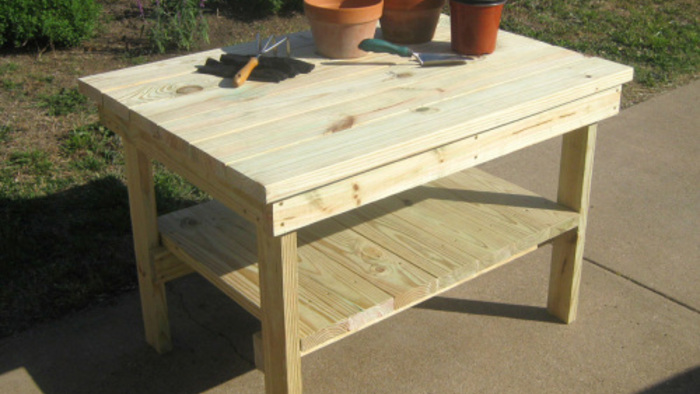
Want to build this bench? Click here to download the materials list, cut list, detailed drawing, and step-by-step instructions in pdf format.Photo/Illustration: Gary Williamson
-
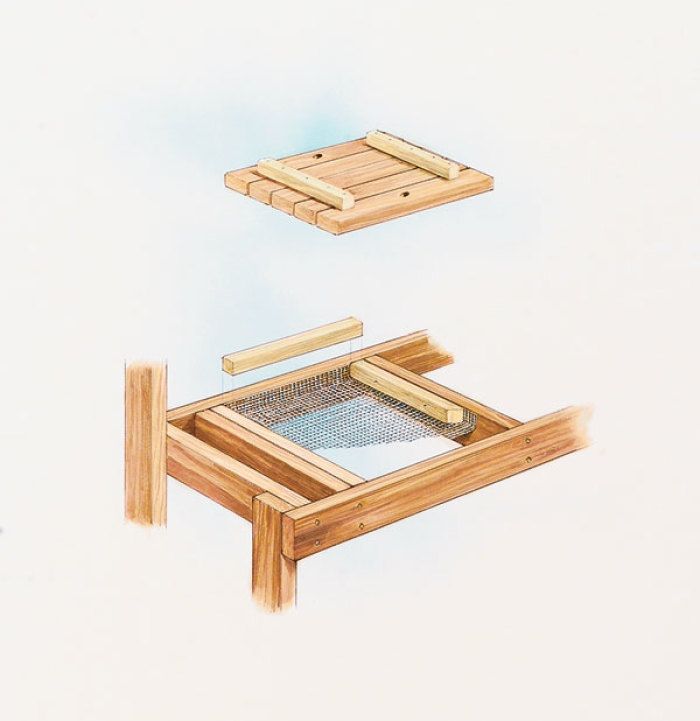
Use 2x2 cleats to hold the hardware cloth in place; the 2x2s support the hatch lid flush with the surface.Photo/Illustration: Boyd Hagen
-
Photo/Illustration: Boyd Hagen
-
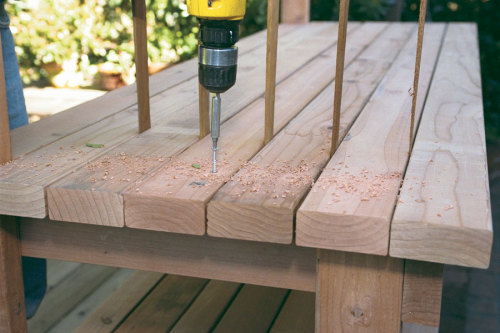
Cut notches from each end of the front two bottom shelf boards to fit around the front legs.Photo/Illustration: Boyd Hagen
-
Use shims to keep the boards properly spaced while driving galvanized deck screws into the redwood.Photo/Illustration: Boyd Hagen
-
Photo/Illustration: Gary Williamson
-
Photo/Illustration: Gary Williamson
-
Photo/Illustration: Boyd Hagen


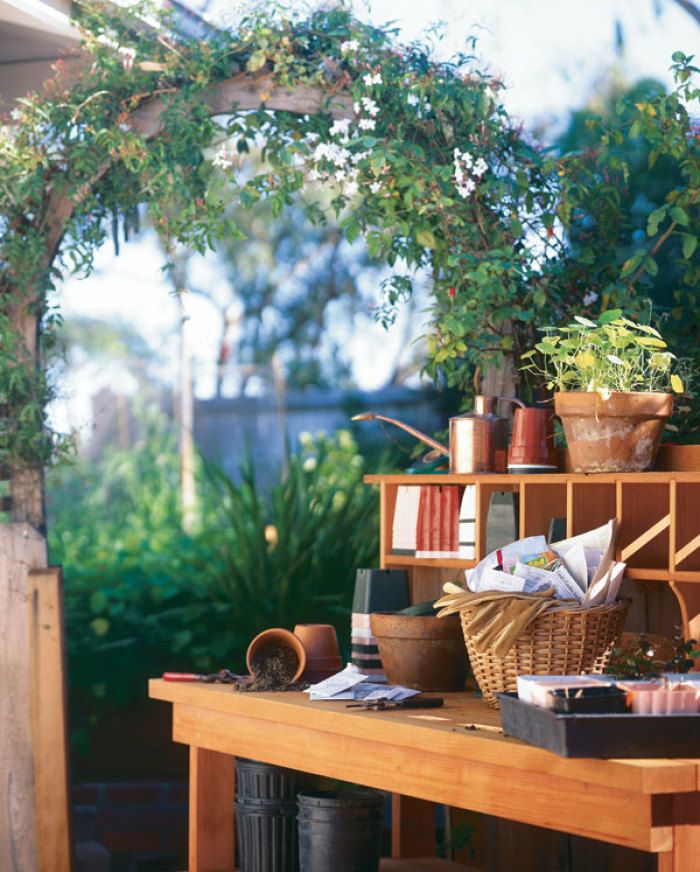
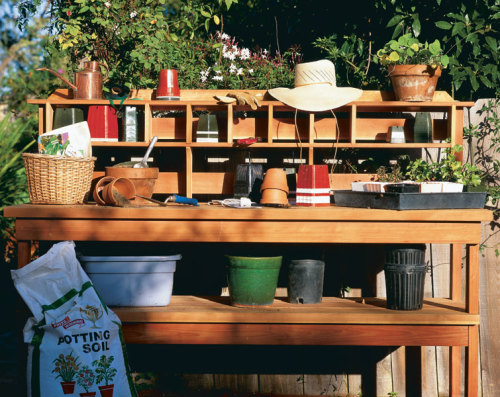
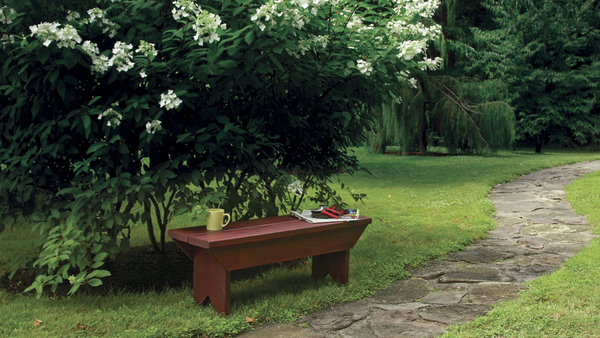
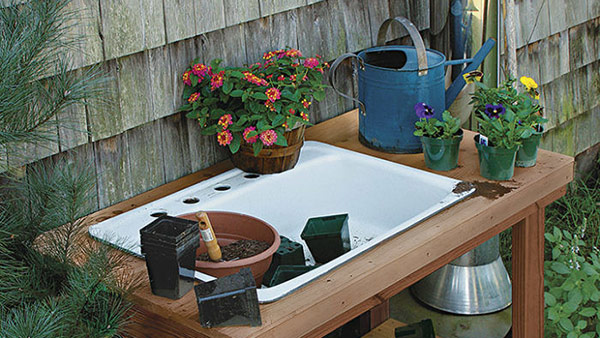
In the heart of every gardener grows the desire for a potting bench. It is form and function, ornament and tool. It’s a place where you work with your hands, a place where you let your mind run on. It can be used year-round, though there will be times when it stands still and orderly, its surface swept and tidy, tools, pots, labels, scissors, and soil all in their place.
As a carpenter, I have come across a number of potting benches, some bluntly utilitarian, some detailed like fine furniture. The original design concept for this bench emerged during the give and take between carpenter and client. It’s not difficult to build, but if it’s beyond your ambition or skill, engage a carpenter to build it for you.
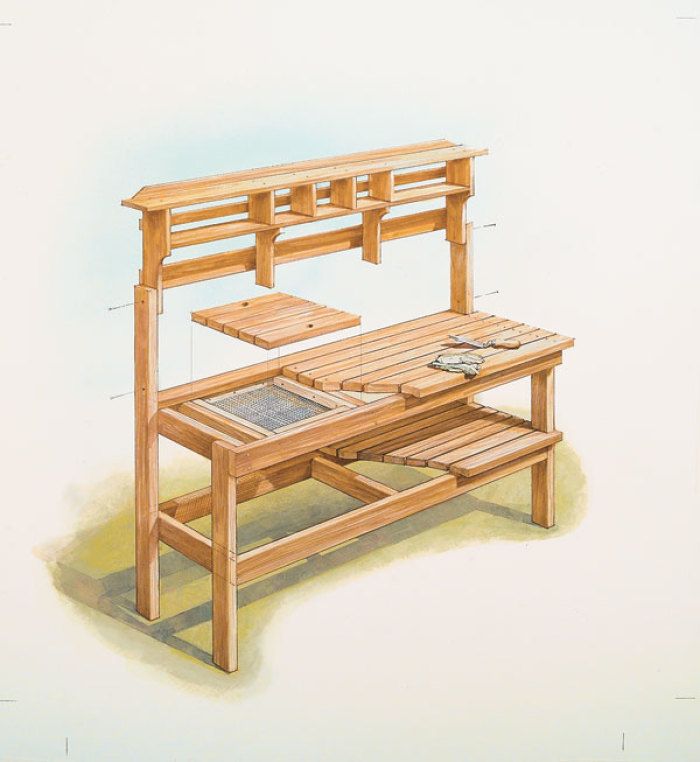
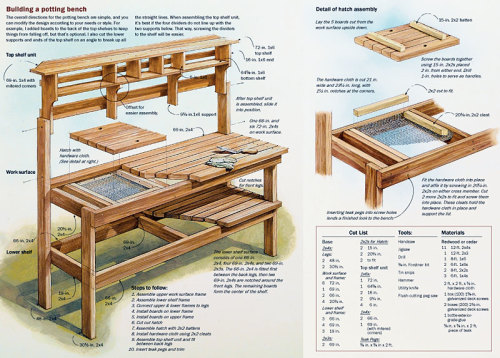
My client wanted a potting bench for her garden, for seed sowing, transplanting, and potting up cuttings. She had looked unsuccessfully for the perfect piece. There were features she liked on various benches, but no single design met her needs. She wanted the bench to be 6 ft. long, about 2 ft. deep, and 32 in. high, with organizing shelves on top. I added a hatch with hardware cloth, duplicating a feature she had seen on another potting bench. The hardware cloth provides a potting surface that allows excess soil to fall through to a bin on the shelf below.
Getting started
 |
|
| Want to build this bench? Click here to download the materials list, cut list, detailed drawing, and step-by-step instructions in pdf format. | |
Deciding on materials for the potting bench was easy. I chose redwood because it’s readily available on the West Coast, and because it naturally resists rot. I leave potting benches unfinished, allowing them to weather naturally. I used B-select redwood for the entire bench because it seemed to have the best combination of quality and affordability (materials in the mid-1990s cost about $160 on the West Coast). When choosing wood, look for pieces that are relatively straight, dry, and knot-free.
If redwood is unavailable, consider cedar, another good weather-resistant wood. You could also use pine or fir and stain or paint the finished piece. Be aware, however, that pine and fir require more maintenance.
To assemble the bench, I used 2-1⁄2-in. galvanized deck screws. Redwood is fairly soft, so drilling pilot holes for screws isn’t necessary unless you are within 1-1⁄2 in. of the end of a board. In this case, drill 1⁄8-in. pilot holes to keep the wood from splitting.
For a rustic look, you can drive the screws flush with the surface and just leave them exposed. But for a more elegant look, the screws can be counter-bored so the heads are 1⁄4 in. to 3⁄8 in. below the wood surface (a 3⁄8-in. Forstner bit works best for this). The resulting holes can be filled with either round plugs or square pegs (see below). Filling the holes gives you a bench that is more like a piece of furniture than a work bench. Plugging the screw holes also makes the top easier to clean.
 |
Making the frames
The upper frame consists of a 66-in.-long back rail, a 69-in.-long front rail (or apron), and four 20-1⁄2-in. cross members. Using two screws at each connection, attach the outer cross members to the rails, making sure the front overlaps the sides by 1-1⁄2 in. The other cross members determine the size and location of the hatch. I leave 18 in. between these two pieces and set them 6 in. to 8 in. from one side or the other. Their placement and size can vary.
The lower frame is similar to the top except that the front and back are both 66 in. long and the three cross members are 19 in. long. As with the top frame, attach the outer cross members to the ends of the rails. These should be flush against the sides, with no overlap. Place the third cross member in the center.
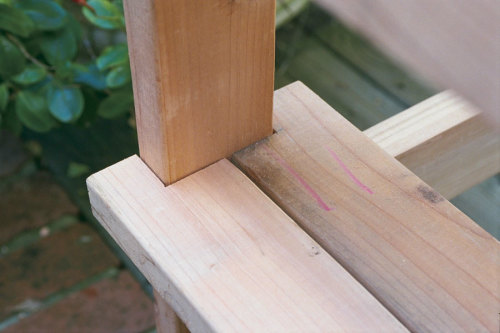
To make the legs for a 32-in.-high bench, cut two pieces 30-1⁄2 in. long for the front legs and two pieces 48 in. long for the back legs. Mark the front legs 15 in. from the bottom. This is where the top of the lower frame will line up. Mark the back legs twice, at 15 in. and at 30-1⁄2 in. from the bottom. The first mark indicates the location of the lower frame and the second mark, the upper frame.
Once the legs have been cut and the top and bottom frames constructed, they can be connected to provide the basic structure of the bench. The easiest way to attach the legs is to lay the two frames on the ground, standing them on their backs, 10 in. to 11 in. apart. Place the back legs next to the frames, lining up the frames with the marks on the legs. Use three screws at each connection.
For the front legs, line up the lower frame with the mark on the leg, and align the top edge of the upper frame with the top of the leg. The bench can now be tipped up onto its legs and the bottom shelf and work surface screwed on.
Assembling the bench
The lower shelf surface consists of seven pieces: one 2×4, 66 in. long; four 2x4s, 69 in. long; and two 2x3s, 69 in. long. Install the 66-in.-long piece first, between the back legs and flush with the back edge of the frame.
 |
|
| Cut notches from each end of the front two bottom shelf boards to fit around the front legs. | |
 |
|
| Use shims to keep the boards properly spaced while driving galvanized deck screws into the redwood. | |
Next, install the two front 2x4s. The first board should overhang the frame by 1-1⁄2 in., so you will need to cut notches 1-1⁄2 in. deep and 2 in. long from each end to fit around the front legs. The second board has notches 1- 1⁄2 in. deep and 1-1⁄2 in. long cut from each end.
After these boards have been screwed down, place the remaining four boards on the frame, line up the ends, and space evenly. You can use cedar shims as spacers between adjoining boards to adjust the gaps and hold the boards in place while you screw them down.
The work surface boards, one 66 in. long and six 72 in. long, are installed in the same manner as the lower shelf boards, except that you will not need to notch around the front legs. Install the 66-in. piece first between the back legs, followed by the front piece which will overhang the front and sides by 1-1⁄2 in.
Cutting the hatch
To cut the hatch, place a straight edge on top of the bench. Sight down through the cracks to the underside of the work surface to line up along the inside edge of the hatch cross-members. Draw lines for both sides of the hatch opening. Use a jigsaw to make the cuts. The gap between the boards should be wide enough to insert the blade to start the cut. If not, drill a hole next to the line to insert the blade.
To assemble the hatch, take the five pieces that are cut out and lay them on top of the bench, upside down. Make sure to match the spacing of these pieces with the spacing of the table. Use two pieces of 15-in.-long 2x2s as battens to hold the hatch together. Place the 2x2s 2 in. from the ends of the 2x4s and screw together. Drill two 1-in. holes in the hatch to serve as handles.
 |
|
| Use 2×2 cleats to hold the hardware cloth in place. The 2x2s support the hatch lid flush with the surface. | |
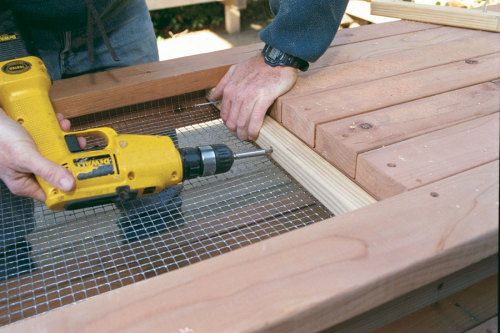
Use tin snips to cut a piece of hardware cloth 21 in. wide and 23-1⁄2 in. long. Cut 1-1⁄2 in. by 1-1⁄2 in. notches from each corner and fold up the sides, using a block of wood as a straight edge. Fit the hardware cloth snugly into the hole. Cut two pieces of 2x2s 20-1⁄4 in. long and screw through these, affixing the hardware cloth to the sides of the cross members. These cleats hold the hardware cloth in place and support the lid, so make sure they are securely attached. Cut two more pieces to fit to support the front and back, and screw them into place. The top of the hatch should fit down into the opening and sit flush with the rest of the bench.
Fitting the top shelf unit
The upper shelf unit is made of 1×6 redwood and consists of a 72-in.-long top shelf, a 64-5⁄8-in.-long bottom shelf, two 16-in.-high ends, two 9-1⁄4-in.-high supports, and four 6-in.-high dividers. The number of dividers and their spacing can vary.
The first step is to attach the two supports to the bottom shelf. You can now attach the dividers to the top shelf. If you want to avoid having to drive the screws in at an awkward angle, make sure the dividers do not line up with the supports.
Once the dividers are attached to the top shelf, flip it upside down and attach the dividers to the bottom shelf. When this step is done, the ends can be affixed.
There are two 66-in.-long 1x4s (or 1x2s) and one 69-in.-long 1×4 with mitered corners screwed to the back to prevent items from falling off the shelves. The shelf unit should now slide snugly between the two back legs and can be attached with two screws driven into each leg. Your bench is now complete.
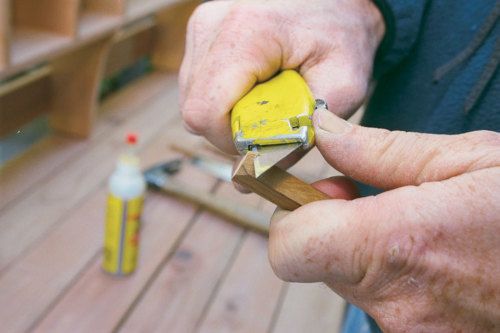
Putting a square peg in a round hole
The final step is to make pegs for the screw holes. I learned at a very early age that you could not put a square plug in a round hole, but several years of cabinet making have shown me otherwise. As long as the wood used for the pegs is significantly harder than the wood into which you are driving the peg, it’s possible to challenge this rule.
Redwood is fairly soft, so any wood works well as pegs for the potting bench. I chose teak for its weather resistance and for its contrast to the redwood. Teak is more expensive, but since you need only a 3⁄8 in. x 3⁄8 in. x 2 ft. piece, it’s worth it.
 |
|
| Whittle the ends of the pegs into an octagon shape. | |
To make the pegs, cut a 2-ft. strip of teak into 6-in. or 8-in. pieces, as these will be easier to work with as you proceed. Now, using a utility knife, cut the corners of one of the pieces so that when you look at it from the end, it looks like an octagon. This octagon should end up being very close in size to the holes in the bench.
To insert a peg, first put a few drops of glue into the hole. Place the tapered end of the peg into the hole and turn the peg so that the diagonal axis of the square is parallel to the grain of the wood in the bench, giving it a diamond shape. Now gently tap it home with a hammer. Saw the peg flush with the redwood.
by Bill Myles
December 1997
from issue #12


Comments
How do I get the materials list?
I am also looking for the plans. How do I get them. The link in article doesn't work.
Log in or create an account to post a comment.
Sign up Log in