
It’s not easy being the carpenter son of a garden-center owner. It seems as if every year my mother asks me to build something crazy that she has seen in a magazine or at a flower show—like the 56-foot-long window box she had me construct on the roof a few seasons ago.
But when she asked me to build her the “perfect” potting bench, I was actually excited. After all, I’ve seen how much of a pain an “imperfect” table can be for my mother and her gardening friends, with pots falling off the sides of a bench that’s too small or soil spilling everywhere because there isn’t anywhere to put it.
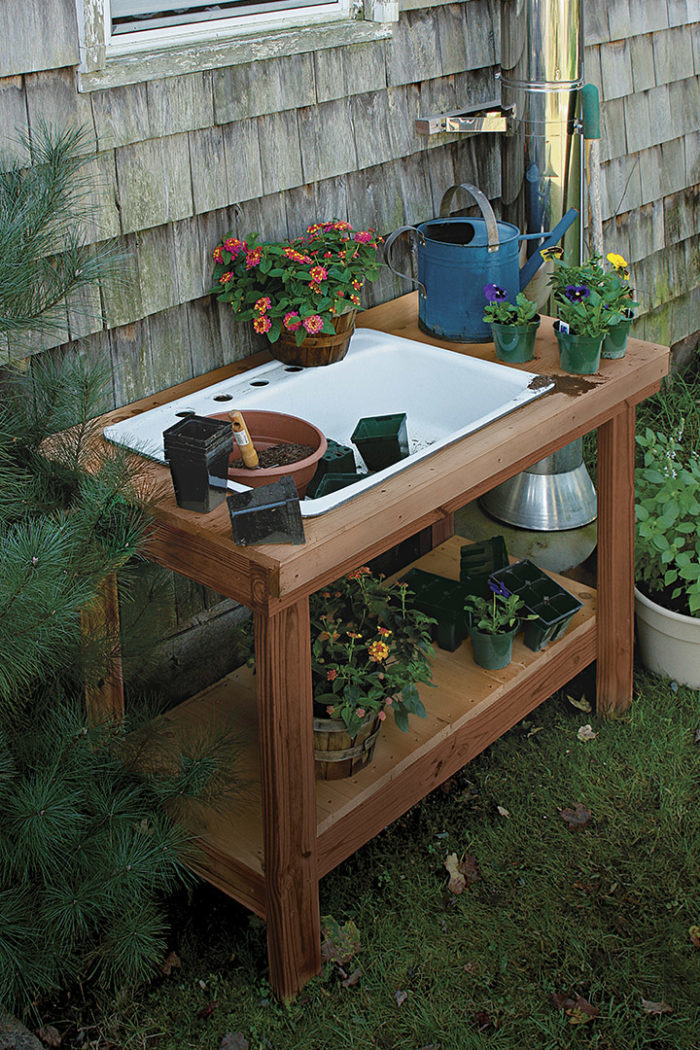
I thought, “Why not turn an old claw-foot tub into the ultimate potting bench?” The recycled tub could keep the soil contained in an easy-to-access spot, while a counter set to one side could provide an adequate work area. I realized, however, that a bathtub would be a little too big to meet the needs of the home gardener, so I opted, instead, for a sink.
There are countless ways to build this bench, but here are a few essential things I learned while constructing mine.
What you need to know
This bench can be sized up or down depending on the space you have available. The key component is the sink, which not only keeps the soil in place but also allows you to pot things within it, thus keeping the mess contained.

A. Use pressure-treated lumber and special screws for longevity
If your potting table is going to be exposed to the outside elements, I recommend using pressure-treated lumber; it will hold up well to the weather and won’t collapse after a few years. You can use red cedar instead, but it is expensive. I also recommend using exterior-grade screws (I prefer ceramic-coated decking screws) for a similar reason: They are built to be long lasting outside. If your bench will be inside, you still might want to use weatherproof materials because your bench will get wet while you’re potting.

B. Drill the holes to avoid frustration
The downside of using pressure-treated lumber is that it is dense and so screws have a tendency to twist and bend when you try to drive them into the wood. To save yourself from stripping an entire box of screws, drill pilot holes so that the screws sink more easily into the wood.

C. Brace the legs for extra stability
Regardless of whether you use a bathtub or a sink for your bench, the bench is going to be heavy. With all that extra weight, your table needs to be braced so that it doesn’t sway back and forth while you’re working. The back two legs should be reinforced with two crosspieces set at opposing 45° angles. This will ensure that your bench is stable.

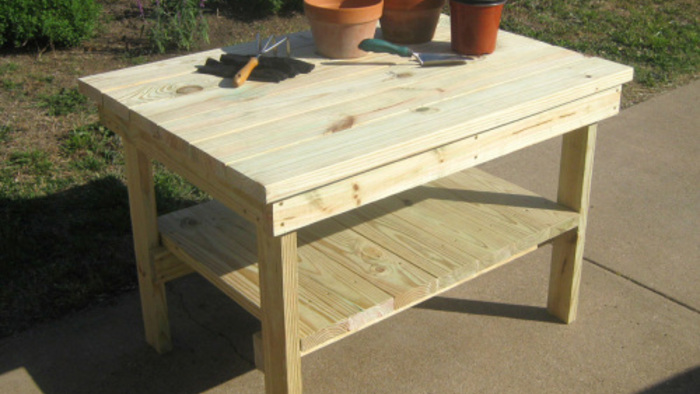
D. Use tongue-and-groove boards for a quick-and-easy top and shelf
You can use plywood for the top of your table and for the bottom shelf, but plywood doesn’t look very nice and won’t last more than a few years. Instead, use some cedar tongue-and-groove boards. The red cedar weathers well, and the tongue-and-groove boards snap together quickly, like puzzle pieces. It took me only 15 minutes or so to cut, construct, and screw together the top and shelf of this table.

E. Select a used sink, with or without the plumbing intact
You don’t need to spend hundreds of dollars on a new sink for this project. If you know people who are remodeling their kitchen, you can use the sink that’s being discarded. Or you can stop by a local landfill or recycling center, which will usually allow you to buy a sink for a small fee. You can leave the faucet and plumbing intact if your bench is going to be close to a water source; if so, your sink can be used as a container for soil, or emptied out and used as a wash basin. If your bench won’t be hooked up to water, remove the plumbing so that it doesn’t get in the way.

F. Secure the sink with construction adhesive
After you’ve cut a hole in the top of the table for the sink—leaving a lip for the sink to rest on—you need to secure the sink. Prop a scrap piece of wood underneath the sink while it’s resting in the cut-out hole, and run a thick bead of construction adhesive around the edge of the opening. Press the sink down, and allow the seal to cure overnight before moving the bench or getting it wet.

Annual upkeep helps a bench last
After you build your perfect potting table, do yearly tune-ups to make sure that it lasts for multiple seasons.
Check the paint
(One or two times a year)
Even if you use pressure-treated lumber, weatherproof your bench with exterior paint, stain, or sealant to help it last. After a long season of normal wear and tear, repaint or seal any areas of your bench that have chips. This will ensure that moisture won’t seep into these spots, which can cause wooden benches to rot. If you don’t like the look of paint or shiny varnish, consider using a matte water sealant, which is sold at most hardware stores.
Flip it over, and tighten the hardware
(Once a year)
No matter how solid your construction is, a bench will start to wiggle over time. This is usually because the screws holding everything together have loosened. Flip the bench upside down, if possible (which enables you to access the screws more easily), and tighten the screws.
Cover the soil
(All the time)
If you have a soil-holding area on your bench (like a sink or bathtub), make sure that it’s covered and protected from rain when you’re not using the table. I like to use a rubber container that rests over the top of the soil, but a sheet of plastic or a tarp works just as well. A cover will protect your soil from becoming a muddy mess and will prevent water from collecting and becoming stagnant at the bottom of the trough.
Matthew Smith owns Smith’s Carpentry, Roofing, and Remodeling in East Lyme, Connecticut.
Photos: Danielle Sherry. Illustration: Chuck Lockhart


Comments
Log in or create an account to post a comment.
Sign up Log in