

Make Your Own Seed Packets
Save and share your favorites with this easy-to-follow template
Whoever coined the phrase “Good things come in small packages” must have been a gardener. For it’s from those smallest of packages we call “seeds” that life in the garden begins. It’s a miracle, really, when you think about it: Five-foot-tall tomato vines laden with juicy red fruit spring from flat, round dots; clambering beans sprout from shiny, rock hard, black-speckled seeds; an apple tree grows from a teardrop brown capsule. We’ve all felt the magic when those little specks we sow and tend reward us with beauty and bounty.
Sooner or later—moving from season to season and year to year—we start to save our own seed, completing the circle of sowing, tending, harvesting, and sowing once again. Saving seed was often a necessity for our ancestors, who relied on their own resources to feed their families. And so vegetable varieties were passed along from neighbor to neighbor, from friend to friend, and from generation to generation in small packages of saved seed. Today, heirloom tomatoes, beans, and squash are all the rage. We’re able to enjoy them because people years ago took the time to harvest, dry, and preserve their own seed.
Directions for making seed packets
Homemade seed packets made from our template are a great way to share seeds from your garden with family and friends. We have provided space on the packet to note details such as seed type and the date and location of seed harvest, as well as specifics on germination requirements, days to maturity, and growing tips.
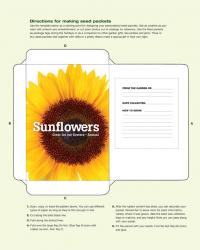
Use the template above as a starting point for designing your personalized seed packets. Get as creative as you want with artwork and embellishment, or cut plant photos out of catalogs for reference. Use the filled packets as package tags during the holidays or as a companion to other garden gifts, like pickles and jams. Three or four seed packets tied together with raffia or a pretty ribbon make a special gift in their own right.
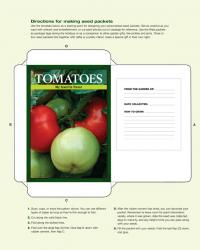
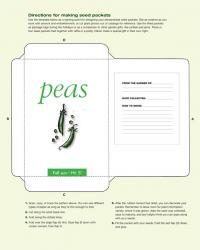
Packet designs for tomato, sunflower, and pea seeds
Seeds from tomato, sunflower, and pea plants are easy to collect and save. We’ve put together three packet designs for these, and you can download them by clicking on the images below.
|
|
|
|
|
|
If you are new to saving seed, don’t be daunted by the task. Seeds of some plants are easier to save than others; see the list in the box below for the ones you might want to try first. If you are game to tackle some of the trickier plants, like melon and squash, learn more about hand pollination and isolation techniques by reading Seed to Seed by Suzanne Ashworth or The New Seed-Starters Handbook by Nancy Bubel.
Easy seed to save
Under proper storage, your seeds should last for the following length of time:
Chervil: 3 years
Chive: 1 year
Dill: 5 years
Lettuce: 3 years
Lima bean: 2 to 3 years
Parsley: 2 years
Peas: 2 years
Runner bean: 2 to 3 years
Snap bean: 2 to 3 years
Tomato: 4 years
Once you’ve gone to the trouble of gathering and drying your own seed, make sure your cache is stored properly. The most important thing to remember about storing seed is to give seeds the opposite of what makes them sprout. Because seeds need moisture, warmth, and light to germinate, the best place to store them, therefore, is in a dry, cool, dark environment.
Put your seed packets in a large airtight jar, then find a location in your home to stash them over winter. A cool, dark place, like a basement stairway or a closet, is ideal; some people keep seeds in the back of the refrigerator. If you live in an area with high humidity, add moisture-absorbing silica gel to the container. Most important, if you’re planning to save seed from season to season, don’t leave your storage container on the porch from April through July while you plant in the garden. Return your seeds to the cold and dark to maintain viability for future sowings.
Success with seeds
|
|
|
|
|
|


There’s nothing more frustrating than sowing a flat of seeds, then waiting … and waiting … and waiting for germination that never occurs because the seeds are no longer viable. If you’re not sure how old the seeds are or you question their storage, save yourself some heartache by testing for germination before you sow.


Comments
I'm gonna try this to pack my own seeds but first I've to find someone who can provide me with Assignment Writing Help Services in Saudi Arabia once I'll found them I'm gonna try this and share my experience here.
Log in or create an account to post a comment.
Sign up Log in