

An Easy Approach to DIY Drip Irrigation
Assembling this watering system yourself saves time and money

When my wife and I planted our gardens in Sandy, Utah, we knew we’d have to somehow irrigate our plants. For several years, we watered with a hose and sprinkler, but that got old in a hurry. We considered in-ground sprinkler systems, but they seemed costly and wasteful of water. Then I learned about the merits of drip irrigation. With a series of carefully placed emitters, water could be delivered right to the root zones of plants. And we could enjoy the convenience of a permanent watering system.
Water is a finite natural resource. As populations increase in North America, many areas are facing water shortages and periodic droughts. These crises make a water-thrifty garden-irrigation system an attractive tool. With a drip system, my plants thrive with less water. Keeping water off foliage also cuts down on fungal diseases. When I occasionally use foliar fertilizers, they aren’t washed off when the system kicks in. And because only the plants that I want get watered, far fewer weeds pop up.
Flexible parts make it simple to construct
Think of a drip-irrigation system as an upscale soaker hose. But instead of water spraying out every 2 inches, it can seep out every foot—or maybe every 3 feet—drip by drip. With a little planning, those drips can line up with the root zones of plants.
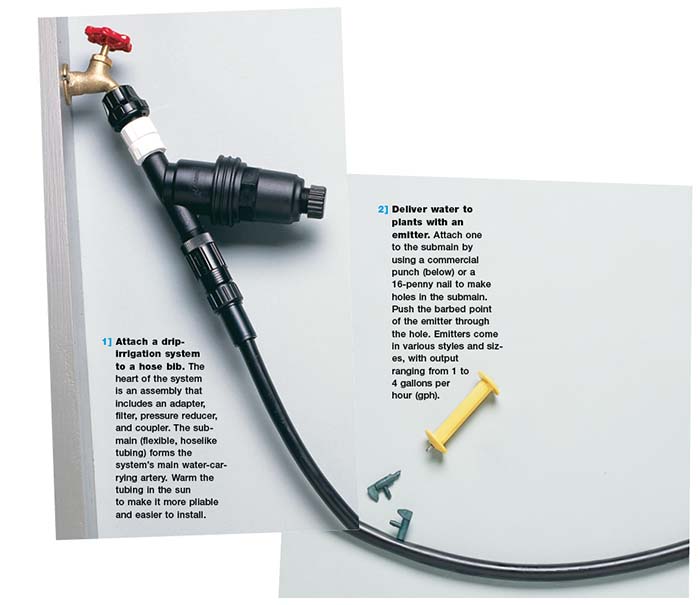
Drip-irrigation parts snap together like modular toys and can be adjusted as your garden changes. You’ll need a filter, water-pressure reducer, emitters, and 1/2- or 5/8-inch-diameter flexible polyethylene tubing—also known as the submain. You may need a backflow preventer if it’s required by your municipal water department. Optional parts include 1/4-inch-diameter solid tubing, 1/4-inch-diameter drip line, connecting tees, 90-degree elbows, connecting barbs, hold-downs to keep tubing in place, goof plugs to fill holes you decide not to use, timers, and fertilizer injectors. You can buy these parts at hardware stores or garden centers or from companies specializing in irrigation systems. Parts from different manufacturers are almost always interchangeable.
System costs are reasonable. You could cover about 250 square feet with drip irrigation for $20 to $50 in parts, not including a timer. For installation, all you need are strong shears to cut the tubing and a 16-penny nail or commercial punch to poke holes in the submain for the emitters and 1/4-inch-diameter tubing. You can bury the submain just below the soil, or leave it on the surface and cover it with mulch. Either way, I try to run it along the edge of a bed so that I won’t accidentally disturb it. The 1/4-inch-diameter tubing can also be buried, but leave drip lines on the surface so that the emitters don’t clog with soil. I use a combination of buried and mulched lines in my garden, so only small emitters are visible here and there.
There are two critical points to keep in mind. First, drip irrigation works on low pressure—from 10 to 30 pounds per square inch (psi). Water pressure at hose spigots, however, runs anywhere from 50 to 100 psi, so you need a pressure reducer on every drip-irrigation circuit. Second, as a conservative rule of thumb, any one drip-irrigation circuit can handle only about 225 gallons per hour (gph), so you’ll need to calculate the total gph for all emitters on each drip circuit to make sure they don’t exceed this amount. Each emitter has its own rating, so simply add up the numbers.

How to: Overwinter your system
Maintenance for a drip system is fairly simple. If you live where it freezes in winter, disconnect the line from the spigot in the fall and take the backflow preventer, pressure reducer, and filter inside. The other tubing is flexible and should not split if frozen. Tie plastic wrap over the end of the submain.
In spring, open the end of the submain, and flush the system to get rid of any debris. In a warm climate, your entire system may remain in place year-round.
Assess your watering needs before you start to build
Use a tape measure to roughly determine how much flexible tubing you’ll need for the submain. Start at the hose spigot and work your way through your garden. The total run of submain on any one drip-irrigation circuit should not exceed 400 feet. The tubing is flexible, but for a 90-degree turn, you’ll need an elbow. If you want to branch the submain, use a connecting tee.
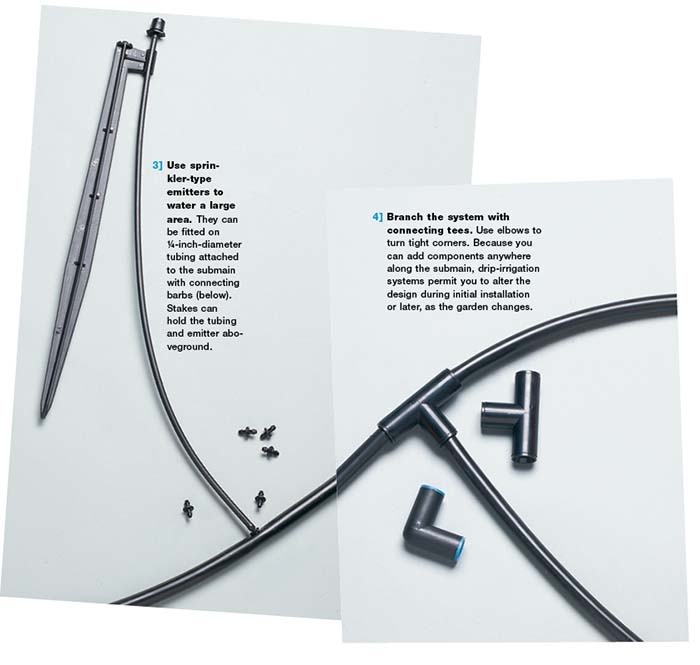
Wherever the submain runs within a few inches of a plant, you can snap in an emitter to provide water. The emitter has a connecting barb on one end. To water a plant farther from the submain, put a barb in the submain, attach ¼-inch-diameter solid tubing to the barb, then put an emitter on the other end.
Figuring how many emitters you’ll need is not a hard-and-fast proposition. You will have to consider your soil type, the plants’ size and general water needs, your garden’s microclimates, and the presence or absence of mulch. A 1-gph emitter will cover a 12-inch-diameter area in sandy soil or an 18-inch-diameter area in clay soil. With large plants, I start with one 1-gph emitter per foot of branch-spread diameter. Got a 4-foot-diameter blueberry bush? Space four 1-gph emitters halfway between the trunk and the drip line. I use 1-gph emitters because it’s easier to keep track of how many gph are on any given line.
For entire beds, I use 1/4-inch-diameter drip-line tubing with built-in 1/2-gph emitters every 12 inches. This tubing attaches to the submain with a connecting barb; each line can snake up to 50 feet through a bed. Drip lines work best with a 25-psi pressure reducer.
To get the equivalent of an inch of rainwater from a 1-gph emitter takes just shy of an hour. In our hot Utah climate, 2 inches of water per week is recommended during the growing season. Consult a county extension agent for the recommendation in your area.
Individual plants are the best indicators of how long you need to water. If plants look the worse for wear in the evening after a hot, sunny day, that’s pretty common. But if the same plants still look wilted early the next morning, you need to investigate. You can check soil moisture with a screwdriver. In damp soil, it’s easy to push in the screwdriver. In dry soil, you’ll need help from a big hammer. If the soil is dry, then your plants aren’t getting enough water. Run the system longer each time, or add more emitters. If the soil is wet, then you might be overwatering. Pay special attention to new plants because their roots haven’t yet spread out in the soil. Just because the soil is damp a few inches from a new plant doesn’t mean the plant is getting any water.
It’s best to water deeply but infrequently. If there are puddles by emitters, you’re running your system too long. You should see, instead, a small area of damp earth. Below the surface, where roots can go as deep as 18 inches, water will spread out and sink into the soil.
Map out your drip-irrigation needs
Using flexible tubing allows you to run your drip lines up and down the rows of your vegetable beds. Connecting tees and elbow pieces make it possible to branch the system off and around corners. Each minisystem that runs through a particular bed should connect back to the submain. Before you start building the system, make sure you measure out how much tubing you will ultimately need.

—T. A. Johnson installs drip-irrigation systems in the Salt Lake City, Utah, area.


Comments
Log in or create an account to post a comment.
Sign up Log in