

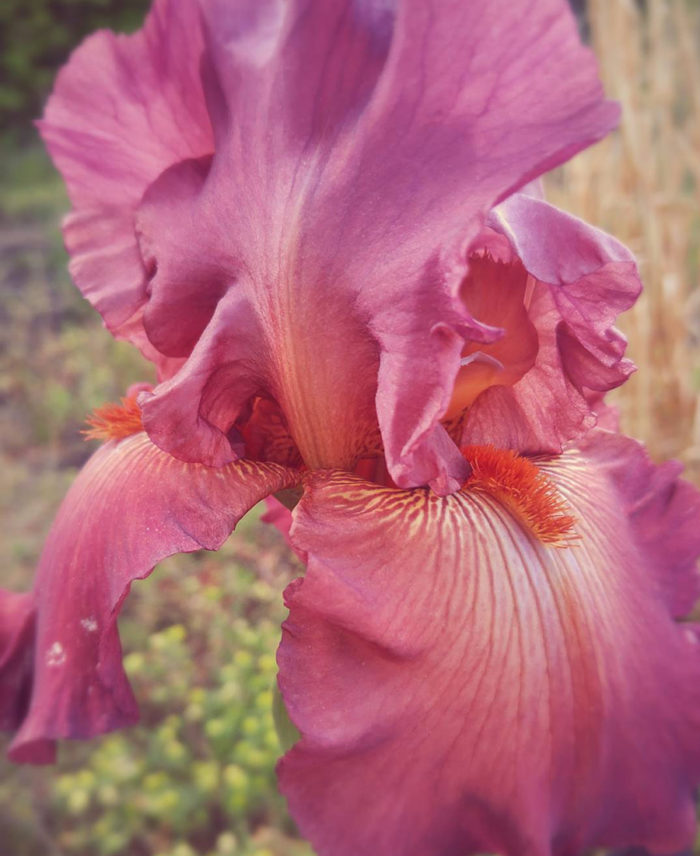
Divide bearded irises. If your garden includes good old-fashioned bearded irises (Iris × germanica, Zones 4–9), ask yourself when you last divided your clumps. If it’s been longer than five years, or if you’re wondering why they’re not blooming like they used to, it’s time to lift, separate, and replant (and/or play plant fairy by donning your gloves and dropping off a bag of rhizomes on a friend’s doorstep). Here’s a simple step-by-step guide on dividing bearded irises. Replant your irises right after digging, or protect their roots in damp newspaper for up to a week before replanting. If their previous site has become shady, move to a spot with at least half-day sun, in decently drained soil, and plant shallowly. Northern references will insist on full sun, but they’ve not got our full sun! Water them well every few days for about six weeks. If you’ve got sandy soil, a little fertilizer each spring is in order. Otherwise, you’re good to go for the next five years.

Encourage late-blooming perennials to stand tall by cutting them back before they bloom! This is known as the Chelsea (or June) Chop. While it sounds like a form of medieval torture, it’s actually revolutionary for tall perennials. In seasons of good rain, especially in clay-loam soils, tall perennials can shoot up like rockets only to crash down during windy summer storms. Reducing their height by cutting them back by one-third to one-half now won’t sacrifice bloom. Perennial sunflowers (Helianthus spp. and cvs., Zones 5–9), asters (Symphyotrichum, Zones 3–8), tall black-eyed Susans (Rudbeckia spp. and cvs., Zones 3–11), salvias (Salvia spp. and cvs., Zones 5–11), and upright sedums (Hylotelephium spp. and cvs., Zones 3–9) may bloom a week or so later than usual with this method, but you’ll get to appreciate them upright and shining on sturdier stems, rather than lying down on the job. Here’s a handy how-to guide for performing the Chelsea Chop. Some of the plants listed in this article as good candidates, like summer phlox (Phlox paniculata, Zones 4–8) and yarrow (Achillea spp. and cvs., Zones 3–9), may already be in bloom here in the Southeast in June. They can still benefit from a Chelsea-style chop after their main bloom is fading, which would function essentially as a mass deadheading to encourage a second wave of bloom.

Propagate woody plants. June and July are prime time in the Southeast for woody plant propagation by cuttings. Many woody plants are moving from the softwood stage into the semi-hardwood stage this month. Some great candidates for June propagation are camellias (Camellia spp. and cvs. Zones 6-10), viburnums (Viburnum spp. and cvs., Zones 4–9), tea olives (Osmanthus spp. and cvs., Zones 7–10), forsythia (Forsythia spp. and cvs., Zones 4–9), and spireas (Spirea spp. and cvs., Zones 4–9). But don’t stop there—research the plant you want to try in any trustworthy resource that includes propagation information (such as Michael A. Dirr’s Manual of Woody Landscape Plants). If you see any of these terms—“late spring,” “midsummer,” “softwood,” or “semi-hardwood”—go for it. Yes, I’m suggesting you try this at home! You’ll need rooting hormone powder, perlite (or coarse sand), and potting soil (or peat). Various containers—from plastic storage containers, to milk jugs, to used cell-packs, to pots paired with jumbo-sized Ziploc bags—can be used to contain and protect your cuttings. Here’s a great step-by-step guide for propagating woody shrubs. Keep it simple, and treat it as an experiment—expect some learning (and rooting) to occur!

Sterilize between cuts if pruning susceptible plants. Your pruners are still in use this month as you finish up pruning spring-bloomers and broadleaf evergreens, fine-tune your fruit trees, and deadhead roses. Moving from one plant to another has the potential to spread bacterial or viral diseases in certain woody species. If you’ve never sterilized your pruners, don’t panic. Unless you work in a nursery, sterilizing pruners between plants is only necessary in a few cases:
- Roses. The widespread prevalence of the eventually deadly rose rosette virus means I routinely sterilize my pruners when moving from one rose bush to another.
- Woody plants in the rose family such as apples, pears, cherries, plums, and peaches. These are prone to various diseases, including fireblight—a bacterial disease that may be present before the tell-tale sign of burnt-looking twigs shows up. Sterilize between branches and trees in this group.
- Evidence of disease. If I can see evidence of viral or bacterial disease, I always sterilize before moving to another related plant.
How to sterilize? Pick a method that is convenient for you. My two preferred ways are (1) using Lysol or alcohol wipes, or (2) using a small spray bottle with alcohol (70% ethanol or isopropyl) to spray pruners (away from plants), waiting a few seconds, and then wiping with a rag. My least preferred method is a freshly mixed 10% household bleach solution. It will sterilize, but it always results in collateral damage—to my clothes, my plants, or in the form of rust on the pruners themselves.

Protect your berries from hungry birds. Near-ripened blueberries and blackberries are as enticing to birds as they are to you. Hungry birds have impeccable timing, so yours has to be better. Get ahead of them by netting shrubs just as the first berries begin to turn color. Drape your shrubs with lightweight bird netting, and weigh down the ends with rocks or stakes. Thornless blackberries can be covered in the same way once the first berries begin to color. If your blackberry canes have prickles that catch and snag netting, try instead tying strips of reflective material (old party decorations, cut up mylar balloons, or shiny curling ribbon) to canes to spook at least some of the birds away from the buffet of berries.
—Paula Gross is the former assistant director of the University of North Carolina at Charlotte Botanical Gardens.
Fine Gardening Recommended Products
DeWalt Variable-Speed Cordless Reciprocating Saw with 6-Piece Saw Blade Set
Scotts Cordless Grass-Shear/Shrub-Trimmer Combo
Black and Decker 22-inch Cordless Hedge Trimmer


Comments
That's Great!
Log in or create an account to post a comment.
Sign up Log in