

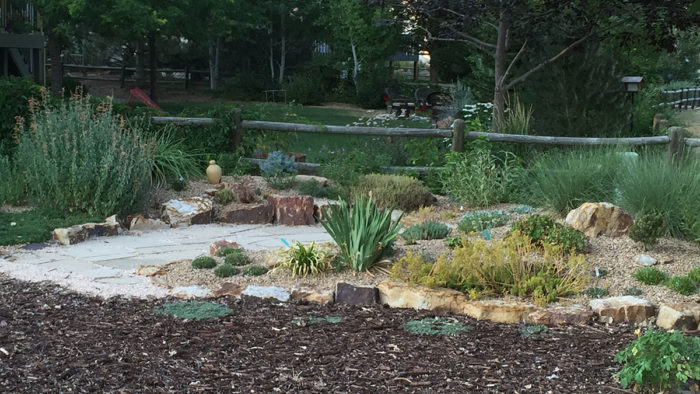
Several years ago, we opened a new rock garden at the Gardens on Spring Creek, the botanic garden in Fort Collins where I serve as executive director. The beautiful showpiece inspired my husband and me, along with many others, to add a rock garden to our personal landscapes. Here are the steps you can take to make that transformation happen for yourself.

1. Identify the location and plant palette
We identified an empty corner in our backyard for our rock garden. It receives full sun throughout the year and provides visual interest in the distance, inviting people to take a closer look.
We wanted to use mostly alpine plants in our rock garden. These plants are typically low-growing. The rocks help create planting pockets that become microclimates of heat and water retention. These plants do not like the heavy, clay soils we have on the front range, so we built a berm to mimic their preferred location.

2. Create the berm
Part of the reason we chose this particular corner was that there was already a berm in this location–albeit a highly dysfunctional one that was too steep and narrow for anything to successfully grow on it. Mulch would simply wash down the slope during each rainstorm.
Done correctly, a berm allows soil to drain more quickly. Using shovels and rakes, we spread the soil out, which both lowered and broadened the existing berm. While we didn’t have to truck soil through the backyard, this was still quite a bit of work. We tried to create a more organic shape to fill up most of the corner.
3. Figure out how you will water the area
While we had drip irrigation in this area, I hand-watered the garden often in the first couple of years. As it has matured, it has needed less water. Over the years, we’ve observed shrubs growing larger, some perennials dying out, and some perennials self-sowing. These changes confirmed my choice to hand-water. This unpredictable evolution would have made the drip irrigation challenging to work around.
4. Decide whether you need to amend your soil
The soil in our berm appeared to have been brought onto the site. As it wasn’t heavy clay, and rock garden plants don’t love rich soil, we chose not to amend. If in doubt, do a soil test of the area. Scoria (small volcanic rock) or sand can be added to help break up heavy clay if needed.

5. Get your rock
We chose a beautiful stone from a local quarry called Cherokee. The colors of it really reflect the Mountain West. We selected each stone as we were looking for particular sizes to outline the beds and larger stones for the middle of the beds. We also had to make sure we could lift them into the truck and carry them across the yard!

6. Use the rock to define the space
We used most of the rocks to define the edge of the garden. First, we dug a narrow trench and layered it with sand to help set and stabilize the rocks. We buried each rock to a depth of about one-third its size. We picked the nicest sides of each stone to face outward to utilize the many colors and textures of the stone. Next, we backfilled soil around the stones as we finished sections of the bed to anchor everything in place.
7. And more rocks for aesthetic effect
We chose some larger stones and randomly spaced them to add visual interest in the garden. In addition, we used some smaller stones to build shelves in some of the steeper parts of the garden to minimize runoff and erosion in these areas until plants could establish.
We also added a flagstone area. (Yep, that meant more trips to the rock yard!). This area allows us to maintain the garden easily without having to walk among the plants, which would compact the berm.

8. Add the plants!
Finally—the fun part! I knew I wanted four-season interest in this garden, so we started by adding several dwarf conifers: pine (Pinus spp. and cvs., Zones 2–9) and spruce (Picea spp. and cvs., Zones 2–8). These were spread throughout the garden. I also added one section of small grasses and a dwarf yucca (Yucca spp. and cvs., Zones 4–11) to provide contrasting textures.

We added perennials and small woody shrubs next. Many of these are small plants that pack a punch of color and thrive in the rocky environment. Some of my favorites include:
- Gentian (Gentiana paradoxa, Zones 3–8)—a small, herbaceous perennial with bright blue flowers
- Pasque flower (Pulsatilla spp. and cvs., Zones 3–8)—an early blooming perennial; different species come in a variety of colors
- Shrubby daphne (Daphne arbuscula, Zones 5–8)—a diminutive evergreen shrub with tiny, bright pink flowers
9. Last but not least, mulch!
Once plants were in, we mulched the garden with pea gravel. Another type of small rock will do as well. We coordinated the color of the pea gravel with the Cherokee stone. The alpine plants thrive on the heat the gravel provides and the minerals it adds to the soil. Like other mulches, pea gravel helps retain moisture and cut down on weeding.

Over the years, this garden has become one of my favorites, with its unique palette of plants. The raised berm is easy to care for, as less bending is required. I only water every couple of weeks if needed. The dwarf conifers and grasses have slowly filled in. Perennial plants have moved around, died out, and been replaced; I’m always trying something new.
For more information about rock gardens, visit the North American Rock Garden Society’s website. There are several local chapters throughout the Mountain West, and many of our public gardens can provide rock garden inspiration and plant ideas for our climate. And be sure to read Rocky Mountain Rock Gardens, Part II: Plant Picks for even more plant recommendations for your rock garden.
—Michelle Provaznik is executive director of the Gardens on Spring Creek in Fort Collins, Colorado.
Fine Gardening Recommended Products
Scotts Cordless Grass-Shear/Shrub-Trimmer Combo
DeWalt Variable-Speed Cordless Reciprocating Saw with 6-Piece Saw Blade Set
Black and Decker 22-inch Cordless Hedge Trimmer


Comments
Log in or create an account to post a comment.
Sign up Log in