
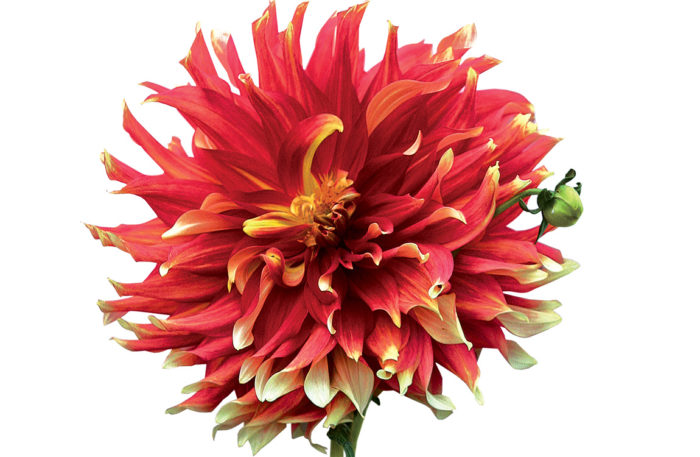
There are two ways to grow hybrid dahlias (Dahlia cvs., USDA Hardiness Zones 9–11): by planting tubers or by growing plants from cuttings. Both methods will produce healthy plants and vibrant, late-summer blooms. So why should you grow from cuttings?
This technique is a great way to increase your stock of favorite varieties and get a head start on the growing season. Plants grown from cuttings will often bloom weeks ahead of those grown from tubers.
Taking cuttings is also a good way to guarantee that you have viable plants, especially when spring growing conditions are less than ideal. Even healthy tubers can rot if they are planted in cold, wet soil. To avoid this problem, dahlia growers in the United Kingdom grow almost exclusively from cuttings.
Although this method is used mainly by professional growers, a beginner need not feel intimidated. With some basic supplies and a small investment of time, any gardener can be a dahlia propagator.
Your first step is to find a space to use as your growing area. If you don’t have a greenhouse, consider adapting a basement, spare room, garage, kitchen counter, or windowsill to serve as your propagation space. Choose a convenient location as you’ll be using the space often.
You will need a flat surface to use as your potting bench as well as a dedicated growing area where you can provide the heat, light, and moisture that your plants will require. Fluorescent shop lights are an excellent, affordable light source and are worth installing.
Follow the steps below to produce a bounty of sturdy, healthy dahlia plants, ready to set out in your garden when the warm weather arrives.
Steps to Success
Plan to start propagating in late winter to early spring for the best results. Select firm, healthy tubers, making sure that each includes a piece of crown (the swollen area at the base of last year’s stalk). You can expect to get five to 10 cuttings per tuber.
Step 1: Break dormancy
Waking up your tubers 10 to 12 weeks before your region’s average last-frost date will help ensure that you have healthy plants—not too leggy or root-bound—ready to set out in the garden in early summer.
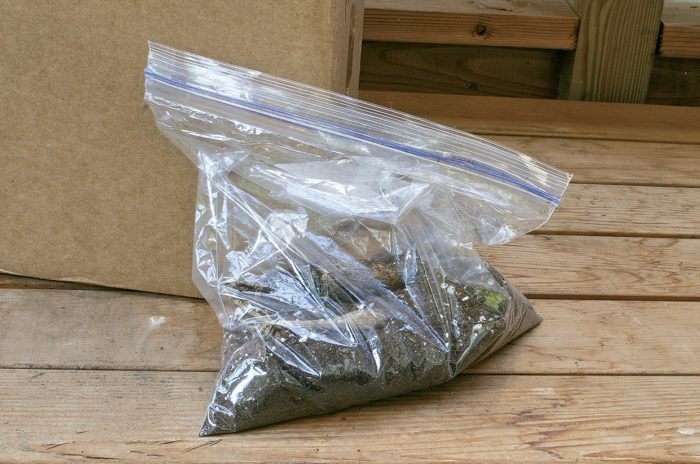
Place up to six medium-size tubers in a 1-gallon plastic bag. Several handfuls of sterilized potting soil from a freshly opened bag will contribute just the right amount of moisture. Do not add water! Place bagged tubers in a closed cardboard box in a warm location, such as on top of a refrigerator or water heater. From this point forward, be sure to handle the tubers gently to avoid damaging the fragile eyes and feeder roots that will start to form.
Step 2: Pot up your tubers
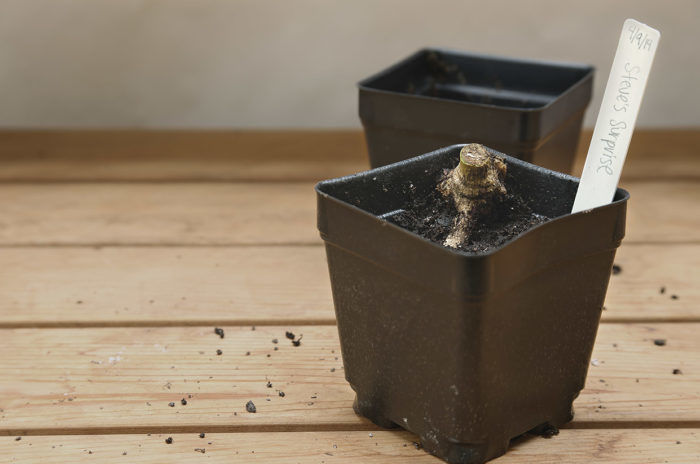
In about 10 days, most tubers will begin to show eyes and feeder roots. Plant each tuber in a 3½-inch-square plastic pot, leaving the crown end an inch or more above soil level. This will make it easy to take cuttings. Water your tubers weekly but only if the soil is dry, and make sure that they have lots of light. A fluorescent shop light works well, positioned so that the bulbs are no more than 6 inches above the crowns; a bright windowsill would also work. Bottom heat can be helpful in a cool garage or basement but is unnecessary in a heated room. Shoots should start to form in seven to 10 days, though some varieties might take longer.
Step 3: Take cuttings

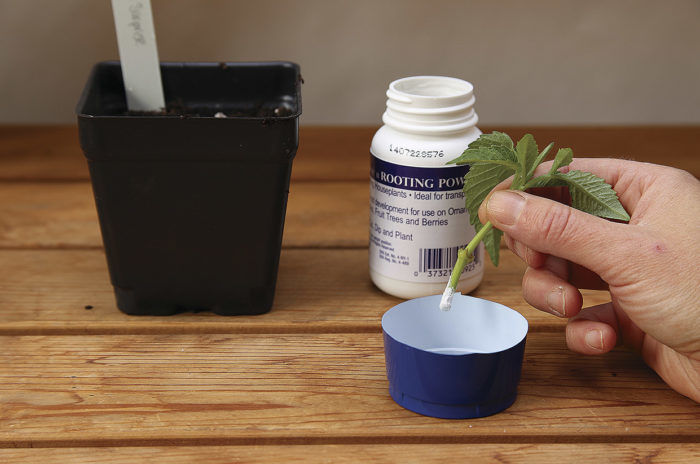
When shoots are about 3 inches tall, with two or three sets of leaves, it is time to take your first cuttings. Use a clean, razor-sharp blade to slice off each shoot about a dime’s width above the point where it emerges from the crown. Dipping your blade into soapy water before each cut will help ensure that you do not introduce pathogens. Take care not to damage the four new eyes that should be forming around the base of the shoot; these will produce your next crop of cuttings. New shoots will continue to form, and you can continue taking cuttings until you have the number you need or until the shoots emerging from your tubers start to look thin and weak.
Step 4: Hydrate cuttings, and remember to label
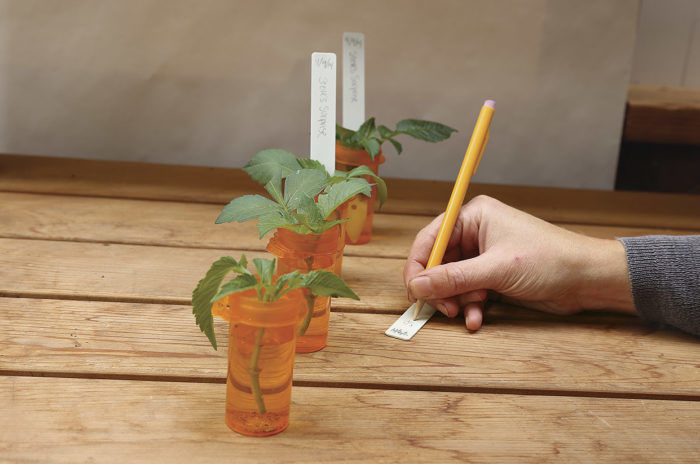
After each cutting is taken, remove the bottom set of leaves and immediately place the cutting in a small jar or pill bottle with fresh water. Soaking cuttings for an hour or two helps them take up as much water as possible before they go into the rooting medium.
Make a label for each cutting, including the varietal name and the date the cutting was taken. You can place a label into the pill bottle along with the cutting. Keep the label with the cutting as it is rooted and later planted out in the garden.
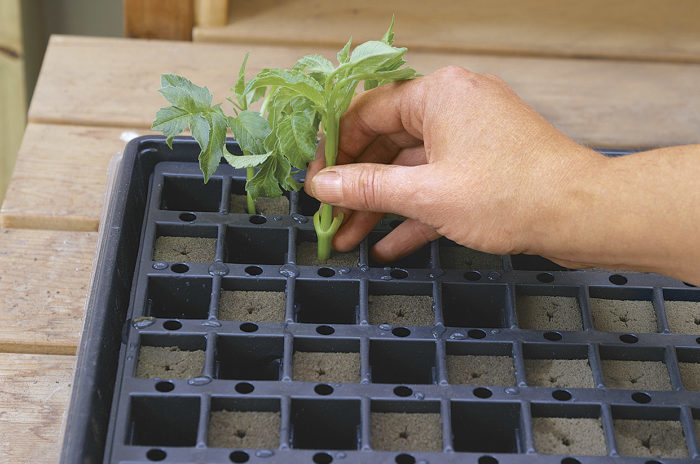
Step 5: Root in soil
Once the cuttings are thoroughly hydrated, they are ready to be rooted. The most common rooting medium is moist potting soil.
The advantage of rooting directly in soil is that it’s a one-step process. Simply fill a 3½-inch-square pot with moistened, high-quality potting soil. Dibble a half-inch deep hole in the soil, dip the cutting in rooting hormone, and carefully insert the cutting into the hole. Press the soil firmly around the stem to eliminate air pockets.
Set your cuttings in a location where they will get plenty of heat and light. A heat mat and fluorescent lighting can be helpful, but a bright, warm windowsill will also work. Be sure to keep the soil moist until the cuttings have rooted.
For less mess in your work space and to reduce the risk of damping off, you might want to consider rooting your cuttings in Oasis.
Step 6: Enjoy your new plants

Once your cuttings have rooted, you can care for them in much the same way as you would seedlings or other indoor plants. They can be kept in a cool location, like a garage or basement; just be sure that there’s no chance that they’ll freeze and that they will get about 14 hours of good, strong light each day. Shop lights hung about 6 inches above the leaves will keep your plants from getting spindly.
When the weather outside begins to warm up, you can start hardening off your dahlias. Start by carrying them outside on a mild day and leaving them in a sheltered location for an hour or two. Gradually increase the amount of outdoor time and sun exposure that they receive. As your last frost date approaches, you’ll likely be leaving them outside all day, bringing them inside only at night. Be sure to wait until all danger of frost has passed before you plant your young dahlias out in the garden. Even if your plants have gotten a bit gangly, no one will know the difference once they are topped and pushing out new growth.
Propagation strategies for the dahlia enthusiast
If you’d like to grow a large number of dahlias from cuttings, try these tricks from the pros.
1. Plan ahead with pot tubers

If you want to build up your stock of a favorite variety, consider setting aside some cuttings as “pot tubers.” Grow these plants all season in their 3½-inch-square pots, then cut them down and overwinter them in a cool (40°F to 50°F) location, where they are protected from excessive moisture, heat, and cold. Pot tubers break dormancy quickly and will often send up multiple shoots, making them ideal for cuttings.
When it’s time to take cuttings, pull the tubers out of their pots, and follow the same steps that you would with single tubers. Aside from the fact that they will produce eyes more quickly (in about five days instead of 10), the process is the same.
Dahlia varieties that don’t overwinter well as single tubers will often do fine when they are stored as pot tubers, divided, and set out in the garden.
2. Root cuttings in Oasis
Oasis Wedges are made from a proprietary foam medium that provides just the right balance of air and water for quick rooting. The wedges come packed in special trays, preformed with a central hole and impregnated with a mild 1–1–1 fertilizer to promote root growth. Give these wedges a try if you want less mess in your planting area, quicker rooting, and less risk of damping off.
Presoak the wedges for about an hour before they are needed, and use every other slot in the tray for better air circulation and ease of handling. Push each cutting about half an inch into the medium.

Keep the wedges moist, and when white feeder roots start to emerge, pot up each cutting—wedge and all—in a 3½-inch-square pot. If a cutting fails to root, pot it up anyway. These slow starters will almost always grow. (Oasis Wedge Medium and Tray, 102 count, $10.50; gardensupplyguys.com)
Richard J. Parshall and his wife, Danielle, own Clearview Dahlias in Snohomish, Washington. They have introduced more than 30 new dahlia varieties and grow hundreds of dahlias from cuttings each year.
Photos: Carol Collins, Daryl Beyers, and Richard J. Parshall


Comments
Log in or create an account to post a comment.
Sign up Log in