

-
Photo: Scott Phillips
-
Photo/Illustration: Scott Phillips
-
Photo/Illustration: Scott Phillips
-
Photo/Illustration: Scott Phillips
-
Photo/Illustration: Scott Phillips


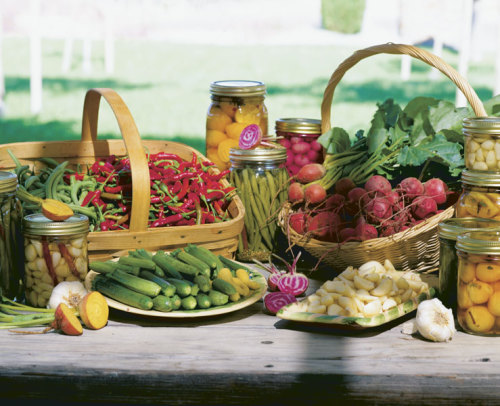
There is a certain irony to a gardener’s life, as the bulk of the harvest often arrives when we are too hot, too busy, and too exhausted—usually from working in the garden—to consume the bounty. And while eating seasonally is great, there are only so many days in a row you can happily face blackberries for breakfast, cucumbers for lunch, and tomatoes for dinner.
Fortunately, there is a wonderful solution to these dilemmas: canning. Many gardeners would like to pack their pantries with homemade pickles, jams, and salsas but are intimidated by the canning process, imagining enormous copper kettles suspended over open fires, vats of melted paraffin, and lots of billowing steam. Things have changed. With some basic equipment, an investment of time, and not too much steam, anyone can can. Once you have learned how to do it, you will be hooked.
Canning preserves quality
When jars of food are heated at high temperatures for extended periods, microorganisms are killed and enzymes are inactivated. At the same time, air is driven from the jars, creating a vacuum seal.
There are two recommended methods for home canning: boiling water and steam pressure. In the first method, boiling water completely surrounds the filled jar and cap. This method can be used to preserve a wide variety of naturally acidic foods such as tomatoes and other fruits. The steam-pressure method must be used for low-acid foods such as vegetables, meats, seafood, and soups. The steps for preparing foods and filling the jars are essentially the same for both methods. The only difference is that a steam-pressure canner allows low-acid foods to be super-heated to 240°F, destroying toxic bacterial spores that can survive boiling at 212°F.
Because fruits and tomatoes are abundant producers and versatile in the kitchen, beginning canners tend to start with them, using the boiling-water method. It is slightly less complicated than the steam-pressure method, and the canner costs less. That’s the method I’ll discuss here.
Most kitchens already contain most of the equipment needed to can. A few inexpensive, specialized items are helpful: a plastic or stainless steel wide-mouth funnel to fill the jars, a magnetic-tip lid wand to remove the lids from hot water, a narrow plastic spatula to eliminate air bubbles trapped in filled jars, and a jar lifter to safely lift jars into and out of the canner. Of course, you’ll need home-canning jars, two-piece metal caps (screw band and lid), and a boiling-water canner. The canner consists of a large, porcelain-coated steel or aluminum pot with a tight-fitting lid and a wire rack, preferably stainless steel, that fits inside and keeps jars upright, separate, and off the bottom of the canner.
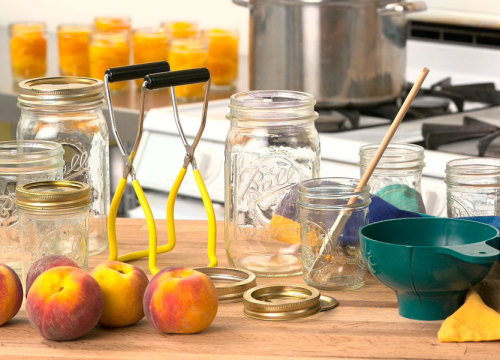 |
| For home canning you’ll need jars, two-piece metal caps, a canning pot, tongs, and a wide-mouth funnel. |
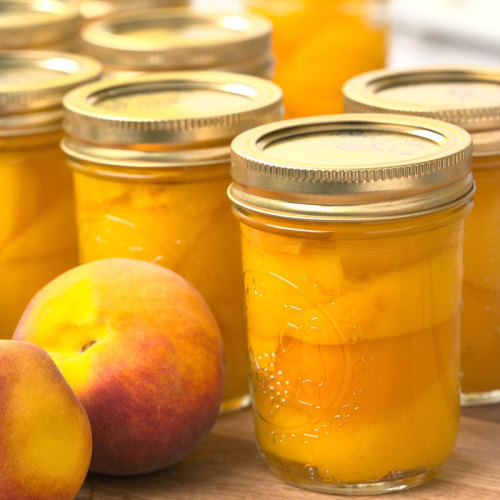
Use only the best-quality foods when canning. Freshness is vital; most produce is at its peak 6 to 12 hours after harvest. Apricots, peaches, pears, and plums should be fully ripe when you can them. When making jam, however, choose fruits that are slightly underripe, as they contain the most natural pectin.
Organize your time and work space
Although canning is not difficult, it does require a block of time and a bit of organization. Have your work area and equipment organized before you begin.
Start with clean jars. Check for nicks and scratches, wash the jars in hot soapy water, rinse thoroughly, and place them in the canner, filling it with enough water to completely submerge the jars. Bring the water to a simmer (180°F) and process the jars for at least 10 minutes. Alternatively, jars may be heated in the dishwasher, using the complete regular cycle; keep the door closed until you are ready to fill them.
The metal lids also must be heated to aid in the sealing process. Wash and rinse the lids, then bring water to a simmer in a small saucepan, turn off the heat, and place the lids in the water for at least 10 minutes. You don’t want to boil the lids, as this may damage the gasket compound. The lids can be used only once, but screw bands can be reused, as long as they are not oxidized or damaged. The screw bands do not need to be heated.
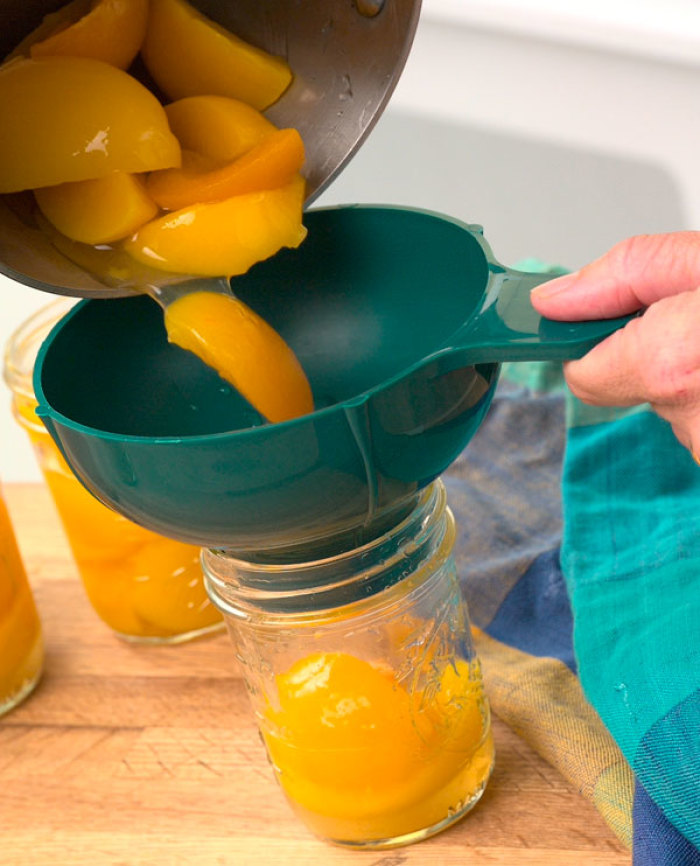
While the jars are heating, prepare your recipe. There are two methods of filling jars: hot pack and raw pack. With the hot-pack method, hot jars are filled with hot, cooked food. With the raw-pack method, uncooked food is firmly packed into hot jars and then covered with boiling syrup, juice, or water. Because hot-packed foods retain more color and flavor, it is the preferred method. Only cucumbers and some fruits are sometimes raw-packed.
Stick to the recipe
 |
|
| Use a wide-mouth funnel to ladle the fruit into sterile jars. | |
 |
|
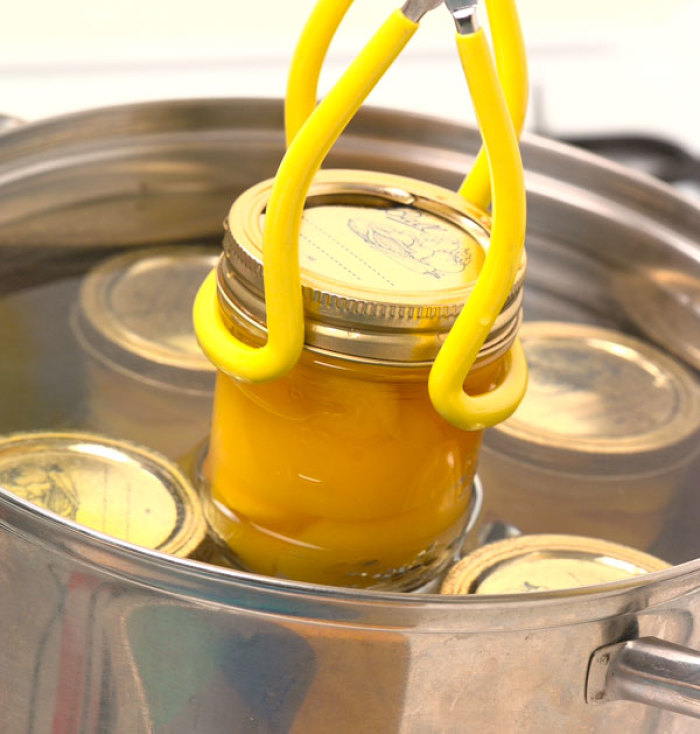
| Using tongs, lower the jars into hot water, making sure there’s space around each one. | |
Whichever method you choose, stick to kitchen-tested recipes and follow them meticulously. Do not reduce the amount of vinegar in pickled products, and do not double jam recipes.
Apples, apricots, peaches, and other light-colored fruits may be treated with ascorbic acid or citric acid to prevent browning. Use ascorbic acid powder or dissolve 3,000 milligrams of crushed vitamin C tablets in a gallon of water.
To fill the jars, lift the wire rack of jars out of the water and secure it by hooking it on to the rim of the canner. Remove one jar from the canner with a jar lifter, carefully pour out the hot water, and place the empty jar on a towel to prevent slipping. Carefully ladle food into the jar, leaving the specified amount of headspace, or room between the food and the jar’s lid. This space allows food to expand during processing and a vacuum to form as the jar cools. The headspace is typically ¼ inch for jams, jellies, pickles, and relishes, and ½ inch for fruits and tomatoes.
To eliminate any air bubbles, push a spatula into the jar and against its sides. Wipe the top and threads of the jar with a clean, damp cloth. Center a hot lid on top of the jar, then place a screw band over the lid. While holding the lid down with one hand, secure the band just until it resists.
When all the jars are filled, put them back in the canner. Add more hot water until it is at least 1 inch above the jars. Adding ½ cup of vinegar to the canning water will prevent mineral deposits from forming on the jars during processing.
Cover the canner and turn up the heat. When the water is boiling vigorously, reduce the heat to maintain a gentle boil, then set a timer for the minutes specified in the recipe. Processing time depends on the size of the jar and increases at higher altitudes. Refer to the instructions, or contact your cooperative extension office.
Check the seal
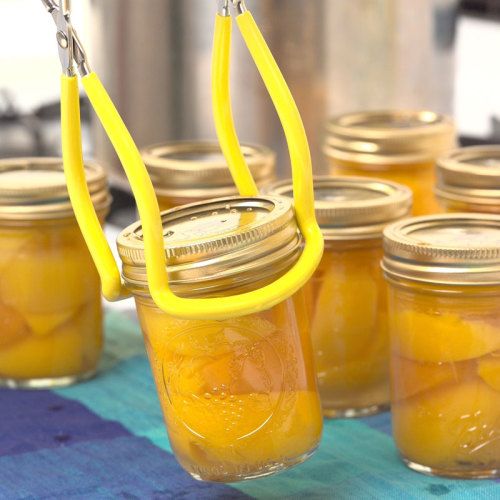
When the jars have been processed for the recommended time, turn off the heat, remove the jars with the jar lifter, and place them on a towel to cool, leaving at least 1 inch of space between the jars. Do not tighten the screw bands. After 12 to 24 hours, you can check the jars to make sure they have sealed correctly. Press in the center of each lid; the lid should be concave and should not move. Remove the screw bands and gently try to lift the lids off. If one unseals, refrigerate the jar and use its contents within a few days.
 |
 |
|
| When the jars have been processed, remove them from the canner and place them on a towel to cool. | Jars of canned fruit await labeling and dating. | |
Be sure to label the jars with the date and contents. Jars should be stored, without the screw bands (because the bands can corrode), in a cool, dark place. Use them within a year. Pickles, sauces, chutneys, and relishes will taste best if allowed to sit for at least a month before opening.
Canning your own garden-fresh foods offers many rewards: rows of flavorful sauces and salsas awaiting winter in the pantry, and the delighted smiles on the faces of your (very impressed) loved ones when you present them with jars of homemade raspberry jam. But the best reward of all is being able to spend the rest of the summer guiltlessly eating something other than berries for breakfast, cucumbers for lunch, and tomatoes for dinner.
 |
Ready to give pickling a try? • Zesty Garden Pickles Cucumber pickles are great, but why limit yourself? All manner of vegetables and even fruits can be pickled. In this article, Jane Selover walks you through the few simple steps to making tangy treats you can enjoy all year. |
This article originally appeared in Kitchen Gardener #24 (December 1999).


Comments
Log in or create an account to post a comment.
Sign up Log in