

Photo/Illustration: Michael Gertley
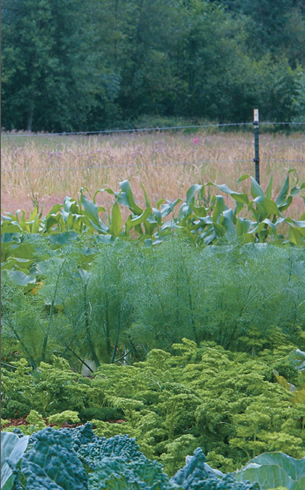
When June arrives, fresh ripe strawberries are the prize of the garden. Unfortunately, slugs find them just as tempting and often get to them first. This Strawberry Tower, however, keeps the berries well above the ground and reduces the damage done by these persistent marauders. At the same time, it’s an attractive garden centerpiece that saves valuable space. By utilizing its vertical growing area, the tower can accommodate up to 90 strawberry plants. If grown in traditional rows, this number of plants would consume 60 ft. of row space. Also, traditional rows often become choked with runners and young plants, whereas on the tower, runners can be easily snipped off as they appear.
If 90 strawberry plants are too many for your family’s needs, consider growing them on two sides of the tower and planting the alternate sides with flowering annuals such as alyssum, lobelia, pansies, and petunias. By midsummer your tower will cascade with a lush display of fruits and flowers.
When we sat down to design the Strawberry Tower, we originally intended to use a separate finial at the top. But during one of our frequent trips to the lumberyard, we noticed a gothic-style cedar fence post that promised to simplify the construction of our project as well as lower its cost.

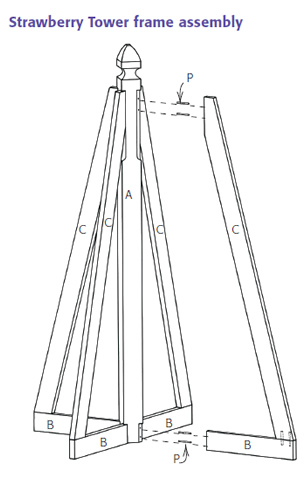
The tower is constructed by attaching four L-shaped frame sections to a center post with hardwood dowels. Since the frame sections extend directly out from the four corners, we had to create flat surfaces to accept the ends of the frames. With the frame constructed, it’s just a matter of adding a series of progressively smaller soil-retaining boards to hold in the dirt. Once you set up your table saw to make the compound cuts necessary on the retaining boards, trimming and installing the boards goes rather quickly. The retaining boards also lock the entire frame together, making a sturdy structure that should last for years.
Step 1
Trim all of the boards to size. It’s a good idea to trim the soil-retaining boards (E thru N) about 1⁄8 in. to 1⁄4 in. full so they can be custom-fitted to the frame during assembly. Trim the overall length of the center post (A) to 6 ft.

Step 2
Begin by creating the flat surfaces along the edges of the post where the four frames attach (see the top illustration at right). Use a backsaw to make 1⁄2-in.-deep cuts at one end of each of the flat surface joints. These would total four small cuts 3 1⁄2 in. from the bottom of the post and four cuts 2 in. below the base of the finial. Set the adjustable base of your sabersaw to 45°, then starting at the bottom of the post, trim the four corners until you reach the cuts made with the backsaw. Follow the same procedure
to create the flat surfaces below the finial, starting your cuts about 14 in. below the cuts made with the backsaw. The illustration at right shows what these surfaces should look like when you’re finished. Each flat surface should be about 3⁄4 in. wide and 1⁄2 in. deep.
Step 3
To construct the four L-shaped sections that attach to the center post, cut all of the side frame boards (C). Attach one bottom frame board (B) to each side frame board with a pair of dowels, as shown in the illustration at left. Use a doweling jig to accurately place the holes for each dowel pin. When all four frame sections are complete, attach them to the center post. Use a doweling jig to drill two holes in each end of the frame sections, then use four dowel centers to locate the position of the holes on the center post (dowel centers slip into the holes in the frame and have a point on the opposite end, which leaves a mark on the post when the frame is pushed into place).Drill the matching holes in the center post and install the four frame sections using four dowel pins for each frame. Allow the joints to dry at least 24 hours.

Step 4
Next, install the four bottom trim boards (D), as shown in the illustration at right. Notice that the ends of these boards have a 45° bevel (see illustration below). Attach these boards at the bottom of the tower frame with two wood screws (R) at either end. Drive each screw through the bottom trim board, then into the bottom frame board. Always predrill each screw hole to prevent the wood from splitting, especially when they are being installed near an edge.

Step 5
Prepare the 10 soil-retaining boards (E thru N) for installation by making compound cuts. Once your table saw is set up for the first compound cut, the rest will go faster than you might expect. First, set the miter gauge to 60°, then tilt the sawblade to 35°. These settings will produce the chamfer along each of the miter cuts. To produce both compound cuts on each soil-retaining board, position the miter gauge to the left of the sawblade, but reposition it to the opposite 60° mark for the second cut. Try cutting a couple of test pieces until you’re comfortable with making the two cuts. Because the frame may not be perfectly symmetrical, it’s best to cut each of the retainer boards a bit full. If necessary, you can trim the boards after testing them in the frame.
Step 6
Install each set of retainer boards 5 in. above the previous set (as measured along the edge of the side frame board). We found it helpful to pencil the position of each set of retainer boards, including the 35° angle they form in the frame. Use two wood screws (R) to attach each end of the soil-retainer boards.

Step 7
After the retainer boards are in, install the top trim boards (O) (see the illustration at right). These boards are cut with simple 45° miters and give the frame a finished look. Secure each one with two 4d galvanized finishing nails (Q). Drive these nails through the trim boards near each mitered edge, then
into the top of the side frame boards. For added stability, we also hammered in four nails near the edge of each miter joint to lock them together.
Step 8
Finish the tower, if desired. If you make the tower out of a rot-resistant wood such as cedar or redwood, it’s not necessary to add a preservative or finish to the final structure. However, we wanted to extend the life of our tower, so we applied an oil-based semitransparent stain. If you do apply a stain or preservative, read the label carefully to make sure it is nontoxic when cured. Let the tower sit out in the weather for at least two or three weeks.

Photo/Illustration: Michael Gertley
Step 9
After placing the new Strawberry Tower in the garden or other chosen site, fill it with soil. Remove one of the soil-retaining boards about halfway up the tower so you can fill up the bulk of the space using a shovel (see the photo at right). Fill the upper half of the tower using a small scoop or trowel. After watering the soil thoroughly, you can begin planting your strawberries. Throughout the summer, check the soil’s moisture daily. The soil in the upper tiers will dry out more quickly than the soil in the tiers at the base of the tower.


Comments
Forgive me if I'm missing it, but I don't see any angles provided for part "c". These angles are critical for constructing this.
Yes, please an answer to this would be helpful! Too late for us as we had to "wing-it" but it is critical to these plans. Also, the dowels were a good idea, but very difficult to clamp given the angles and four sides.
Hi Jan,
I'm planning to construct a strawberry tower on my balcony. Is the process the same? Or should I perhaps look for other schemes on professional gardening portal of achieveessays for beginners?
The problem is if you don't get the angles correct on the C panels all the angles will then be wrong, has anyone written the C panel sizes and angles down to post here.?
Log in or create an account to post a comment.
Sign up Log in