


With Spring moving right along and Summer hiding around the corner, your veggies should (hopefully) be growing well. In the case of your vining crops—cucumbers, pole beans, and some melons—they undoubtedly will need some support at some point. If you are using a raised bed system in your garden, you have to use your space wisely.
In my previous article on trellises, I identified the advantages and types of trellises and how they can use vertical space efficiently in your garden. This project uses the “wall” type trellis, which is fairly common. What makes this project a little different is not the type of trellis, but how the string is applied. Anyone can order a plastic net, go out to your trellis frame with staple gun (or worse, hammer) in hand, hope it’s the right size, and put it up. This application, however, borrows from the game of tennis. That’s right friends… we’ll be stringing our trellis like a tennis racquet! The advantages of doing it this way are: 1. You can control the type and spacing of your strings; 2. You don’t beat up the sides of your trellis with staple and nail holes; and 3. You can control how tight the strings are, and adjust them as necessary as the season goes along. “But that seems like too much time and trouble,” I can imagine you asking me. I was actually surprised as to how quickly the strings went up. I completed the stringing of the 5′ x 5′ trellis you see in the photos in less than an hour. And that was doing it alone and stopping to take photos. For this project I used cedar for my trellis frame, for both it’s beauty and longevity. At the moment it’s kinda standing out next to the raised bed it’s attached to (made from regular plywood); but this is temporary, as I will be replacing my beds with cedar next year. Onward…
• 2 – 2″ x 3″ or 2″ x 4″ wood ‘posts’, 4 to 5 feet long (the length of your raised bed) (Photo A) • 2 – 2″ x 3″ or 2″ x 4″ wood ‘posts’, 5 to 7 feet long (determined by how tall you want your trellis) (Photo A) • 4 – 1.5″ metal angle brackets (#1, Photo B) • 4 – 3″ metal angle brackets (#2, Photo B) • 1 – box of #8 1 3/4″ wood screws, 50 or 100 quantity (which is more than you’ll use, but they’re cheaper that way) (Photo C) • 1 – ball of string/twine, at least 200-300 feet length (Photo C) • Drill & drill bits • Measuring tape • Saw • Pencil
Easy to intermediate, depending on your wood building skills.
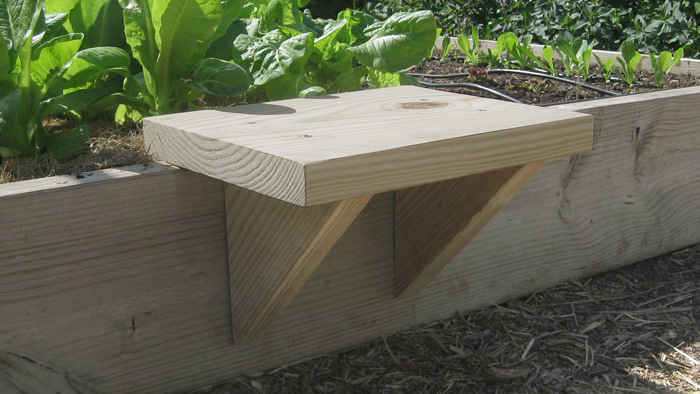
1. Measure the height of your raised bed, as well as the length of the side the trellis will be mounted to. For the purposes of this post, my raised beds are approximately 5 feet wide by 5 feet long by 10″ high. 2. Cut TWO of the four 2×3’s/2×4’s to the width of your raised bed, MINUS twice the thickness of your raised bed’s sides. That way the trellis will correctly match the raised bed’s width. 3. Then, cut the remaining two of the 2×3’s/2×4’s to the height you wish your trellis to be. You’ll end up with 4 pieces, two different matching lengths (Photo A). 4. Gather up your hardware – brackets, screws, drill, etc. 5. Arrange the four pieces as they will be put together (Photo D). The distance of the bottom horizontal piece from the end of the posts is determined by the height of your raised bed. 6. Place the bracket where two of the wood pieces meet in the corner. While holding it in place, mark the holes with a pencil (Photo E). 7. While holding the bracket and wood together, drill the holes, and put in the screws (Photo F). Repeat for the remaining 3 corners. 8. The trellis frame is now complete. Now it’s time to drill the string holes. Measure and mark the holes with a pencil on all sides. For my trellis, I went with 15 holes, spaced 4 inches apart (Photo G). 9. Drill your string holes with a hole large enough to easily feed the string through (at least a 1/4″) (Photo H). 10. Place the trellis next to your raised bed. Using the four 3″ angle brackets (two for each side), screw the trellis to the side of the raised bed (Photo I). 11. Here’s where the “tennis racquet” part comes in. Feed the string through the leftmost hole and feed it down to its corresponding hole at the opposite end of the trellis. In other words, if you started at the bottom, you’ll be going up to the corresponding hole at the top. (Photo J). 12. Pull the string all the way through that hole, then loop it back into the hole next to it. Again, pull it through to its corresponding hole on the opposite end. 13. Repeat this process until you’ve gone all the way across the width of the trellis. 14. Now continue with the horizontal strings, by going top to bottom. When finished, you should now have a nice grid of string squares (Photo K). Your trellis is pretty much ready to go at this point. Mounting it to the side of the raised bed should provide enough support, not only against winds, but the weight of your vining veggies. If the winds in your area are typically stronger than average, you may need to reinforce the trellis. This could be done by screwing in additional posts to connect the trellis to the raised bed at a 45-degree angle. I have included a schematic illustration of the trellis to assist with construction. You can download it here. Enjoy and good luck! |


Comments
Log in or create an account to post a comment.
Sign up Log in