

There comes a point in every gardener’s life when starting your own transplants from seed not only makes economic sense, but also opens up a whole new world of varieties that are available to you. Two invaluable purchases that need to be considered are heat mats and grow lights.
|
Regarding grow light systems, there are many options available to you, at different sizes and styles. Unfortunately, most of these can come with a steep cost. The ones I researched online were in the neighborhood of $150-200 or higher.
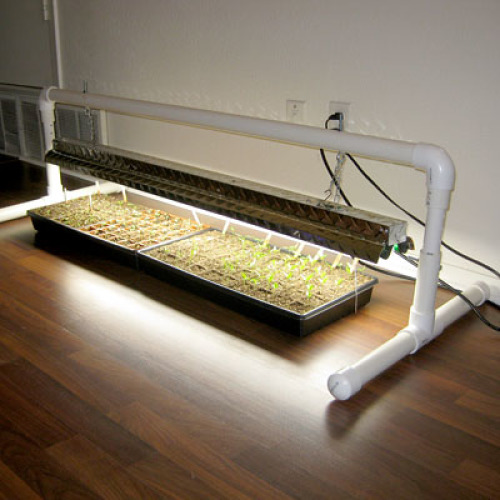
While these were of pretty good quality, it made me look for more inexpensive options. So I offer you a basic DIY grow light stand made entirely of PVC (with required metal hardware). I was able to build one of these for less than $60, including the light fixture itself. This design’s measurements will yield a grow light stand that supports a 4-foot (48″) wide fluorescent shoplight fixture. You can certainly design it to fit a smaller one that carries a 3- or 2-foot fixture.
• 48″ Fluorescent twin-bulb shoplight fixture with recommended bulbs (1). • 10-foot length of 1 1/4″ (1.25) PVC tubing (2) • Two 2-foot (24″) pieces of 1″ PVC tubing (3) • Two 1 1/4″ (1.25) “Tee” PVC connectors (4) • Two 1 1/4″ (1.25) 90-degree “elbow” PVC connectors (5) • Four 1 1/4″ (1.25) PVC end caps (6) • Two lag bolts or equivalent, and their accompanying nuts. I would recommend 1/4″ diameter by 3″ bolts • Pack of two 1/4″ x 4″ “eye hooks” and their accompanying nuts. • Pack of two 1″ “S-hooks” • Drill and assortment of drill bits • Hacksaw or PVC cutting tool • Tape measure • PVC cement • Pen or permanent marker • Timer
Easy to intermediate, depending on your craft and cutting skills.
1. Gather all of the needed parts and tools (Photo A). 2. Cut a length of the 1 1/4″ PVC tubing long enough to go beyond the length of your fluorescent light fixture. For the 4-foot fixture, I cut a piece about 55″. Then glue one of the elbow connectors to each end. You now have the “top support bar” completed (Photo B). 3. Cut 4 equal lengths of the 1 1/4″ PVC tubing to serve as support “legs”. These can be whatever length you wish, but I wouldn’t go any shorter than 8″. I cut mine to 10″ (Photo C). 4. Take two of those 4 equal length pieces and glue them to the Tee connector. Then glue two of the 4 end caps to that. You have now finished one of the “leg stands”. Repeat this step for the second leg stand (Photo D). 5. Cut 2 more equal lengths of the 1 1/4″ PVC tubing, and glue into the ends of the “top support bar” you finished in STEP #2. I made mine about 2 1/2″ (2.5), but that length can be between 2-6″ (Photo E). 6. Cut 2 more equal lengths (again) of the 1 1/4″ PVC tubing to serve as the “risers” coming up from the leg stands. These can again be whatever length you wish. I made mine about 6″. These pieces are one of the two pieces that will raise and lower the light fixture (Photo F). Yep, that’s right! This baby is adjustable. Not the fancy mechanism that the more expensive commercial ones have, but it will do the job. Here’s how it happens: 7. Insert one of the 1″ PVC tubing pieces into the “leg stands” you finished in STEP 4. This is the other piece that will determine how tall your light fixture is raised. Drill a hole into BOTH the outer 1 1/4″ AND the inner 1″ pieces of PVC tubing. The hole diameter should be wide enough to allow the adjustment bolts to go in and out of the hole easily. Repeat this for the other side (Photo G). This is the lowest point that the light fixture will be, so keep that in mind. Remember to compensate for the height of your seed trays. Yes, you can also adjust the chains on the light fixture, but this way is easier. 8. Take both of the 1″ PVC pieces out, and mark 4-5 points, in 1″ increments, to the LEFT of the hole that you previously drilled. These will be the different positions you can raise the light fixture with (Photo H). 9. Using the pen marks as a guide, drill the other holes. If you put the piece with the holes back into the base, you can now see how the fixture will be raised and lowered (Photo I). 10. Put the top support bar onto the two leg pieces and you’re almost finished (Photo J). 11. Drill two holes, at equal distance from each side, on the top of the support bar. Put in the eye hooks, “hole” in bottom. These will connect to the chains provided by the light fixture (Photo K). 12. Unpackage your light fixture and attach the support chains to the eye hooks on the PVC support. Note: I had to cut one of the included chains and use each half because they were too long. So you might have to adjust yours as well. If all the adjustments are good, install the bulbs in the fixture (Photo L). At this point my friends, you’re pretty much done. Plug it in, attach an optional (but highly recommended) timer to it, and you’re ready to go. So go forth and let your seedlings “see the light” |


|
Did you like this project? We have lots more! |


Comments
I think I'll give this a go! It will serve for start season and I can keep my kitchen herbs going year-round.
Log in or create an account to post a comment.
Sign up Log in