

Photo: Lee Anne White
When I told my 40-something daughter I had taken up worm composting, she gave me a horrified look and declared, “I don’t want to know about it. Don’t show me where they are. And don’t ask me to take care of them if you go out of town!”
Despite their unsavory image, I’ve become very fond of worms. I turned to worm composting—or vermiculture—when I became disabled with a chronic illness several years ago. Though I had been an avid gardener for years, hauling garden wastes and turning compost piles suddenly became impossible. I needed an easy, affordable, and low-maintenance way to keep composting. I discovered that a couple of pounds of wriggling worms can turn my kitchen scraps into nutrient-rich compost in about 60 days. There’s little or no odor, and no heavy lifting. And, best of all, my worms make compost in a compact container right in my own home.
Worms eat it up
Worms are nature’s ultimate recyclers; they take garbage in and turn out black gold. To create a worm-composting haven in a bin, you can’t use just any old worms. You need worms that are real chowhounds. Red wigglers, which are also called red worms, are the most voracious eaters of the earthworm family. They can consume half their own weight in organic matter each day, and they leave behind fertile compost. Pale red, the tiny, threadlike baby worms grow from 1/8 inch up to 4 inches long at maturity.
Red wigglers are available from garden-supply catalogs and through ads in gardening magazines. They are sold either by the number of worms or by the pound. Prices range from $20 to $40 per pound, which is usually about 1,000 worms. Since they won’t survive shipping in cold weather, you may not be able to purchase them by mail from November through March. I ordered my worms from a garden-supply house in September. They arrived on Halloween, tucked in moist peat moss and wrapped in aluminum foil inside a brown paper bag. I recommend starting with 2 pounds of worms for a two- or three-person household.
These wigglers are in worm heaven as long as you give them a dark, cozy home with plenty of food, moisture, oxygen, and a comfortable temperature. You won’t have to worry about them escaping from their bin as long as you provide the right conditions.
Create a cozy home for your wigglers
Worm bins are commercially available, but they can be expensive—from $50 to $100. Instead, you can use plastic, lidded containers, or you can make a bin from wood. I started out with a 33-gallon plastic box with a tight lid. However, I found that the box was too high and had too much wasted space. The top 10 inches were used by the worms only to deposit their eggs. I now use two 10-gallon plastic bins that yield twice the compost as the larger bin. My worm-compost harvest has averaged 60 gallons a year. The bins cost about $5 each.
As a rough gauge, your worms will need about 1 square foot of surface area to digest each pound of waste material generated per week. You can always increase your composting operation, especially since your worms will reproduce when they are well fed.

A worm bin needs to have drainage holes on the bottom and air holes above the level of the bedding . The holes should be 1/8 inch to 1/4 inch wide. For a 10-gallon bin, I made eight drainage holes on the bottom and a total of 18 air holes in the lid and on the sides near the top. I first tried using a heated awl, but the holes were not big enough. So I plugged in my soldering iron and made holes just the right size. You can also make holes in soft plastic with a drill, heated ice pick, or a knitting needle. If you are melting plastic, make sure you’re in a well-ventilated area.
To create the right environment, line your bin with biodegradable bedding. You can use peat moss, aged manure, sawdust, dried grass clippings, hay, garden loam, even shredded cardboard, newspaper, grocery bags, and most types of shredded leaves. Oak and other highly acidic leaves are not recommended, since these worms don’t like an acidic environment. It’s not a good idea to use heavily colored or glossy paper, since they may have inks or other substances that are toxic to red worms.
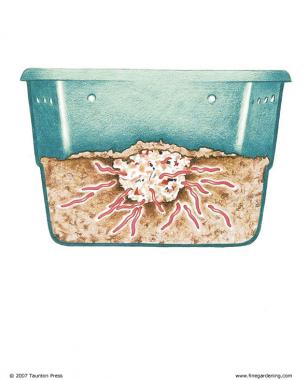
Worms need moisture to keep their skin wet enough to wriggle and burrow with ease. When using paper products for bedding, soak them overnight or longer in a separate container, and then pull them apart into small pieces. For other substances, add enough water to your bedding to make them slightly moist, like a wrung-out sponge. I use peat moss to make a quick and easy bedding, mixing it with warm water before filling the bin about 6 inches deep.
Since food scraps contain water, it’s best to place a shallow container—a cat-litter box or plastic drawer divider—underneath the bin to catch any runoff. You can also place plastic sheeting under the box to protect the surface below.
Paper products in the bedding may soak up moisture, so monitor the box carefully. If the bedding becomes dry, spray or sprinkle water to spread the moisture evenly.
Worms are photophobic—they shun both sun and artificial light, burrowing as deep as they can. Use a dark-colored bin, or drape it with a dark covering. If you move the worm bin outside in warmer weather, make sure it stays covered in a cool, shaded place. The worms will perform best when the temperature is between 50°F and 70°F.
Feed your worms a well-balanced diet
While I tried to maintain a regular feeding schedule when I started worm composting, I have since learned that red worms are very adaptable and will eat whatever is available, including bedding materials. With 2 pounds of worms, try starting out with about a cup of food scraps every other day. Observe how quickly they eat it up, and adjust your feeding routine accordingly. But don’t worry—they can survive for weeks at a time without any fresh scraps.
Good food for red wigglers
|
Add to worm bins |
Keep out of worm bins |
|
Fruits and peels |
Meat, poultry, fish |
|
Vegetables and peels |
Animal bones |
|
Bread and cereal |
All types of eggs |
|
Pasta and grains |
Cheese and other dairy products |
|
Eggshells |
Butter, margarine, and oils |
|
Coffee grounds |
Mayonnaise and salad dressing |
|
Tea leaves and bags |
Peanut butter |
|
Shredded leaves of most trees |
Oak leaves |
|
Peat moss |
Colored or glossy paper products |
|
Shredded newspaper and cardboard |
Pine needles and bark |
|
Human and animal hair |
Fresh grass clippings |
|
Dried grass clippings |
Wood chips |
|
Fine sawdust |
|

Aim for a well-balanced diet with a variety of fruit and vegetable scraps, as well as leftover bread, pasta, and grains. While worms are able to digest animal and dairy products, these substances may cause disagreeable odors and attract flies. Avoid feeding them oils and fatty foods like peanut butter, which could become rancid.
Place the scraps on top of the bedding, or make a shallow hole in which to bury them. When burying, it helps to mark the spot with an object like a pencil and add the next feeding in another part of the bin. I started feeding my worms food scraps cut into pieces about 1 inch square or so. Then I discovered I could hasten the composting process by running leftovers through the food processor. Worm composting works even if you leave the scraps uncut—it just takes longer. The worms also gradually digest most bedding materials, so it’s best to keep these in small pieces as well.
Harvest heaps of rich compost
Within about 60 days, the bedding had turned into rich, black, earthy-smelling compost; finished compost has the color and consistency of crumbly chocolate cake. However, there’s no set timetable for when you need to remove compost from your bin.
I discovered that the easiest way to harvest the finished compost is simply to push the bedding and worms to one end of the box and fill the other end with fresh bedding and table scraps. Within a few weeks, the worms will munch their way over to the fresh food and I can scoop out the compost from the now deserted side of the bin.

Another way to harvest is to arrange a table covered with plastic under a 100-watt bulb so that the light is within 2 feet of the table. Heap the compost on the plastic in a cone-shaped mound. Any worms exposed to light will scurry to the center of the mound, letting you scoop away compost from the perimeter. Wait another 10 to 20 minutes and you can remove another layer of compost. Eventually, all the worms will have burrowed into a compact mass in the center of the pile. You can then move the worms back into the bin after lining it with new bedding.
With either method, I find I usually have to pick a few worms out of the finished compost, so I like to use disposable gloves when I harvest. While I was squeamish at first, I’m no longer bothered by handling a few of the red wigglers.
Worm compost will keep plants well fed
Rich with phosphorus, nitrogen, and many other nutrients and trace minerals, worm compost is an excellent organic fertilizer. I use it as a potting medium or top dressing for houseplants. Each time my plants are watered, fresh plant food is delivered to the roots without any danger of overfertilizing or burning.
In the garden, I use compost in planting holes and as a top dressing for flower beds. You can also brew a liquid fertilizer or “compost tea” by placing some compost into a pantyhose leg. Tie the opening tightly, and steep the “tea bag” in your watering can for several days.
Thanks to my indoor vermiculture factory, I’ve been able to continue composting year-round with little effort. My houseplants and garden keep thriving in the process. And my daughter has come around to giving my worms their due respect.
Watch this video and learn how to give your worms a happy home so they reward you with lots of castings.


Comments
I find that using horse manure works great for raising worms. http://simplecomposting.com/using-manure-for-gardening/
Bokashi composting can be incorporated into your vermicomposting regime. By using bokashi composting you can compost all of the items to 'Keep out of your worm bin', such as cheese, meat, bones etc. The bokashi'd food waste can then be added to your wormery. Read more here: http://bokashiliving.com/bokashi-and-wormeries/
<a href="http://google.com
[url=http://google.com]google[/url]
Log in or create an account to post a comment.
Sign up Log in