
-
Photo/Illustration: Roger Foley
-
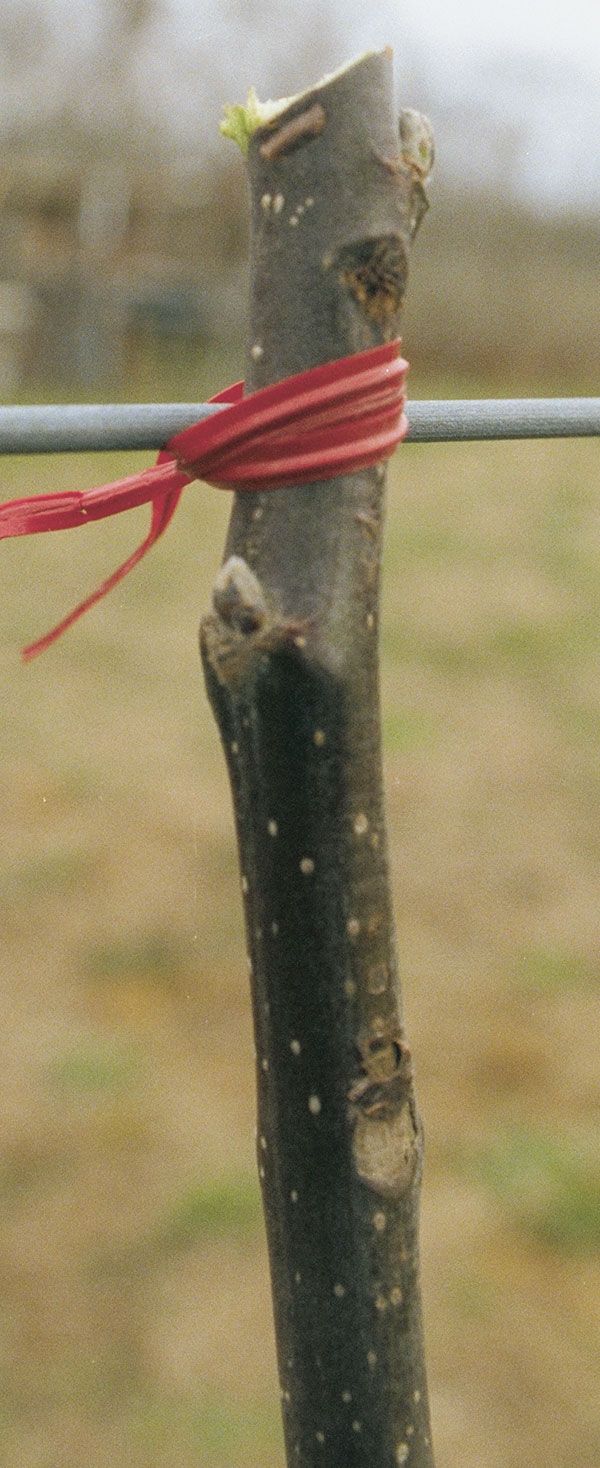
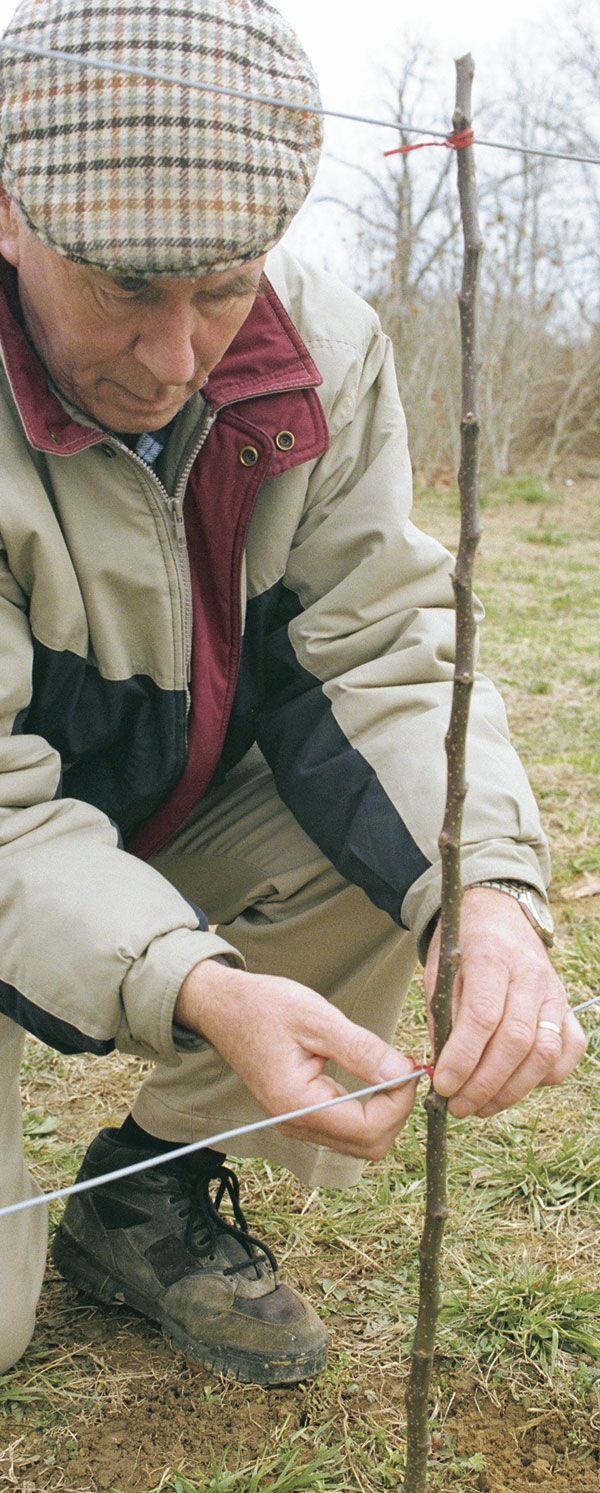
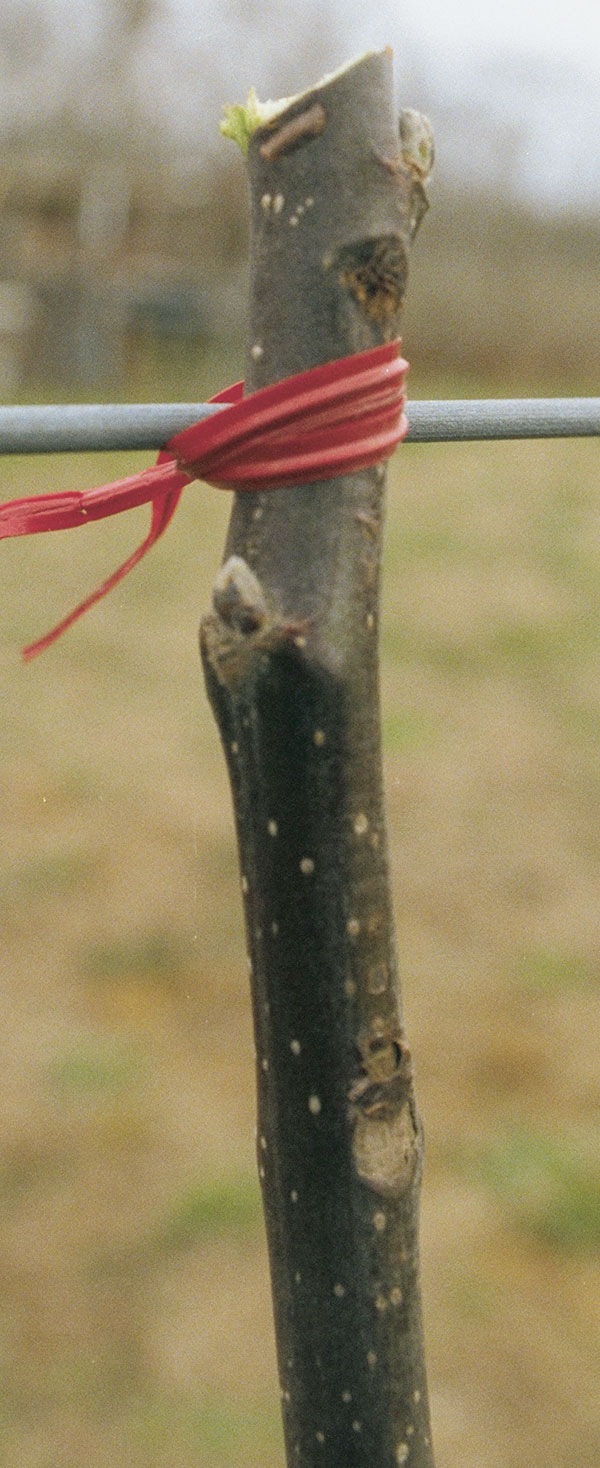
One cut, two ties—that's it to get started. It may be a cold day in March, but you'll need only a minute after planting to cut your whip just above the top wire and then secure it loosely with plant ties (next photo).Photo/Illustration: Marc Vassallo
-
Photo/Illustration: Marc Vassallo
-
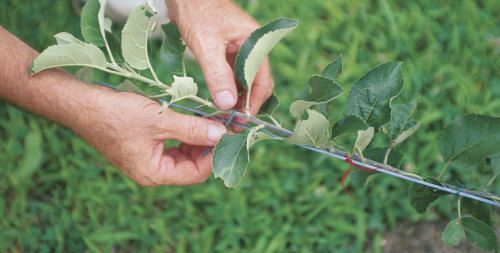
Always prune at a 45° angle, just above and sloped away from a bud. Notice the position of the opposing buds near the wire.Photo/Illustration: Marc Vassallo
-
Photo/Illustration: Roger Foley
-
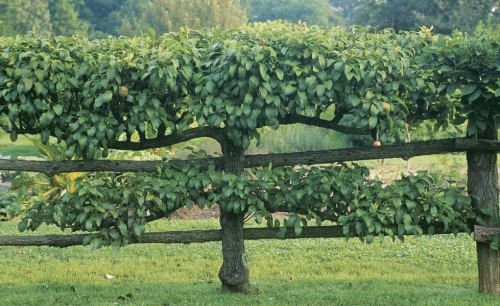
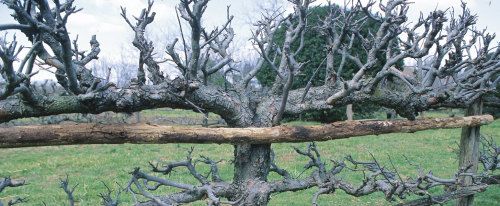
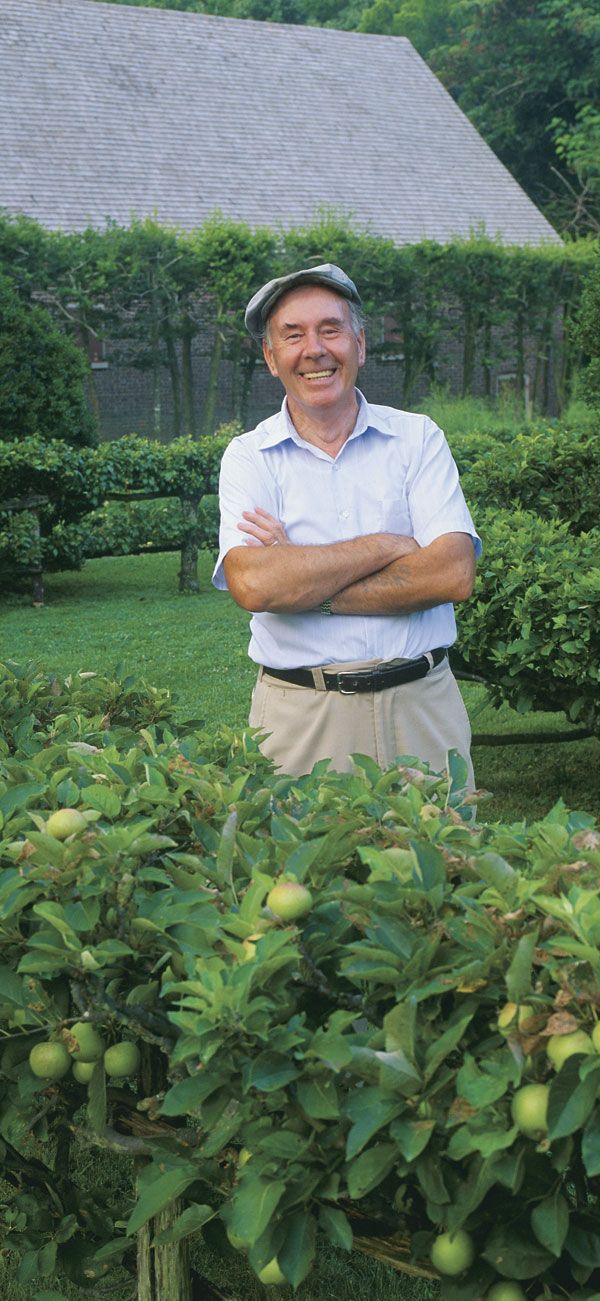
Old espaliers have regal personalities, which they perhaps display best in winter.Photo/Illustration: Marc Vassallo
-
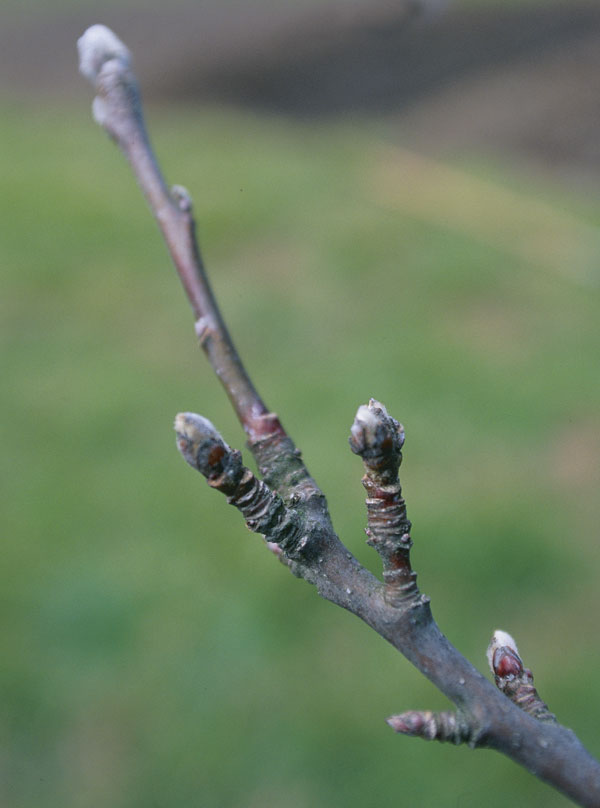
Fruit buds vs. lateral buds. The plump, furry, ringed buds are fruit buds; leave them alone if you want apples. The smoother bud at the tip can be pruned.Photo/Illustration: Marc Vassallo
-
Tie down the laterals when they're thin and whippy. If they get too woody, they could snap when bent. Tie them in the middle of the bend, not at the tips, so they'll grow straight rather than bowed.Photo/Illustration: Roger Foley
-
Photo/Illustration: Roger Foley
-


I will never forget my first encounter with espaliered fruit trees. In the 1950s, it was. I was interviewing for the post of assistant head gardener to a prominent British aristocratic family. During my guided tour of the exquisitely manicured gardens, we turned a corner, leaving a boxwood parterre, when ahead of us was an avenue of espaliered fruit trees, ending at a grotto surmounted by a huge piece of garden statuary. I was but a few years out of horticultural college, so my reaction to this enchanted lane of hedgelike trees was a combination of fascination and daunting thoughts of how to deal with the trees.
My guide, seemingly unaware of the horticultural magic we were passing, continued chatting, about what I don’t remember. I felt the trees were staring back at me menacingly, daring me to ruin years of training and loving care. I got the job, later becoming head gardener, and I believe that over the years, the espaliers and I came to respect, if not love, each other. Little did I realize that first day that nearly 30 years later I would come to America to serve as superintendent of the gardens at Stratford Hall, the Virginia birthplace of Robert E. Lee, where, lo and behold, I was placed in charge of a garden bisected by avenues of treasured espaliered fruit trees.
| More on growing apples in the backyard orchard, plus links to apple recipes… | |
Espaliers, of course, have a long history before me. The ancient Romans grew them first, but the form was brought to perfection several hundred years ago by the French, who are responsible for naming the system espalier, a derivation of the French word épaule, meaning shoulder.
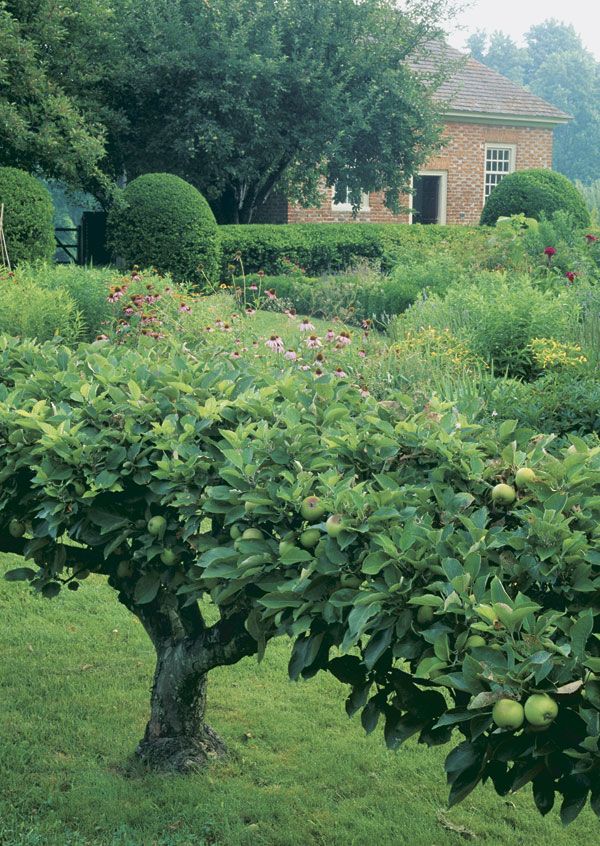
But why should we bother with espaliers today when we have all the dwarf fruit trees we need? Basically, and right down to the nitty gritty, it’s the challenge. This art form gives gardeners justification for sticking out their chests and saying, “I did that, and I’m glad you like it.” There are a number of back-up reasons, too. Espaliers are a year-round garden feature, and they’re easier to maintain and harvest than standard or dwarf fruit trees. Even the most rambunctious of children will thrill at being asked to harvest fruit from trees no taller than they.
Select a spur-bearing variety
The best tree for the method I’m describing is a dwarf, straight-leader tree known as a “whip.” A whip is a young tree comprising a single vertical growth with no branches or side shoots. Whips are normally sold as two- or three-year-olds at a height of 3 ft. to 4 ft. The rootstocks of these trees should be of M9 or similar dwarfing stock. M11 and M26 rootstocks are also suitable.
You can train pears or peaches on a two-wire trellis—though not cherries, which prefer fan training—but I’m going to limit my discussion to apples. I suggest you choose your favorite modern varieties, with one important caveat: The varieties must be spur bearing, meaning their fruit forms close to the main branches, not at the tip of vertical growth. ‘Red Rome’, ‘Stayman’, ‘Red Delicious’, and ‘Golden Delicious’ are all spur bearers and would be my choices. Some companies offer varieties they say are self-pollinating, but for reliable cropping, all apples need a second tree to effect pollination, so plant at least two.
I recommend purchasing a balled and burlapped tree. I don’t like container-grown fruit trees because they may be pot bound, which discourages the tree from forming roots in its new surroundings. Bare-root trees are okay, but with them, a slight drying out can be fatal.
Plant a single-stem tree
 |
|
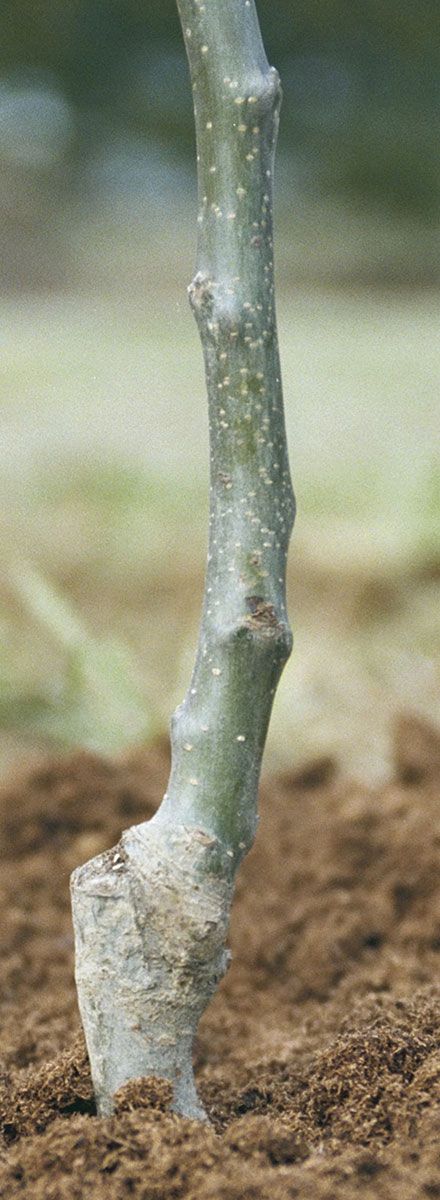
| Keep the graft union 2 in. to 3 in. above the soil to ensure survival of the newly planted whip. | |
You can plant apple trees in either the fall or the spring—here in Virginia, mid-March is ideal—so long as you do not plant them when the ground is frozen or waterlogged. You will no doubt want to establish a row of espaliers, but for the sake of simplicity, I’ll describe how to proceed with one tree. First you’ll need to select an open site. You can run a 10-ft. trellis east to west, north to south, or any which way, but avoid shade and poorly drained soil.
Dig a hole halfway between the trellis posts; you want the tree to extend 5 ft. in either direction. The hole needs to be about 4 in. to 6 in. deeper than the root ball. I suggest you place a stick across the hole to ascertain the surrounding ground level. Be sure soil removed from the hole is returned “as is.” Mixing in additives such as peat moss, compost, manure, or fertilizer will discourage the tree roots from expanding to search for food and anchorage.
Replace a little broken up soil in the hole, then lower the tree into it, and check the depth against the stick. The graft union, a swollen area just above the top of the root, should be 2 in. to 3 in. above ground level, as indicated by the stick; if it’s not, add or remove soil to correct the depth.
Ideally, you want to position a pair of opposing buds at roughly the same height as each of the wires. Turn the whip until these buds aim toward the posts, so the lateral growth that springs from them will travel naturally along the wires. Now untie the burlap and push it tightly down into the hole without removing it. Gradually refill the hole and firm the soil. Water the tree copiously to ensure the soil comes in contact with the roots, and then add mulch.
Year one: establish a lateral framework
Now comes the fun part, training. I use a sharp pair of anvil pruners for a safe, clean cut. With anvil pruners, the blade slices evenly while the flat anvil cushions the plant stem. To facilitate water run-off and prevent disease, always cut at a 45° angle, away from the bud. Make your first cut at the top of the whip, just above the two buds positioned beside the top wire. Then take a soft plastic plant tie or a twist-tie and secure the whip loosely to the two wires. Now it’s a waiting game.
 |
 |
|||
| One cut and two ties is all it takes to get started. It may be a cold day in March, but you’ll need only a minute after planting to cut your whip just above the top wire (left) and then secure it loosely with plant ties (center). | Always prune at a 45° angle, just above and sloped away from a bud. Note the position of the opposing buds near the wire. | |||
To create a two-tiered espalier with four horizontal branches, or laterals, you need only the two buds at the bottom wire and the two at the top wire. All other growth should be removed. Use your thumbnail or a knife to rub off or cut away all growth as soon as it emerges from the buds between and below the four you intend to keep.
When the growth from the four buds you have saved is 4 in. to 6 in. long, which will be in four to six weeks, carefully bend the laterals down to the wires and secure them loosely with ties at the center of the arches you have created.
When the four laterals extend another 4 in. to 6 in., about four weeks later, bring them down and tie them to the wires. As the season progresses, continue to tie down the lateral branches as they grow.
 |
| Tie down the laterals when they’re thin and whippy. If they get too woody, they could snap when bent. Tie them in the middle of the bend, not at the tips, so they’ll grow straight rather than bowed. |
Occasionally suckers will sprout below the graft union or even below soil level. This growth is from the rootstock, and if allowed to develop will likely turn your tree into a form of wild crabapple. Use your anvil pruners to remove all such growth.
Year two: prune vertical growth
At some point, most likely during the tree’s second season, the laterals will reach the posts. When they do, cut off the growing tips and continue to do so to prevent the laterals from getting any longer.
As the laterals are growing horizontally, vertical growth will sprout up along their length. When the verticals are about 8 in. tall, you need to prune them back to the first two pair of leaves. After the first pruning, more growth will radiate from the remaining buds. Roughly every six weeks, you’ll need to prune the new growth, again back to two pair of leaves. This amount of growth is sufficient to support the tree in its natural processes of photosynthesis and the conversion of foods into tissue.
 |
|
| The plump, furry, ringed buds are fruit buds; leave them alone if you want apples. The smoother bud at the tip can be pruned. | |
Typically, your first pruning will take place in late April, the second in early June, and the third in mid to late July. Growth will slow down noticeably by mid-summer, so the next pruning might not be needed until September. The last pruning, really a tidying up, may come in late November. The timing of your five or so prunings will vary according to your climate and locality, of course, but this gives you a general idea.
As you continue pruning back to two pair of leaves, fruit bud clusters, sometimes called spurs, will form close to the branches. Fruit buds are plump, furry, and made up of cylindrical rings, all of which distinguishes them from the thinner, smoother lateral buds. Whereas a lateral bud produces branch growth, a fruit bud will, as its name implies, blossom in spring and then bear fruit. You want apples, of course, so do not cut out growth composed of cylindrical rings. Now you see why you cannot use apple varieties that bear fruit at the tips of lateral growth. In pruning, you would have cut off all the potential fruit.
Year three: thin errant branches
During the third year and forever thereafter, you should prune the lateral growth back to a single pair of leaves, rather than back to two pair. As always, leave the fruit buds alone. In year two, your tree might have produced a few apples. Now in year three, your tree should produce a full crop. Do not be tempted to remove any of the apples; rather, leave fruit thinning to the tree itself. At about mid-summer, the tree may discard some of its fruit to support more fully a lesser amount, a phenomenon known as the June drop.
By the close of the third year, the essential structure of your tree will be established. Now comes the winter of its discontent. You should examine the clusters of growth for any branches that are crossing, and cut out the offending branch. Thinning will prevent the branches from damaging each other and will allow more light and air to penetrate the tree. From here on, you need only carry out this thinning of growth clusters every two or three years, depending on the vigor of the variety.
Espaliers of the rich and famous
Robert E. Lee’s Virginia family was by no means the only democracy-loving convert to the aristocratic art of espalier, originally used in chilly Europe to grow fruit trees on the sunny side of a garden wall. George Washington had cordon espalier fences of the type found at Stratford Hall dividing the beds in his Mt. Vernon kitchen garden, and flat espaliers against the brick garden walls.
Captains of industry also joined the horticultural show. The original duPont immigrant, an avid botanist, developed a French-style kitchen garden combining vegetables and flowers, its sections divided by cordon apple fences, its beds punctuated with free-standing espaliers, and its edges displaying a variety of elaborate flat patterns, including the beautiful Belgian fence. In duPont’s homeland, gardeners had been outdoing each other since the time of Louis XIV developing ever-more-splendid espaliers, perhaps reaching their crowning achievement—or low point, depending on your perspective—with an espalier developed by M. Lepère honoring the Emperor Napoléon.
 |
| Old espaliers have regal personalities, which they perhaps display best in winter. |
by Ron Wade
February 1998
from issue #13
Fine Gardening Recommended Products

DeWalt Variable-Speed Cordless Reciprocating Saw
DeWalt Variable-Speed Cordless Reciprocating Saw with 6-Piece Saw Blade Set


Comments
Log in or create an account to post a comment.
Sign up Log in