

Stormwater runoff, and the damage it can leave behind, has become a seemingly unmanageable problem for gardeners from coast to coast. The perfect mix of unpredictable and changing weather patterns, urban infill that plots houses just feet apart, and disturbed soil stratification due to poor grading practices can turn a beautiful garden into a chaotic mess in short order. Fortunately, we gardeners have several options for mitigating the problem. These include installing mass plantings of rhizomatous grasses or shrubs that hold the ground in place and slow down stormwater, rebuilding soil structure, and installing dry creek beds.
If that last solution conjures up visions of a ditch filled with haphazardly placed chunks of stone cutting through your garden, think again. A dry streambed can be a beautiful focal point around which to build a garden—while still effectively moving stormwater to more desirable places. I’ve been designing dry streambeds for over 15 years and can promise you there is a style that fits nearly every garden. Hopefully, after seeing the beautiful spaces pictured here, you’ll want one of these features for your very own—regardless of whether you have a runoff problem or not.
Learn more:
A Gallery of Inspiring Naturalistic Dry Creek Beds
Plants Making a Positive Impact on the Environment


Evaluate your site to determine your approach
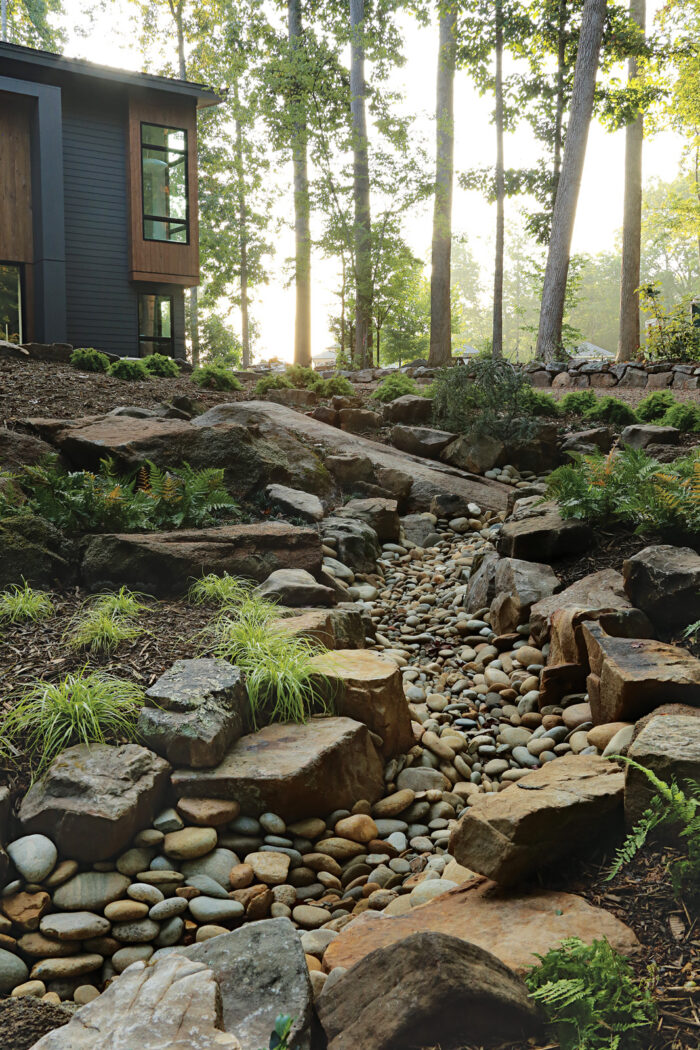
In planning a new dry streambed, the first step is to study your particular space. There are four things to consider: the natural surroundings of your property, your personal aesthetic/style, the problem you are trying to solve for (i.e., how water currently runs through the landscape), and the topographical and/or soil-structure challenges of the site. After all, an ideal dry streambed should be both beautiful and functional.
The second step is to observe and understand how water flows in nature. Aside from the obvious fact that water moves downhill, nature offers subtle lessons in how to create a realistic and efficient streambed. By studying a stream, perhaps in a nearby park, you’ll notice that the water bounces off a boulder, regroups and changes course, and flows until it meets another obstacle before again changing direction. Therefore, gentle curves are essential in laying out a naturalistic streambed. You’ll also notice that smaller rocks and gravel are generally at the bottom of the stream, while larger rocks and boulders are found a bit higher up on the sides. Ignoring nature’s own layering is the main reason that most streambeds look artificial and contrived. Finally, notice how plants grow along the edge and what types they are.
Now that you are armed with a basic knowledge of the style of your garden, how your yard handles water, and how water naturally flows in streams, it’s time to begin building.
How-To
Building instructions for a simple dry streambed
Before grabbing that shovel, contact your local utility companies to have power and water lines marked. Then determine the best site for your streambed, ideally in an existing depression if your property has provided this for you. If not, you can create small rolling berms along the banks later if desired. Consider where the water originates and where you would like it to dissipate. Whenever possible, keeping water on-site is preferable to directing it into a storm drain. Many municipalities even reward homeowners for keeping stormwater on their property.

[ STEP 1 ]
Dig a ditch
To start, dig a ditch at least 3 feet wide and 2 feet deep. It’s generally a good idea to go a bit deeper and wider than you think you need to, in order to accommodate the boulders and river rocks you’ll add later. You’ll need to slope the bottom a minimum of 5° toward the termination point in order for water to flow properly. Not doing so can create pockets of stagnant water—the perfect breeding ground for mosquitoes. If the land is extremely flat, consider installing a sump basin with a pump to send the water to another area of your property where it can be used for irrigation.
[ STEP 2 ]
Design a layout that gently meanders
When digging the initial ditch, be sure to use wider, gentler curves as opposed to tight squiggly lines. Not doing this can impede water flow and create a visually complex scene that fights against the peaceful vibe of your garden. After creating the starter ditch, dig further outward to create some steplike shelves; this is where you’ll site your boulders. Be sure to vary the height of these shelves in order to create a natural feel. Leave room for larger boulders at the beginning and midway point of your curves to simulate water digging out its own course like a natural stream does over time.

[ STEP 3 ]
Select and place stones of various sizes
Look for stones that appear natural in your area of the country, with colors that easily blend in to your garden. When creating a natural-looking streambed, I use at least four different sizes of stone: larger boulders, known in the industry as “three-to-four-man boulders” (the number of people typically needed to move them); smaller boulders, referred to as “two-man boulders” (about the size of a basketball or watermelon); larger smooth river rock (5 to 8 inches across); and smaller smooth river rock (3 to 5 inches across).
Although it seems contrary to logic, place smaller stones on the bottom and larger ones at the top of the trench. The stones should be locked tightly in place, creating an irregular pattern. Blend the sizes together just a bit to create a more natural look. To accentuate this, you may want to place several boulders in the middle of the bed at irregular intervals along the course. Just be certain this doesn’t impede water flow.
[ STEP 4 ]
Build up the banks
You will likely need to build up the soil line behind the larger boulders that are securing the banks of your stream to create a gentle transition between the streambed and the rest of your garden. When doing this, take care not to inhibit the flow of water from your property into the streambed itself. Runoff should be able to enter the streambed at regular intervals along its course. Over time the stone will develop an aged patina. Moss, lichens, and sprouting fern spores will create a more natural and unique appearance. Maintenance on a dry streambed is minimal; generally, it’s just removing leaves and debris that can clog the channel.
|
TIP▸ A weed barrier isn’t always essential Depending on the composition of your soil, you may or may not want to use landscape weed cloth to line your streambed. In my area of the country the soil is mainly clay. We use this to our advantage by embedding our rocks directly into the clay, which holds them firmly in place. If you have very loamy or sandy soil, you may need weed cloth to keep soil out of your streambed. However, do not think that weed barriers eliminate any possibility of weeds. Detritus can collect on the surface of the cloth and create a fertile area for weeds to germinate. |
| Jay’s Plant Picks |
Great options for softening the edges Once your streambed is built, you get to the best part—planting!
You will likely notice crevices between some boulders that make perfect nooks for plants. An array of ground covers, mounding perennials, and dwarf ornamental grasses are all perfect choices. Consider the ultimate sizes of your plants, as you wouldn’t want them to totally hide your creation from view. Look for selections that can have their feet submerged for several days but will not sulk when the soil partially dries out. Here are a few of my favorite plants for along dry streambeds.

Dwarf mondo grass
Ophiopogon japonicus ‘Nanus’
Zones: 6–9
Size: 2 to 4 inches tall and 4 to 6 inches wide
Conditions: Partial to full shade; moist, well-drained soil
Native range: China, Vietnam, Korea, Japan, the Philippines

Weeping blue Atlas cedar
Cedrus atlantica ‘Glauca’
Zones: 6–9
Size: 40 feet tall and wide (kept smaller with training/pruning)
Conditions: Full sun to partial shade; moist, well-drained soil
Native range: North Africa

Sundance™ Mexican orange blossom
Choisya ternata ‘Lich’
Zones: 7–10
Size: 4 to 8 feet tall and wide
Conditions: Full sun to partial shade; moist, well-drained soil
Native range: Southwestern United States, Mexico

‘Brilliance’ autumn fern
Dryopteris erythrosora ‘Brilliance’
Zones: 5–9
Size: 18 to 24 inches tall and 18 inches wide
Conditions: Partial to full shade; moist, well-drained soil
Native range: Japan, China, Taiwan

‘Everillo’ sedge
Carex oshimensis ‘Everillo’
Zones: 5–9
Size: 18 to 24 inches tall and wide
Conditions: Partial shade; moist, well-drained soil
Native range: Japan

Smooth hydrangea
Hydrangea arborescens and cvs.
Zones: 3–9
Size: 3 to 5 feet tall and wide
Conditions: Partial shade; moist, well-drained soil
Native range: Southeastern United States
Jay Sifford is an award-winning garden designer in Charlotte, North Carolina.


Comments
Log in or create an account to post a comment.
Sign up Log in