
No one has to live with those ugly gullies that hard rains leave behind. When you’ve got a spot where runoff is ruthlessly washing away everything in its path, there’s one attractive fix that won’t break the bank: a dry streambed.
For the do-it-yourselfer, building a dry streambed is a relatively simple weekend project, requiring only a shovel, some landscape fabric, and a wide selection of stones. (Heavy machinery and big boulders are strictly optional.) The trickiest part is crafting a design that looks natural. Although a dry streambed is essentially a rock-lined drainage ditch, you don’t want it to look like one. With a little insight on how real creeks are shaped and formed, you can create a streambed that complements the rest of your garden and sends your erosion woes packing.
Five Rules for a Natural Look
In nature, water flows over land in predictable ways. To design a dry streambed that looks real, you need to know a few basics.

1. A bend has one steep bank and a floor that gradually slopes upward.
In real streams, the outer bank has the deepest water and the fastest current, while the inner bank has slower-moving, shallower water. As water flows around a bend, it cuts a groove along the outer edge and deposits that sand and gravel on the inner bank, forming a beach.
2. Flowing water gently curves.
For the most part, streams are straight for only a short distance and rarely form a rhythmic pattern of equally sized and spaced bends.
3. Water collects at low points.
Streams naturally form where the land dips. Thus, any water feature built higher than the surrounding landscape looks awkward.
4. A channel has two vertical banks and a relatively flat floor.
Channels are straight and narrow and, more often than not, mark the transition from one bend to another.
5. The steeper the slope, the narrower the bends.
When a stream flows down a hillside it jumps back and forth because the water moves quickly and has little resistance. Flat landscapes, conversely, slow down the water’s speed and allow streams to nibble away on the outer banks, thus creating wide bends.
[ Step 1 ]

Design a layout that gently meanders
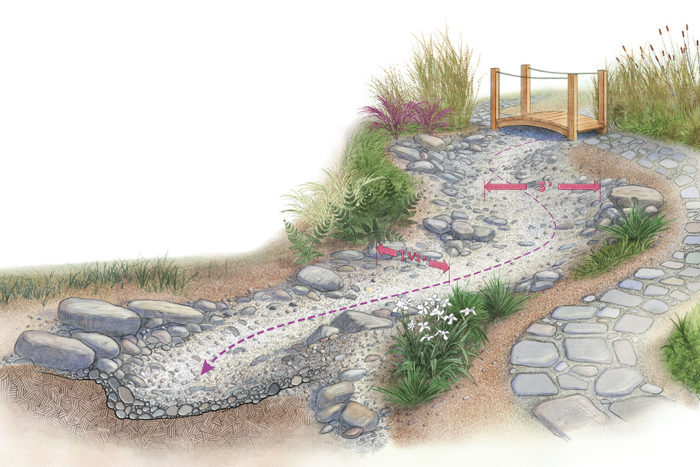
Once you grasp how real streams work, you can create your own design. To determine your streambed’s footprint, use a hose to mark the center flow line (photo, right). It’s important to occasionally step back and get a wide-angle view of your layout. You will usually discover that it needs a few tweaks. Pull the bends one way or the other, taking care not to create bends in an equidistant, sound wave–like pattern. It’s tempting to make short, quick curves, but when you view the streambed from a distance, it will usually look more like a crooked straight line than a flowing stream. Once you are happy with the stream’s path, mark along the side of the hose with lime dust or spray paint (photo, right), and put the hose off to the side.

The next step is establishing banks. Using the centerline as a reference point, mark out the floor’s edges with lime dust or paint so that the bends are roughly twice—or a little less—the width of the channels. If the bend width is 3 feet, for instance, the channel should measure 1½ to 2 feet wide. Just like real creeks, dry streambeds come in all sizes. Pick a width and length that corrects your erosion problem without overwhelming your garden.
[ Step 2 ]
Dig a series of channels and bends

Most of the brain work is now done, and it’s time to begin shoveling. To allow room for soil and cobbles along the banks, start digging 6 inches outside of the lines that mark the floor’s edges and move inward. Keep in mind that every channel should have vertical, somewhat symmetrical banks, while every bend should have a vertical bank on the outer edge and a gradually sloping beach on the inside edge (illustration, above).
A foot is the farthest down you will ever need to dig. The outer bank of a bend and the center of a channel are the deepest sections of a stream. To form a shallow beach along each bend’s inside bank, dig down only 6 inches. You can use the soil you generate from digging to build up the stream’s edges and establish sloping beaches. Once the streambed is dug out, rake away dirt clods and stones until the surface is relatively smooth.

Win the battle over weeds
Landscape fabric is the first material to lay down. I prefer the clothlike material over the thin, plastic, hole-punched weed barrier, which tears easily during rock placement. Trim the filter fabric to align with the outer edges of the cut streambed, and secure the fabric with pins. The filter fabric will allow water to percolate into the ground and keep rooted seeds from pushing up from below. The more rain runoff that flows down your dry stream, the higher the chance that seeds and debris will get trapped between your stones. Although some seeds will inevitably germinate, weeds rooted in gravel are far easier to pull than weeds rooted in soil.
Rounded stones in a variety of sizes are best
In nature, rivers don’t have uniformly sized stones, and neither should your dry streambed. Contact local gravel and sand suppliers to see if they carry river run. This rounded gravel mix is the ultimate material to use for creating your streambed because it is nothing more than a big scoop of natural riverbed. It ranges in size from 6-inch-diameter river cobbles down to sand. If river run isn’t available to you, do your best to obtain the widest range of stones you can, but avoid crushed gravel, which never looks natural. (Sand isn’t necessarily required.) As a rule of thumb, 50 percent of your purchase should consist of 2- to 5-inch-diameter river cobbles. Larger (6- to 8-inch-diameter) stones should make up 20 percent of your order, and smaller pebbles, measuring 1½-inch-diameter or less, should account for the rest. If you decide to incorporate boulders, they, too, should share the same character and feel as your cobbles and gravels.
[ Step 4 ]

Use logic when placing rocks
When it comes to laying out stones, start with the largest, finish with the smallest, and keep the placement random.
Large and medium-size cobbles
Scatter the largest river cobbles on the banks, place them randomly on the floor, and widely space them on the beaches. Then do the same with the medium-size cobbles. It’s important to note that the top edges of these stones should be no more than ½ to 1 inch above the surrounding soil. The exception is a few large river cobbles that infrequently peek up along the banks.
Boulders
In real streams, boulders often cause water to change course. If boulders are a part of your design, use them the same way. Place them on the outside bank of a bend, at the apex of a bend, or a little toward the downhill side of a bend. If you are grouping boulders together, remember that odd-number groups look better than even-number groups. Once you’ve decided on placement, bury the bottom third of each boulder so that the widest portion meets the ground and that no undercuts are visible.
Gravel
Small gravel is the icing on the cake. Use it to cover the beaches and to fill in odd-shaped pockets and nooks between river cobbles. Rake the surrounding soil to the top of the banks and beaches to create smooth transitions.
Jeff Snyder is a landscape architect and owner of Artistic Rock Creations in Buellton, California.
Photos: courtesy of Jeff Snyder. Illustrations: John Hartman; courtesy of Jeff Snyder


Comments
Log in or create an account to post a comment.
Sign up Log in