

A path invites us into the garden, bestowing the freedom to wander and enjoy the results of our labors. On a more practical level, paths allow easy access for performing those labors. Pathways also define the style of a garden, creating a mood of formality or casualness, framing the plantings, and establishing viewpoints.
The path illustrated here, gravel bordered by a cobblestone curb, is adaptable to many garden styles and is relatively easy to build and maintain. This style works well in a formal geometric garden, but it can also be designed to wander with the landscape. The same style would work even in a woodland setting if you replaced the top couple of inches of gravel with bark chips.
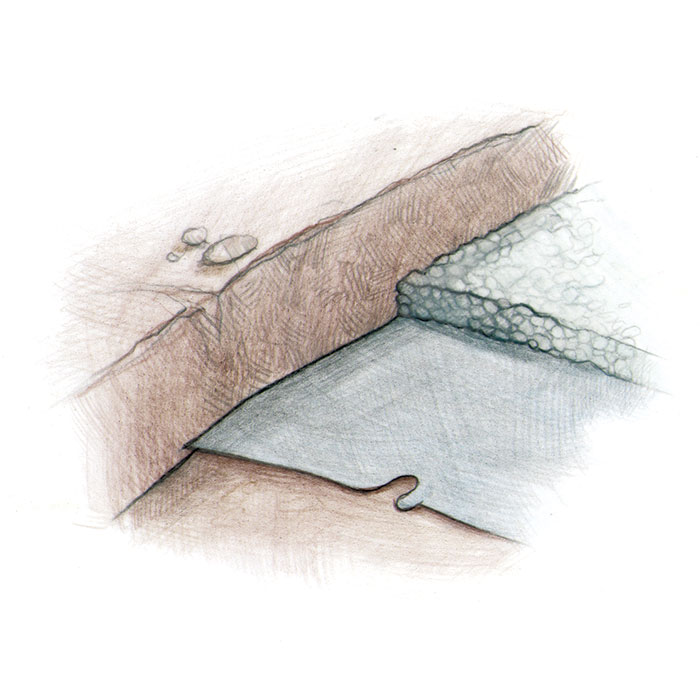
To build this type of path, you begin by digging a shallow trench, lining it with weed barrier fabric, then filling it with an inch of gravel. You then stand cobblestones on edge atop the gravel base layer, adding or subtracting gravel underneath until the cobblestones form a smooth, even line. Once the stones look good, you tamp soil behind the cobbles and fill the path with additional gravel until just a couple of inches of the stone project above the ground. For stability, the cobbles must be buried to approximately three-quarters of their depth.
Few special tools are needed, just a 4-foot builder’s level, a tape measure, stakes, and string. A sturdy wheelbarrow is a must for moving the gravel, and a pointed shovel is the best tool for digging into it. You’ll also need a dirt rake for smoothing the gravel and for tamping and smoothing the soil behind the cobbles. Building a path is labor intensive; getting help and pacing yourself will make the job manageable and more enjoyable.
Selecting stone and gravel
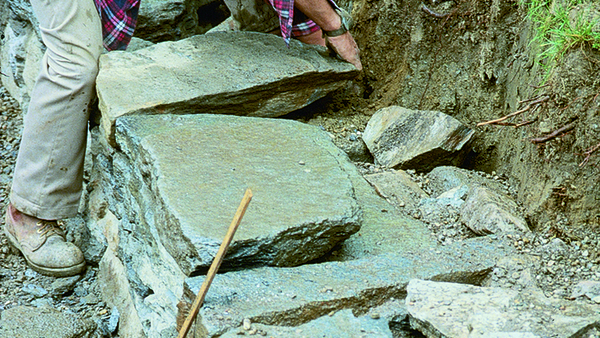
Cobblestones can vary in size, but the ones I used—8 inches wide, 11 inches long, and 4 inches thick—are a good size for curbing. When shopping for stones, take a good look before you buy. The cobblestones should be very close to rectangular and of even thickness. If the cobbles vary a lot, they’ll be hard to fit together and to form into a smooth line.
The best gravel for covering the path is called pea stone. The stones in it are about the size of jelly beans. Pea stone is the coarsest gravel that can easily be shoveled and shifted by hand, an important consideration when setting the cobblestones in place. The coarseness of the pea stone also gives the path texture, encourages drainage, and discourages weed growth. If you want, the top few inches of material can be different from the underlying pea stone foundation. Using white marble chips for the top layer would create a very different look than the darker pea stone.
Since even a small project will need several tons of gravel, try to have it delivered close to the garden. If at all possible, dump the stone on a paved surface or on plywood sheets. I learned the hard way that the bottom of a gravel pile dumped onto grass gets tangled in the lawn, making the last few inches nearly impossible to pick up. What gravel you do recover will be loaded with stems and dirt.
Designing a path
Only a few basic rules pertain when designing a gravel path, but they’re important. Ignoring them will make construction difficult and the path awkward to walk on. The path can go up or down a gentle slope with a rise or fall of up to 1 inch per foot. On a steeper slope, the gravel will shift and gradually work its way down hill. Steeper slopes are best handled either by creating level runs joined with steps, or by zigzagging across the slope’s face.
For easy walking, the path should be level from side to side. For the path to run across sloping ground, recontour the slope to create a level terrace for the pathway. Make the terrace wide enough to leave 6 inches of level ground outside the cobblestones before continuing up or down hill.
Pathway, start to finish
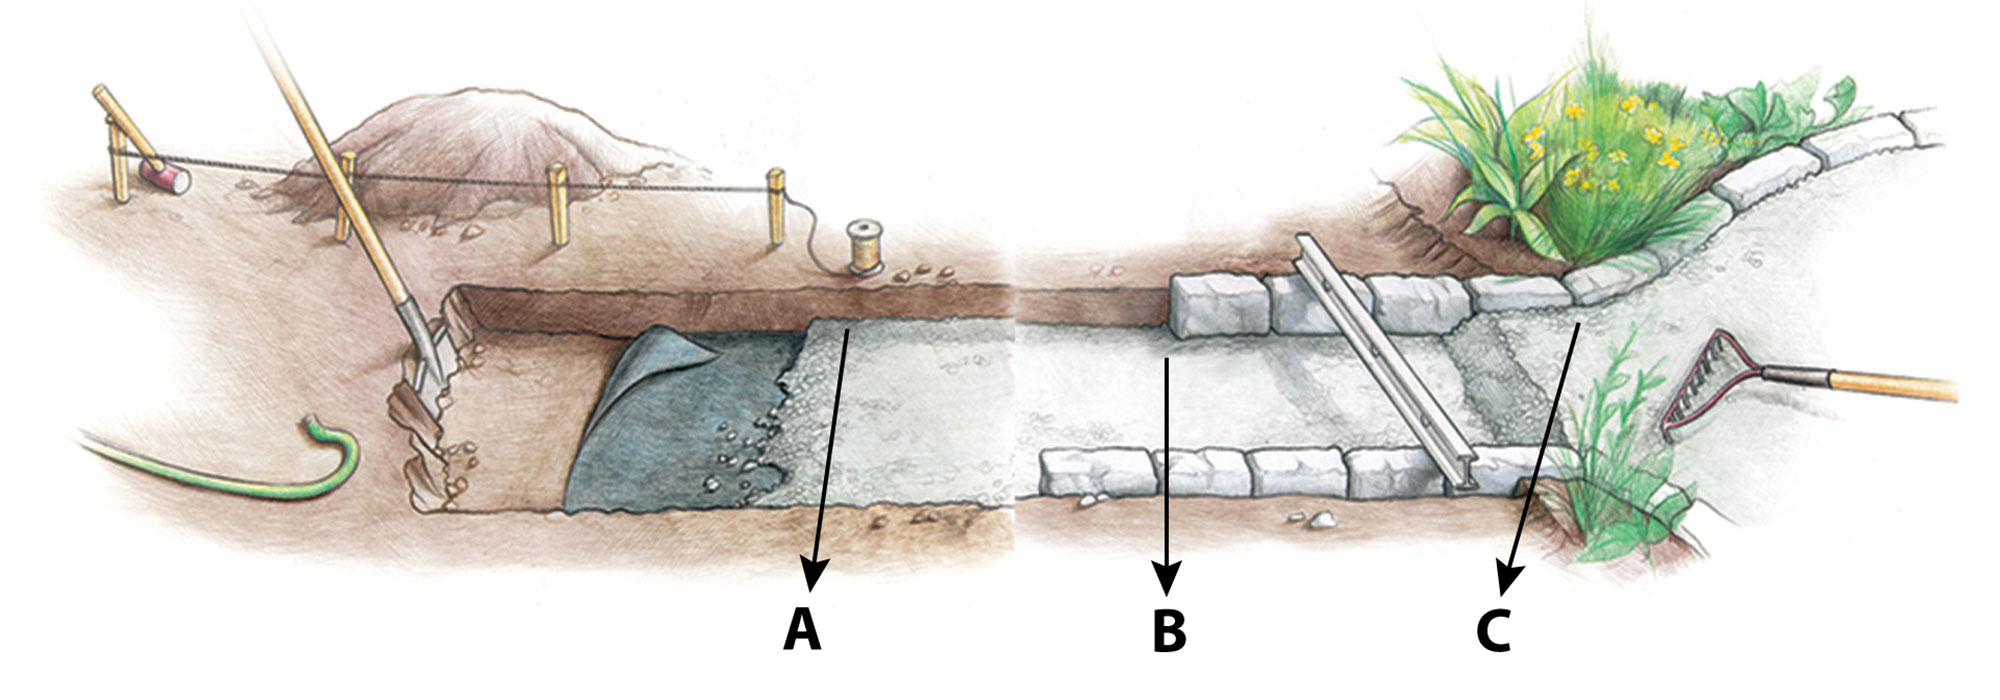
Mark the path with stakes and string set 8 inches out to give yourself room to work. Dig the path 1 inch shallower than the height of the stones. Lay weed-barrier cloth in the bottom of the trench and cover with 1 inch of gravel (see drawing A, below). Place the stones (B), then backfill with soil along the outside. Fill the path with more gravel (C) and rake it smooth.
Because cobblestones can’t be cut to size, avoid designs for which the stones have to fit exactly into place. When the stones must fit against a fixed object, start at the fixed end and work away from it.
Main paths should be at least 3 feet wide between the outside edges of the cobblestones. If you want the paths to accommodate two people side by side, make them a minimum of 4 feet wide. Side paths can be a little bit narrower, but try not to drop below 30 inches wide or you’ll find them restricting.
If you are going to finish the ends of the paths with cobbles laid straight across, the path will need to be an even number of stones wide, but a path doesn’t have to end by being simply squared off. The stones can make a half circle or expand into a larger circle or square, creating an accent in the garden’s design.
Laying out the path
Keeping the basic rules in mind, lay out the path with stakes and string or by laying lengths of wood lath (1 inch by 3 inch wood strips) on the ground. Using wood lath works especially well because it gives you a clear visual sense of how the finished path will appear. For a winding path, use lengths of garden hose to outline the path’s edges.
If you find that the ground needs to be recontoured to keep the path level crosswise and only gently sloping over its length, now is the time to do your major earthmoving. This can be heavy work, but don’t skimp on this step. Getting the ground properly contoured will make installing the cobblestones much easier, and the finished job will look better and be more comfortable to walk on.
Building the path
Once you have the ground contoured and the edges of the path outlined, hammer in a set of stakes 8 inches out from the edge of the path, and run a string taut from stake to stake. This will give you a stable reference point for digging, since the inner stakes or hose will need to be removed for digging the trench. Excavate about an inch shallower than the width of the cobblestones, a 7-inch-deep trench would be right for 8-inch-wide stones (remember that the stones will be set on edge, so their width becomes their height). At this depth, with an inch of gravel underneath the cobblestones, the finished curb will be two inches higher than the ground. Determine the depth by laying a board across the width of the path and then measuring downward.
The width of the trench should be a couple of inches wider on each side than the final width of the path. Digging the walls to 6 inches away from stakes set 8 inches out will give you the extra width you need to handle the stones and ensure that there is a full layer of gravel under them. As you dig, set aside the top couple of inches of soil to be used later as backfill against the outside of the stones. The rest of the soil you remove is waste. It is usually best to do all of the trenching at one time; after that, the cobbles and gravel can be installed a section at a time.
Once the trench is dug, pack down any loosened soil to prevent later settling. Then lay the weed-barrier fabric, making sure it completely covers the width of the trench. Next, spread an inch-deep layer of gravel on the fabric and rake it out level (see section A). Now you’re finally ready to start laying the cobblestones.
Begin by placing four or five cobbles in a line down one side of the path. As you place each stone, wiggle it and press down. The stone will settle into the gravel an inch or so and become fairly fixed and stable.
After you’ve set this first group of stones, step back and check their alignment. They should be even in height, a couple of inches above ground level, forming a straight line or smooth curve as needed, 8 inches in from the outer stakes (see section B).
Readjust the stones until they look right.

Continue setting stones down one side of the path, checking the alignment as you go, until you’ve gone 8 to 10 feet or you’ve come to an intersection. Now go back to the beginning of the path and start setting the opposite curb’s stones in place. Use a level to make sure the new stones are set at the same height as the opposite curb. Use a tape measure to keep the width of the path even. For convenience, you could cut a length of lath the width of the path to use as a gauge. Make sure the stones on each side stay even with each other. If one curb is running a few inches longer than the other, you’ll run into problems at intersections.
Because cobblestones are irregular, setting them and getting them to look right is more art than science. Trust your eye and readjust until everything looks right. For complex layouts, you should have all the cobblestones laid in place and adjusted before you backfill with soil and gravel.
Once you are satisfied with the layout of the stones, backfill the soil, packing it firmly behind the stones. After the backfill is in place, the only remaining step is to fill in the path itself with more gravel, raking it and the soil outside the curb to even up the exposure of the cobblestones (see section C).

All that’s left to do after that is to fetch yourself a cold drink and a seat in the shade and admire your handiwork.
—Woodworker, Furniture designer, and gardener John White lives in Newtown, Connecticut.
Illustrations: Bob La Pointe.
December 2000
from Kitchen Gardening #30


Comments
Log in or create an account to post a comment.
Sign up Log in