
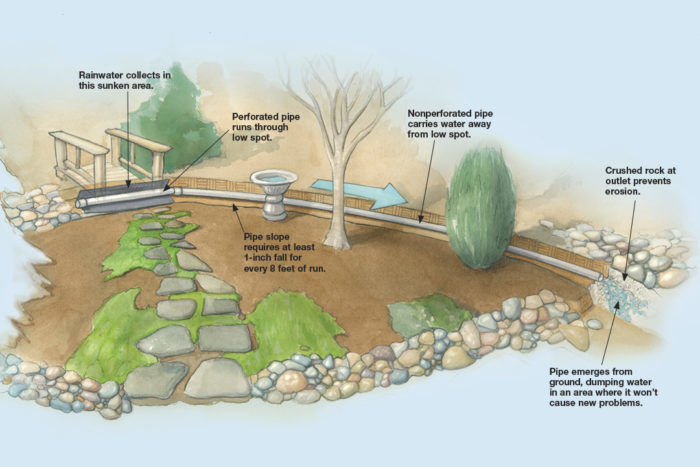
If your garden has a pesky wet spot, perhaps it’s time to consider installing a French drain. In a high-tech world, the French drain is refreshingly old-fashioned. Imagine a gravel-filled trench with a perforated pipe at the bottom, which collects water and carries it away from a soggy area. That’s all a French drain is—nothing fancy but certainly helpful.
You can use a French drain to dry out any low place where water accumulates after it rains. It’s perfect for taking care of mushy lawns or preventing water from building up behind a retaining wall, which could cause it to collapse. It’s also common around house foundations, where it can help stanch basement flooding, mold, and mildew. And because the design is so simple, anyone with a good shovel and a strong back can build one.
Gravity does most of the work
In a French drain, accumulated water flows naturally down an ever-so-slightly-sloped pipe. As long as you have gravity, you’re good to go. Water seeps into the gravel and quickly plummets to the bottom of the trench, where it enters a perforated pipe. It then flows through a downward-tilted nonperforated pipe to a disposal zone, where the end of the pipe simply emerges from the soil. The pipe needs only a slight slope to move water effectively. If, however, your property is completely flat or a portion of your drain runs uphill, you’ll need to pump the water or run your pipe across an adjacent sloping property. (If you’re contemplating the latter option, be sure to get written permission from your neighbor.)
Water usually flows gently and in relatively low volumes through a French drain, so you shouldn’t have to worry about soil eroding where the pipe emerges from the ground; you can protect the soil around the end of the pipe with a little coarse, crushed rock, just in case. The main thing to remember is not to dump the water where it will cause new problems, such as flooding neighboring land or flowing across paved areas.
How to dig your own French drain
Before breaking ground, first look at where the water is coming from and where you want it to go. Be sure that you have a gentle slope to make the system work and that you find a good spot to dispose of the water. If your design requires a very long or deep trench, you might consider hiring out the digging to save your back.
Step 1. Get the depth and slope right
Digging is the hardest part of this job. Make the trench about a foot wide; in most cases, that’s all you need to attract water. And make it about 18 to 24 inches deep; the depth will vary depending on the depth of your soggy area. If your French drain is against a foundation or retaining wall, you’ll need to dig just below the footing. (To avoid jeopardizing the structure’s integrity, however, consult first with a landscape architect or structural engineer.)
Getting the right slope is also essential. Too little “fall” (as the pros call it) will allow water to stand in the system rather than drain away. Aim for a minimal slope of 1 percent, which is approximately 1 inch of drop for every 8 feet of run. Use your level to check.
Step 2. Install the pipe, and add gravel
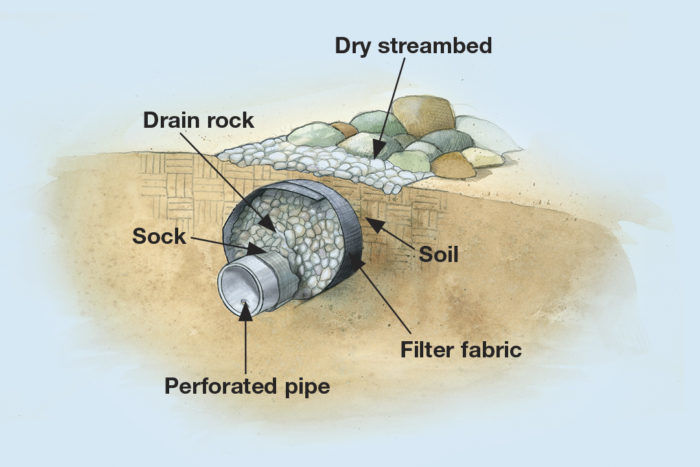
Once your trench is the desired depth, cut the filter fabric to fit, and drape it into the section of the trench that runs through the soggy area. The filter fabric allows water to run into the drain while keeping out fine soil particles that could clog the system. Slip the fabric sock (cut to fit) over the perforated pipe; this sock acts as backup filtration. Place the perforated pipe into the bottom of the trench, right on top of the filter fabric. Make sure the holes in the pipe face downward so that the water will run into them (corrugated pipe has holes all around). Put a cap on the upper end of the pipe to keep soil out. The couplers between lengths of pipe can either be friction-fit or cemented together with specially formulated pipe glue. (The correct method of connecting pipes will depend upon the type of pipe you’re using.)
Shovel drain rock over the perforated pipe, filling up the trench within a few inches of the ground’s surface. Flip the filter fabric over the rock, as if you were making a giant burrito, and cover it with soil up to ground level. You don’t need to use perforated pipe all the way to the end of the line—only where you want to collect the water. Once outside of the sunken area, switch to nonperforated pipe buried directly in the soil. Compact the soil covering the nonperforated section so that it doesn’t settle later, and make a record of where the drain runs so that you can avoid damaging it in the future. Replace the sod and any plants you had to dig up, and the job is done.
Supply list
• Trenching shovel
• Sighting level or simple string level
• Filter fabric made for French drains (sometimes called “trench wrap fabric”)
• Sharp shears (for cutting filter fabric)
• 3- or 4-inch-diameter perforated, smooth-walled plastic pipe or corrugated polyethylene pipe, wrapped in a special filter fabric called a “sock” (usually sold separately)
• Saw (for cutting pipe)
• Pipe cap
• Pipe couplers (for connecting lengths of pipe)
• ¾– or 1-inch-diameter drain rock
• 3- or 4-inch-diameter nonperforated pipe
Why learn the hard way?
You’re bound to run into a few obstacles during the planning-and-installation process. Here’s how the pros dodge the most common stumbling blocks.
Buried roots and rocks
When digging, carefully tunnel under large tree roots, being careful not to damage them. The rocks will have to be dug out; rent an electric jackhammer if necessary. Remember, it’s important to keep the bottom of the trench evenly sloped so that water flows freely through the system.
Paving
You might have to go under or across paved areas, which is a challenge. It’s not too hard to tunnel under a narrow walkway using a digging bar or a special hydraulic nozzle. Driveways are more difficult: Pavement can be removed and replaced, or contact a company that specializes in underground boring.
Other drainage systems
Don’t connect your drain to the sewer system! It will overload the community treatment plant and is illegal in many communities. You should also keep the French drain separate from downspouts and site drains. They handle different flows of water, and it’s possible that the other drains would send water back into the French drain, causing overload.
Owen Dell, ASLA, is author of Sustainable Landscaping for Dummies and principal of Owen Dell & Associates, a landscape-architecture firm in Santa Barbara, California.
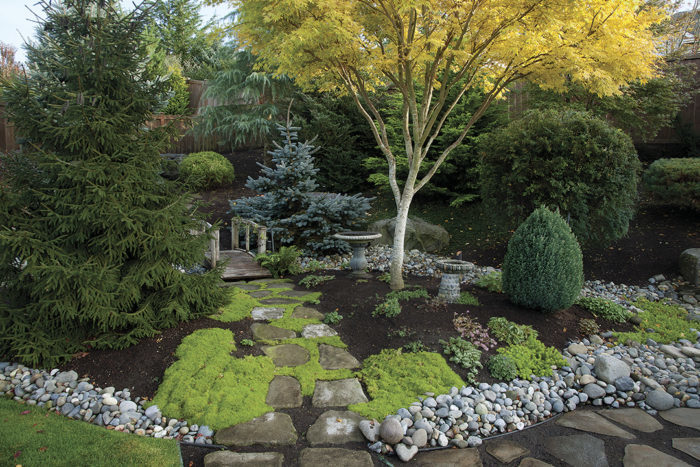
Photo: Joshua McCullough/www.phytophoto.com. Illustrations: Robert LaPointe


Comments
You explained these steps very well. I had a company come in to provide French drain system installation last year, but if I had known it could be this easy I might have done it myself. Still looks like lots of hard work though, and I'm happy with the French drain I have. It works wonders!
Log in or create an account to post a comment.
Sign up Log in