October is the beginning of my gardening year. That’s when I prepare the garden to face the winter rains while at the same time readying it for an early start come spring.
Our first few years of gardening in the Northwest taught us that a benign climate doesn’t mean all goes well in the garden. The winter rains can affect the pH of the soil, leach nutrients, and turn our garden beds to mud. Come summer, the same beds can dry out and be difficult to work. Then there are the slugs. An off-season strategy of mulching the beds solves most of the problems. With summer’s garden debris removed and a thick layer of mulch applied, I can go about my winter maintenance chores: storing the pots, scrubbing the potting container, organizing the tools, and setting out the green tomatoes and late-season pears on the potting bench to ripen. Then we wait.
My autumn yard work serves double duty since I gather leaves and carry them no further than the vegetable garden, where I pile them 2 to 4 inches deep. I use healthy tree leaves and no other form of yard trimmings. Grass contains both grass and weed seed, roses have black spot and powdery mildew, and other plants are host to numerous pests.
Preparation for spring begins in the fall
1. Mulch with autumn leaves. There are many ways to enrich and lighten soil texture. The most convenient method for me is to mulch the garden beds with autumn leaves that I gather elsewhere around the yard. Because the leaves decay at different rates, the more durable leaves-such as wisteria or hawthorn-keep the soil sheltered for months and keep the soil airy when turned under. I have had no disease problems from the leaves.

2. Netting secures the leaves. The only difficulty in using leaves as mulch is that you can wake up the next morning to find them blown out of the vegetable garden and back under your trees. Bird netting is a perfect solution. Because I use raised beds, I simply staple the netting around the perimeters of the cedar planking, bunching up short lengths of netting and stapling through the gathers. I use 3 / 8-inch staples, which are short enough to come out easily; come spring, I tug on the gathered netting, and the staple pulls out without tearing the netting.
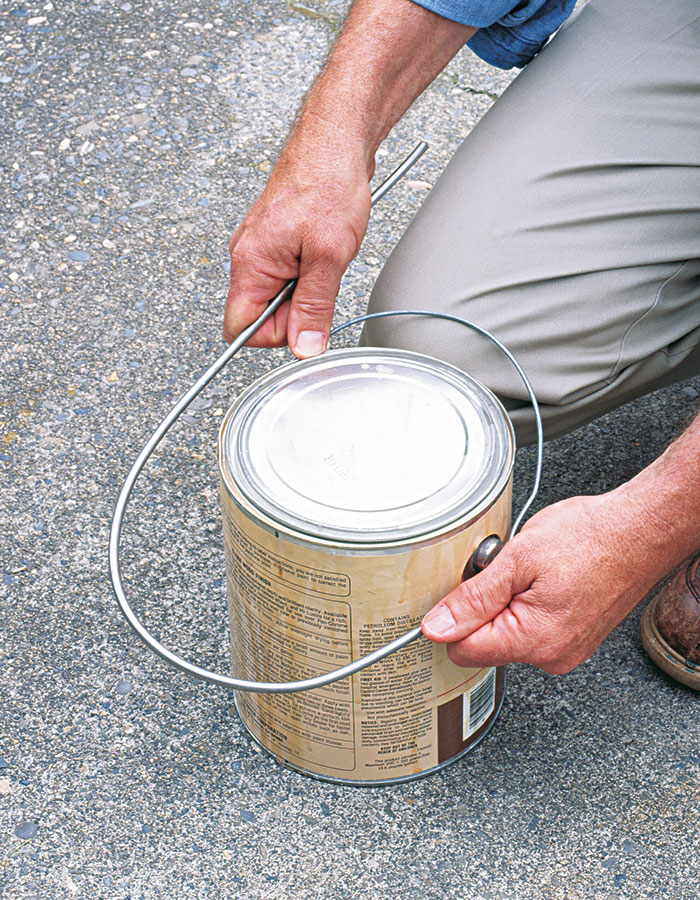
3. Steel hoops are easy to bend. Although American gardeners seldom use them, hoops like these are everywhere in France, where they are a favorite garden perimeter. I made my hoops out of 3 / 8-inch stainless-steel tubing from a local salvage yard. To keep the shape uniform, I bent lengths of the tubing around a paint can; I left about 6 inches extra on either end to put in the ground.
4. Hoops hold down the netting. I use the hoops to border our herb bed and several flower beds. Unlike sunken perimeters, such as plastic bed borders, the hoops can be readily removed and reinstalled if desired. Here I’m using the hoops as an alternative to staples to hold down netting over leaf mulch. If your garden isn’t divided into raised beds, you can stretch netting over very large expanses of it. The steel hoops make convenient tie-downs and beat lugging bricks and stones around. If you want the netting to be tight, tilt the hoops away from the garden in the manner of a tent stake.
Of course, mulch doesn’t stop the rain, but the rain cannot pelt the beds into a muddy mess, and the leaves slowly feed the soil. In addition, leaf mulch shades the soil and helps keep weeds at bay. In Zone 8, weeds are perfectly willing to sprout and grow most of the year; they go about their business until a hard frost stops them. A mulch of leaves greatly reduces my spring weeding chores.
I cover the leaf mulch with bird netting, tacked down with staples or metal hoops of the sort my wife and I noticed in France. In the early spring I roll up the netting and set it aside. My first spring task is to turn the soil, both to loosen it and to blend the remaining leaves. I use a three-pronged hoe that, like the hoops, is of European origin.
To start the spring season early, I employ two tactics when I set out plant starts or seed the beds. For beans and radishes or almost any seeds, I create a tent out of the netting to keep out squirrels, birds, and cats. I place the hoops in the center of the beds like a tunnel of croquet wickets and stretch the netting over the top. That leaves one problem: slugs.
Netting and cloches pamper seeds and seedlings
1. Cultivate with a three-pronged hoe. Much to my surprise each spring, the netting is never tangled in leaves because of the decay process that occurs as the garden overwinters. I roll up the netting for storage and use it year after year. I’ve used several brands, and none has deteriorated from weather or sun exposure. I turn and aerate the soil with a three-pronged hoe. This tool is easy on the back
because it lifts just a quarter of the volume of a conventional fork, and because you pull it rather than lift it.
2. Netting protects seeds. Once the soil is turned and the leaves are worked in, the beds look like an achievement in themselves, even without the vegetable seeds and transplants. All the squirrels, birds, and neighborhood cats will agree that your handiwork looks tempting. I used to find my garden undone by the following morning-seeds asunder, starts dug up, and cat business to boot. No more. Again I cover the beds with netting and again I use the hoops-but this time the hoops go down the middle of the beds to make a tent out of the netting. Once covered, the beds are safe from local wildlife.

3. A cloche protects transplants. Like metal hoops, the glass bell, called a cloche, is another classic European device {probably French) for the vegetable garden. The cloche is a one-plant cold frame and it works like magic for early spring starts such as lettuce. Why not use a cold frame? With a cold frame the plant must be moved; with a cloche the plant is undisturbed when it is time to remove its cover.

4. Plastic jugs make cheap cloches. The problem with the cloche is the unit cost for a dozen or more lettuce starts. Cloches cost at least $50 apiece in the States. I needed a cheap substitute; otherwise, my $1 package of lettuce would become the most expensive lettuce on earth at $600 for a dozen heads. I use plastic wine jugs and cut off the bottoms. I leave the lid off the bottle and water through the opening. Two-liter soda bottles will work but they are much smaller. Check your supermarket for transparent containers that will do the job, and give you early lettuce for pennies.
-D.R.
Here again, an old European garden practice comes to the rescue: the cloche. Those glass bells looked to me like a long-gone Victorian invention until I saw them in an upscale garden catalog—with a very contemporary price tag. The genuine imported cloche is expensive, made of glass, and seldom seen. Still, it’s a great way to create a micro-climate for early spring planting. I use plastic wine jugs instead, though there are many products that come in similar plastic containers. Plastic containers allow light to reach the plants and serve much the same purpose as the glass bells, at little or no cost. The bottoms of the plastic jugs can be cut off with a utility knife or scissors. I leave the lid off the bottle and water the plants through the opening. With Bibb lettuce, I leave the cloche on until the plant is ready for the table. With leaf lettuce or romaine, I remove the cloche before the plants outgrow their quarters.
Although the bird netting will keep most creatures away, slugs are another matter. The cloche is close to a perfect solution. It takes a very bright slug to climb the cloche and enter the top opening.
—David Rigby gardens from early spring to late fall in Seattle, Washington.
Photos: Rob Vinnedge and North Overby.
February 2000
from Kitchen Gardening #25


Comments
Log in or create an account to post a comment.
Sign up Log in