
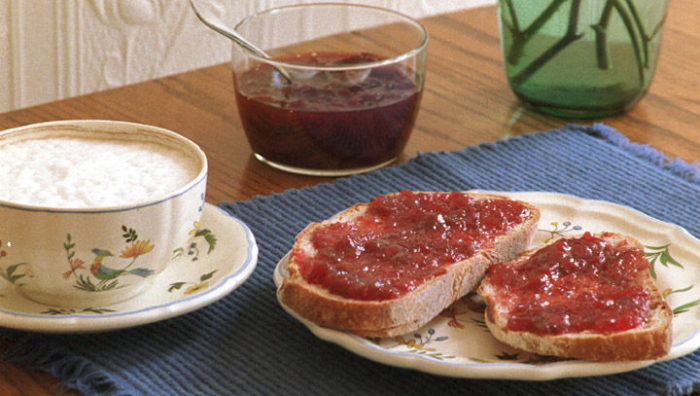
It’s a cold January morning, wind blowing, rain streaming in sheets down the windows. I’m settled at the table with open newspaper and my usual breakfast—strong coffee with steamed milk and toasted country bread with homemade preserves. The root of my rhubarb plant lies dormant underground in the garden, my pear tree is barren, a skeleton on the hillside, and peaches are a distant memory from last summer—until I bite into the toast, slathered with ‘Red Top’ peach preserves put up last July. An afternoon’s work six months ago lets me start my winter mornings with a burst of flavor. You can do the same by preserving fruit, either grown in your garden or purchased from a favorite source.
During the early years of my bakery, we made the occasional case of preserves, and they became so popular that we added them to our regular repertoire. We followed a method described in an old dessert book by the French pastry master Lenôtre, and it worked every time.
A few simple steps make the difference
The recipes at the end of this article follow the same formula. Once you know it, you can experiment with your own combinations. But first, there are a few important things to remember.
Get the right ratio of fruit to sugar. Many classic preserve recipes call for equal amounts of fruit and sugar. However, I prefer a blend of 60 percent fruit and 40 percent sugar, by weight. A 60/40 blend includes enough sugar to preserve the fruit and aid in the jelling process, but allows the flavor of the fruit to come to the fore. If at all possible, use a scale to measure the fruit and sugar. (As a baker, I can’t extol enough the virtues of weighing over measuring.) Although one cup of granulated sugar will consistently weigh 7 ounces, the weight of a cup of fruit varies with the size of the fruit pieces and how tightly they’re packed into the cup.

Macerate the fruit and sugar overnight. The next trick is letting the fruit and the sugar sit for a day before anything even comes close to the stove. Arrange the prepared fruit and sugar in alternating layers, three of each, and refrigerate overnight, or up to three days. As you sleep, the sugar magically pulls the liquid from the fruit. The next day, drain and save the resulting syrup from the fruit by pouring everything into a colander set in a large bowl. Scrape any undissolved sugar into the syrup.
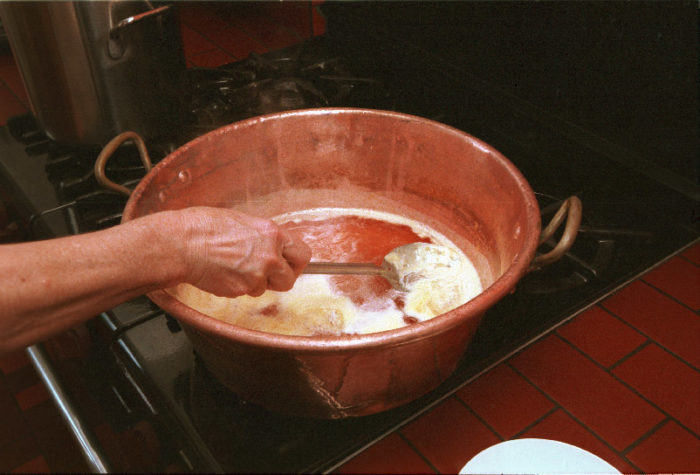
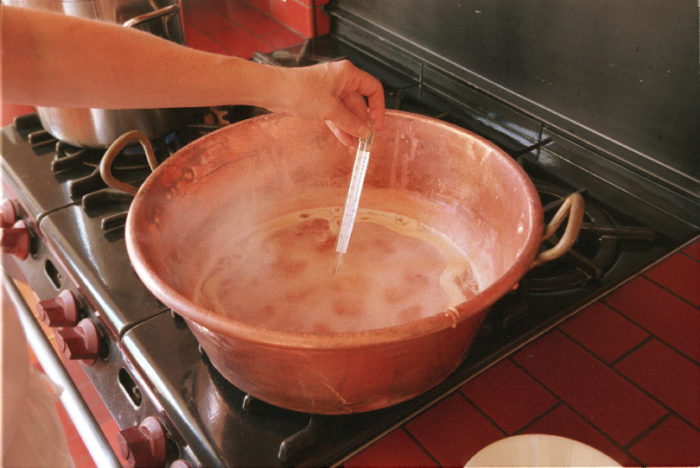
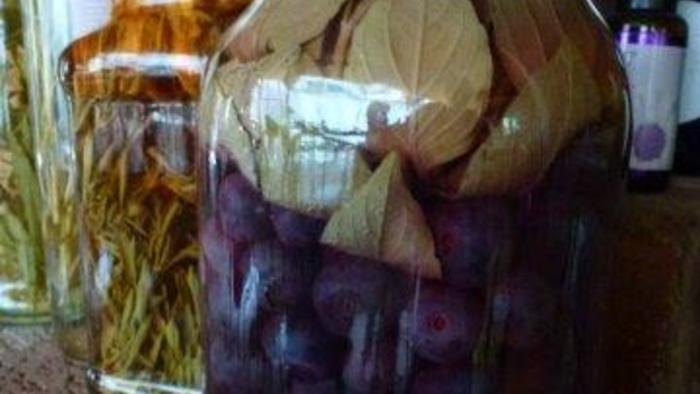
Cook the liquid, then the fruit. Put the syrup in a heavy, nonreactive pot that is wider than it is deep. An unlined copper canning kettle is the best vessel to use, if you have one (photos, p. 31). Copper is such a good conductor of heat that it cooks the preserves quicker and more evenly than other metals. A large, heavy stainless steel pot works just fine, though. Cook the syrup over medium-high heat to 230˚F (110˚C). This will evaporate excess water. Foam will form on the surface. Skim it off and discard it so your preserves won’t be cloudy.
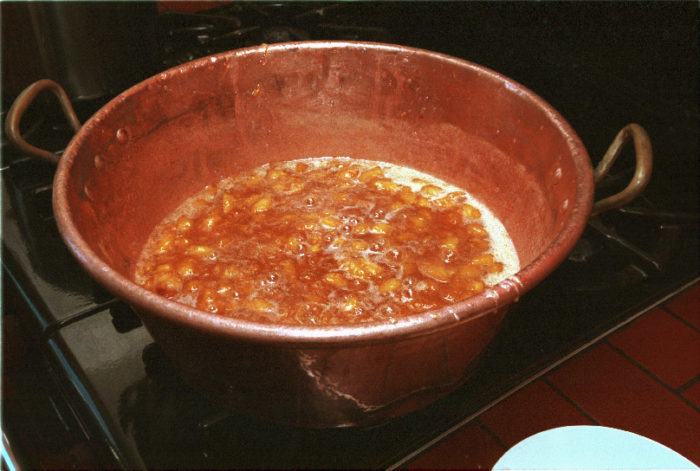
Only when the syrup reaches 230˚F do I add the fruit. This two-step cooking keeps the fruit from overcooking and losing its structure. Add the fruit, return to a boil, and lower the heat to medium. Cook to 221˚F (105˚C), or until the mass is noticeably thicker, the fruit is translucent, and the sound of the cooking changes from a quiet bubbling to a thick splatting. This often happens at a slightly lower temperature, depending on the ripeness of the fruit.

If you’re not sure whether the preserves have cooked enough, put a tablespoon of them on a plate and put it in the freezer for a few minutes. (Take the preserves off the heat while you do this.) If the cold preserves have a consistency you like, proceed to the bottling step. I prefer preserves that are set, but still slightly runny. If they are too stiff, the rubbery texture detracts from the taste.
Some Fruits Need Help to Thicken
Cooked preserves will cool to a spreadable consistency only if they contain the proper balance of pectin, sugar, and acid. Fruit, especially the seeds and skin, contains pectin molecules, which, when heated with sugar in a sufficiently acidic environment, link together and give the preserves their shape. Perfectly ripe fruit contains optimal levels of pectin; the amount declines when the fruit is overripe. The amount of pectin varies from fruit to fruit, and some fruits have more acid than pectin. Plums, currants, and quinces are high in both pectin and acid, so they jell willingly. Blueberries have sufficient pectin but are low in acid. They may need the addition of lemon juice. Strawberries are acidic, but lack pectin, so supplemental pectin will help them jell. Then there are fruits low in both pectin and acid—mangoes, pears, peaches, and all overripe fruit—that need a boost of both for best results.
Because cooking is a science mixed with a little alchemy, there are exceptions to some of these principles. I have had perfect fruit jell at a temperature lower than 221˚F, and I have had ripe but tart peaches cook to a perfect consistency without benefit of lemon juice or pectin. Observing the fruit change as it cooks is just as important as the temperature.
When I do add pectin, I prefer the liquid type because it is added at the end of the cooking, so the amount can vary with the consistency desired. If a batch of preserves stubbornly refuses to jell, add one pouch of liquid pectin and test the consistency. If the preserves are almost set, use less.
Follow these basic steps for cooking preserves:
1. Boil the syrup without the fruit until it reaches 230˚F. Skim away the foam as it forms on top.
2. Toward the end of the cooking, keep an eye on the temperature.
3. Add the fruit and boil until it turns trans-lucent and the syrup thickens. This batch is just about ready.
4. Put a spoonful in a dish and freeze for a couple of minutes. If you like the results, the preserves are done.

Storing the Preserves
Cooked preserves ladled into clean containers will keep several weeks in the refrigerator. But if you make more than a few jars, or plan to give them as holiday gifts, process them in a water bath for
10 minutes. Then they will keep in a cool, dark place for at least a year, providing breakfast treats at a moment’s notice.

Here are a few things you’ll need to make preserves.
The Essentials
• An 8- or 10-quart, nonreactive canning kettle, preferably wider than it is deep, to cook the preserves.
• A slotted metal spoon for skimming foam from the top of the preserves as they cook.
• A candy thermometer.
• A ladle to transfer the preserves to the jars.
• Clean jars with lids.
Additional equipment that makes things easier
• A scale for weighing the fruit and the sugar (highly recommended).
• A wide-neck funnel to minimize drips when filling the jars.
• Clean tea towels for wiping the tops of the jars and cleaning up the spills.
Additional equipment for water-bath processing
• A deep pot that will hold all the jars in one layer and can be filled with enough water to cover the jars by 1 inch. Use this to sterilize the empty jars and to process the jars after they are filled.
• Sixteen-ounce jars with new two-part screw-top lids. Do not reuse old mayonnaise or pickle jars; they will not seal properly. Wide-mouth jars are easier to fill.
• Canning tongs to transfer jars in and out of the water bath. If you don’t have canning tongs, use regular ones. I made hundreds of jars without the special tongs, but it was a revelation when I finally bought a pair. They are much easier to use, and safer.
Recipes
Strawberry-Rhubarb Preserves
Makes five 16-oz. jars
The last of the rhubarb crop coincides with the height of strawberry season, and I think this combination is better than either of these alone. I use more strawberries than rhubarb so the flavor of the berries isn’t dominated by the stronger rhubarb. The actual cooking takes place after 24 hours of macerating, so start a day before you want to make the preserves.
4 lb. strawberries (start with 6 pints, so the net weight after de-stemming will be correct)
2 lb. rhubarb (start with 3 lb.)
4 lb. granulated sugar, about 9 cups
Wash and de-stem the berries. Cut them into quarters, or smaller if they are very large. Wash the rhubarb, trim the ends, and cut into 1⁄4-inch pieces. Toss both fruits together in a bowl to mix. In another large glass or stainless steel bowl or a plastic container that fits into your refrigerator, alternately layer the fruit and the sugar, beginning with fruit and ending with sugar. Cover and refrigerate for 24 hours, or up to three days.
When you’re ready to proceed, put clean jars in a pot, cover with water, and bring to a boil.
Strain the fruit through a large sieve or colander into a heavy, nonreactive
8-quart pot. Put the drained fruit aside. Scrape any undissolved sugar from the macerating container into the pot, and give the syrup a stir so the sugar won’t stick during the beginning stage of cooking. Cook the sugar syrup over medium heat until it reaches 230˚F (110˚C), about 25 minutes, skimming the foam from the top periodically.
Add the drained fruit to the hot syrup and cook until the mixture is 217˚F (103˚C), another 25 minutes, defoaming as necessary and stirring occasionally to evenly distribute the heat.
If the preserves are a good consistency, turn the heat to low and immediately ladle into sterilized canning jars and affix lids. If the preserves are too thin, cook to 221˚F. These preserves will thicken without additional pectin. Either process the filled jars in a water bath for 10 minutes, or let them cool and refrigerate them.
50 cal, 0g fat, 0mg sodium, 0g fiber; per Tbs.
Peach Preserves
Makes five 16-oz. jars
Nectarines can be used for this recipe as well—and you don’t have to peel them. The actual cooking takes place after 24 hours of macerating, so start a day before you want to make the preserves.
6 lb. ripe but not mushy peaches (start with close to 9 lb. so the net weight after peeling and pitting will be correct)
4 lb. granulated sugar, about 9 cups
1 pouch liquid pectin, if necessary
Blanch the peaches to remove the skins. Fill an 8-quart pot three-quarters full of water and bring it to a boil. Have a large bowl of ice water close to the pot. Put some of the peaches in the boiling water, just enough so they have a little space between them (you will have to blanch them in batches). Boil for a minute or two, or until the skin can be easily slipped off the fruit. Test one to be sure. Immediately plunge the peaches into the ice water to stop the fruit from cooking. When the fruit is cool enough to handle, slip off the skins and place the peaches in another bowl. Continue blanching batches of fruit until all are done.
Cut each peach to the pit horizontally around the equator, then cut the fruit vertically into 1-inch wedges, letting them fall from the pit. Using a stainless steel or glass bowl or a plastic container that will fit into your refrigerator, alternately layer the fruit and the sugar, starting with peaches and ending with sugar. Cover and refrigerate for 24 hours, or up to three days.
When you’re ready to proceed, put clean jars in a pot, cover with water, and bring to a boil.
Strain the fruit through a large sieve or colander into a heavy, nonreactive 8-quart pot. Set the drained peaches aside. Scrape any undissolved sugar from the macerating container into the pot, and give the syrup a stir so the sugar won’t stick during the beginning stage of cooking. Cook the sugar syrup over medium heat until it reaches 230˚F (110˚C), 20 to 25 minutes, skimming the foam from the top.
Add the drained peaches to the hot syrup and continue to cook over medium heat, stirring and skimming frequently, until the mixture reaches 221˚F (105˚C), or until it thickens and the fruit turns translucent. (This may happen at a slightly lower temperature.) As peaches cook, they tend to stick and burn, so turn the heat to low as they thicken, and stir frequently. If the mixture begins to look as if it is cara-melizing, stop cooking.
Test for jelling by freezing a small amount on a plate for a few minutes. Add one pouch of liquid pectin if needed. Return to a boil, then turn the heat to low, because continued boiling will break down the pectin.
Immediately ladle into sterilized canning jars and affix lids. Either process the jars in a water bath for 10 minutes, or let them cool and refrigerate them.
50 cal, 0g fat, 0mg sodium, 0g fiber; per Tbs.
Pear Preserves with Crystallized Ginger
Makes five 16-oz. jars
The ginger seems to accentuate the flavor of the pears. The actual cooking takes place after 24 hours of macerating, so start a day before you want to make the preserves.
6 lb. ripe pears (start with 9 to 10 lb. so the net weight after peeling and coring will be correct)
4 lb. granulated sugar, about 9 cups
3 Tbs. (11⁄2 oz.) finely chopped
crystallized ginger
4 Tbs. lemon juice
1 pouch liquid pectin
Peel the pears and remove the stems and cores. Cut the fruit into 1-inch chunks. Using a stainless steel or glass bowl or a plastic container that will fit into your refrigerator, alternately layer the pears and the sugar, starting with the pears and ending with sugar. Cover and refrigerate for 24 hours, or up to three days.
When you’re ready to proceed, put clean jars in a pot, cover with water, and bring to a boil.
Strain the fruit through a large sieve or colander into a heavy, nonreactive 8-quart pot. Set the drained pears aside. Scrape any undissolved sugar from the macerating container into the pot, and give the syrup a stir so the sugar won’t stick during the beginning stage of cooking. Cook the sugar syrup over medium heat until it reaches 230˚F (110˚C), about 20 minutes. Add the pears, chopped ginger, and lemon juice, and continue to cook, stirring and skimming frequently, until the mixture reaches 221˚F (105˚C), another 25 to 30 minutes. Stir in the pectin, return to a boil, then turn the heat to low, because continued boiling will break down the pectin.
Immediately ladle into sterilized canning jars and affix lids. Either process the jars in a water bath for 10 minutes, or let them cool and refrigerate them.
50 cal, 0g fat, 0mg sodium, 0g fiber; per Tbs.
Although she closed her San Francisco bakery in 1995, Fran Gage still makes preserves and bakes bread at home.


Comments
Hey there, gaming enthusiasts! Dive into a world of thrilling spins and endless excitement with https://rocketplay13.com/pokies/all spectacular collection of pokies. Whether you're a fan of classic fruit machines or seeking the latest in themed adventures, we’ve got you covered.
Super Mario's success has spawned a dedicated fan community, creating fan art, fan fiction, and fan games that celebrate and expand upon the rich universe of the Mushroom Kingdom. https://smboyna.gitlab.io/
Compete with friends to top the leaderboards in Traffic Jam 3D. https://trafficjam3d.gitlab.io/
Log in or create an account to post a comment.
Sign up Log in