
Winter comes in many forms. In my SoCal region the temperature never strays into the extremes—it just gets a little wetter. Some of you, however, spend the frigid months fantasizing about the next planting season. You peruse seed catalogs, drool over on-line perennial lists and scan blogs for adventurous new plants.
If your New Year’s gardening resolution will be “out with the old, in with the new,” you’ll be thumbing through magazines and design books on a quest for artistic enlightenment. Have I got a deal for you?!
Visions of sugar maples dance on your screen
Imagine sitting by a crackling fire, bunny slippers toasting your tootsies, visualizing your new perennial bed on your computer screen before you buy a single plant or dig your first hole.
Bonus: You can pull this off without spending a penny on complicated new software. Got internet access? Got a word processing program? Houston, we have lift-off!
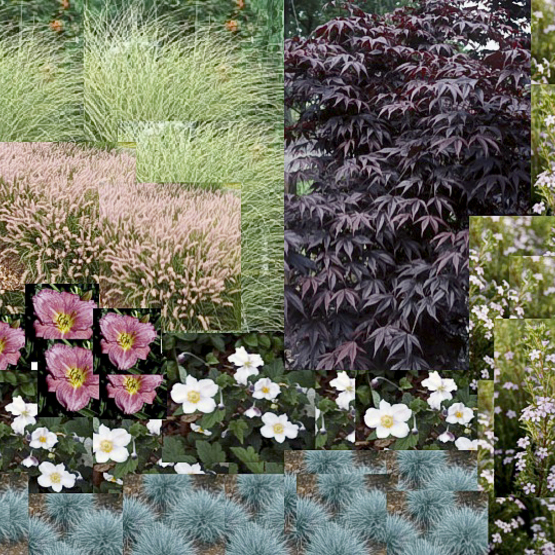
Here’s a picture of what you might end up with:

This vignette is one I recently created for a garden design client. Simulations like this let me show them not only the plants I intended to use, but also the massings in the approximate proportions: one Japanese maple, a hefty mass of Miscanthus ‘Morning Light’, a sweep of Chinese fountain grass at its feet, blue fescue underlining the composition.
Your Garden Vignette Recipe
Inspired by my hours of watching Alton Brown on the Food Network, I thought it would be fun to present this project as a recipe:
Difficulty Level: Medium. If some of the following computer terms leave you scratching your head, enlist the help of a junior high school student—it makes for a fun intergenerational project. BTW: These instructions work on Macs and PCs, but with only slight variations.
Prep Time: 10 minutes
Cooking Time: About an hour or two
Tools:
- A computer with internet access (high speed makes it more fun)
- MSWord, but if you are comfortable using PowerPoint, that’s better
- A 10-quart Dutch oven (just kidding)
Ingredients:
- A design idea—maybe something you want to plagiarize from a Fine Gardening article or a design you’ve already sketched out.
- A printer (with paper)
- A new folder on your computer’s desktop labeled “Plant Vignette Images” or whatever you want. (Right-click on the desktop and select “New folder.”)
Preparation: Finding your images
Start your internet program (Internet Explorer, Safari, Firefox etc.) and open Google.com.
Look for the tab that says “Images” and click it. Instead of looking for words, your search engine is now set to find pictures. Pretty cool.
Type the botanical or common name in the search field. The botanical name will be more accurate—otherwise you might end up with a picture of someone who named their pooch “Eastern Dogwood.” If that happens, just keep looking.

Your screen is now populated with images of your plant (or that dog). Ignore the close-ups of just the flower—you need the overall character of the plant to simulate its effect in the grand scheme of your design.
There’s one more thing to consider before you select an image for your design—how big is it? To find out look just below the thumbnail image for a number combination, like 800×1200. The bigger the numbers, the bigger the picture. I look for images that are at least in the 500-600 range.
Still with me? Now take your eyes off the screen, stand up and stretch. Good.Now, click on the image and you’ll find yourself on a new page. At the top of the screen you should see the words, “See full size image.” Click that link and you’ll zip to a page containing just your picture.
 Saving the image
Got a pic you like? Time to put it in your shopping basket—in this case, that new folder you just created. Right-click (or control-click) on the image and select “Save image as…” or something like that. You’ll need to direct the image to the new folder you created on your desktop.

But before you do that, check to see if the original name of the picture makes sense—sometimes it’s a jumble of letters and numbers. Give it a name you’ll recognize.
Now the picture is stored on your computer for later use.
That’s it. Repeat the process for all the plants on your list.
Prepping the Ingredients
You’ve shopped, washed, sliced, and diced, and you now have a big basket—okay, folder—of pictures. What do you say we start making it look luscious?
Open a new Word—better yet, PowerPoint—document. Under the “File” menu, change the Page Setup to landscape mode—you’ll want a horizontal layout for the page.
Click “Insert” on your menu bar. Then click on “Picture…from file” or something similar to that. Find the folder on your desktop, click on the first image you want to place, and click “Choose”.

Voila! There it is, somewhere in your new document. You da man—or lady, as the case may be!
Now’s the time to save your document!
So far so good. Now for the slightly painful part. It’s not as bad as Meryl Streep’s tear-inducingly painful onion-dicing scene in Julie and Julia, but unless you’re using PowerPoint, it needs to be done.
Right click the pic, Mick, then click “Format Picture.” Find the “Layout” tab with the little Scotty terrier icon and select “Tight.” Selecting “tight” makes it so you can move the picture wherever you want on the page just by dragging it around. Trust me, it’ll keep you from screaming yourself into a case of laryngitis.

You’re done with that picture for now, so click “save” and repeat the process for the remainder of the images. I strongly suggest you insert only three or four plants for now—you can add more ingredients and seasonings once you have the basic technique down.
Time to get cooking
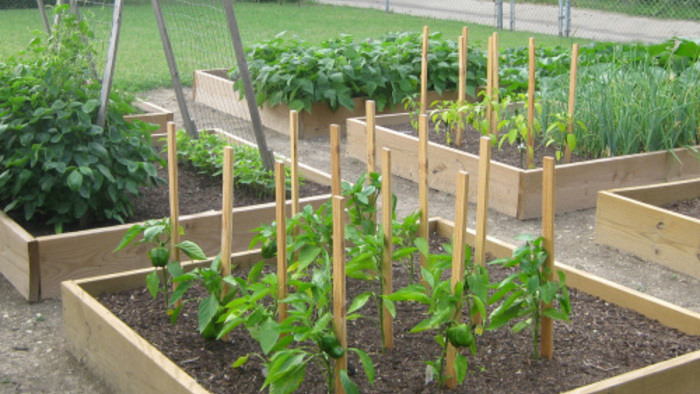
If your page looks something like this, you’re ready to roll. More than likely, you’ll only be planting one small specimen tree as a focal point, but you’ll need at least a handful of shrubs to balance it out. Next, you’ll likely carpet the remaining area with your finest assortment of perennials and ground covers. But you only have one image of each. Start over? No way!
Need two more maiden grass? Right-click the image, then select Copy and Paste. Repeat as needed. (Double check that the formatting came with the copy and you don’t need to tweak the layout.)
Now drag them around and arrange them the way you might plant them in your new bed. Try to be realistic about spacing them. If your image is out of proportion, click on it, grab the dot on the corner and resize it by dragging the corner. Easy peasy.
Tricks for the Tricky
A slightly more advanced technique lets you decide whether images overlap each other. That’s handy if you want the foreground plants to actually look like they obscure the background plants a bit. Again, right-click and select “Arrange.” You’ll have the option of sending pictures backward or forward.

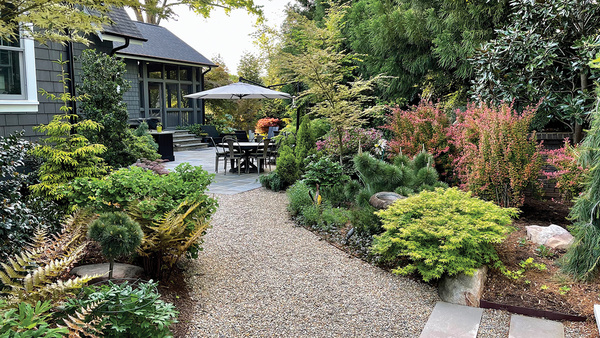
Here’s what you might end up with…pretty slick, don’tcha think?


Comments
This looks like an interesting and pretty easy way to help people visualize planting ideas. I have done the Google picture thing, and know how to change the size of (and crop)downloaded images. The simplicity of your instructions is great, reduces the intimidation factor in doing new computer tasks. If the dire weather forecast for tomorrow comes true perhaps I'll get the chance to try it! (it will also be an excuse to figure out Powerpoint).
Your writing style is so easy to read, I read about how you did your presentations even though I already do this. Great minds think alike. I have found PowerPoint, not to mention Google images, very useful in creating presentations for clients. You can even insert pictures of hardscape, furniture and art pieces along with the pictures of plants to show the complete look.
I am sure this will be a big help to many and, like you said, can give some of those that don't watch football (I can't imagine that) something to do as well. It should keep them copying and pasting all winter long.
Thanks Billy.
Log in or create an account to post a comment.
Sign up Log in