by Clemens Jellema
Last year, I was asked to design a deck for Fine Homebuilding’s Project House. They were looking for a simple yet elegant design that would not be too complicated to build. It would be close to grade, accessed through a pair of French doors connected to a family room, and measure roughly 15 ft. by 12 ft. The deck would feature some built-in benches and planters, and provide a connection to the backyard.
Before I start on any design work, I always check first to see if there are any limitations. These can include slopes, setbacks, easements, and local codes or homeowners-association rules. In this project, the biggest challenge was to create a usable entertaining space while allowing access from both sides of the deck. Typically, stairs create a traffic path where furniture can’t be placed, therefore limiting a deck’s usable space.
The initial size limitation for this deck project also meant we only had room for a seating area. To make room for a dining set as well, I expanded the project area to include a secondary lower-level deck or a patio at ground level. In designing this deck, I used RealTime Landscaping Architect software (ideaspectrum.com). It is fun to work with and easy to learn, and it can create pretty much anything I can think of. It’s also capable of importing models from SketchUp and produces realistic designs. The illustrations here use that software.
As I would with any client, I worked through several designs before arriving at one that satisfied us all. The process offers an instructive glimpse into developing a design for the perfect deck, no matter what the size.
Option 1
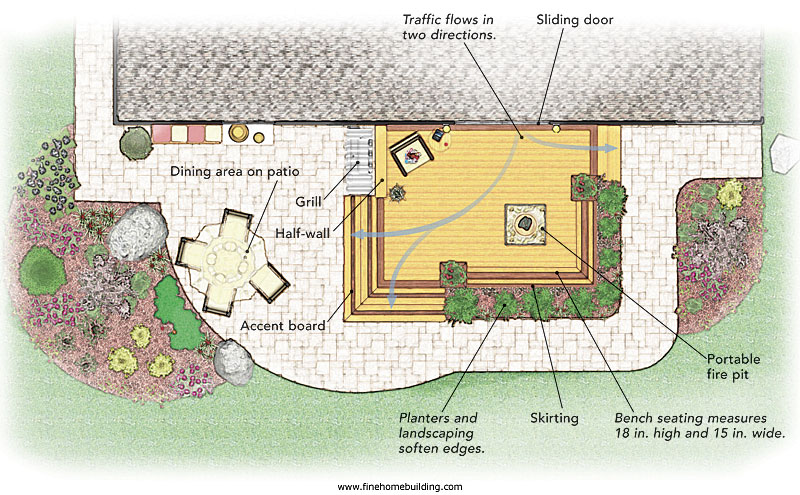
In the initial drawing, the focus was on getting the overall design right, with a good traffic flow. Two stairs—one alongside the French doors and the other wrapping the opposing corner—provide two ways for moving to or from the yard. I chose a corner stair because it provides a nice wide entrance to the deck from the patio and a strong connection between the two spaces. This deck is less than 2 ft. off the ground, so rather than a railing, I suggested enclosing the other outside corner with bench seating, using a rosewood-colored variation of the decking to add interest to the tops of the benches and to the stair treads. Because of the deck’s small size, I suggested locating a dining area off to the side, on a patio that could be built in a second phase. Skirting added around the deck gives the space a more finished look when viewed from the yard.
Option 2
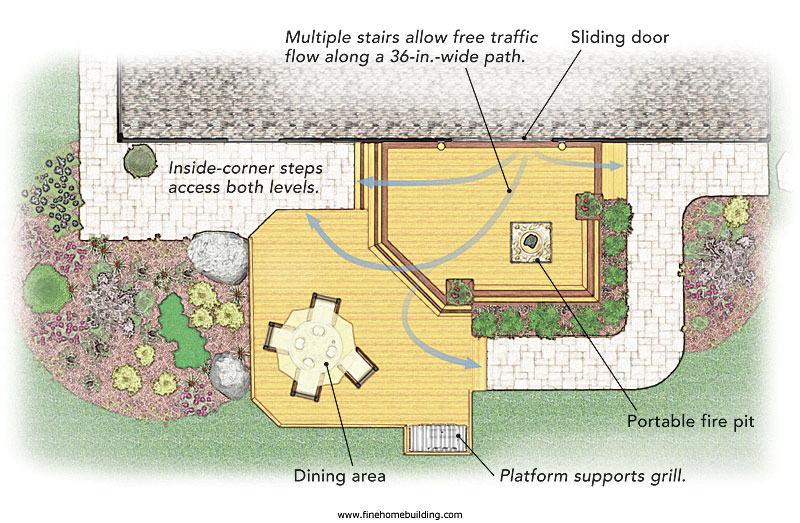
Although the plan had been to keep the deck simple, I also suggested this version, with a nearly grade-level platform that would accommodate the dining set. To be comfortable, a dining set needs 4 ft. of clearance all around (2 ft. for chairs and 2 ft. of open space). For example, a 4-ft.-dia. table requires a 12-ft.-wide space. A small platform extension supports the grill and keeps it out of the way. When I place a dining area on a low deck like this, I normally add 2x4s of the decking material around the perimeter to prevent chairs from sliding off the edge. Steps built into the inside corner formed by the two levels allow direct access from the patio. If budget were a concern, this project could be done in stages.
Option 3
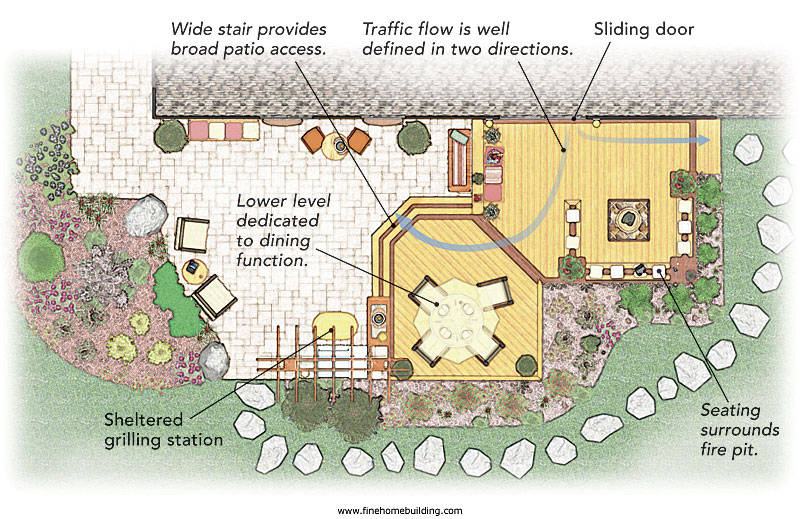
The lower deck in this version is closer in height to the main deck and functions entirely as a dining area. To do this, I eliminated the small step on its right side and moved the grill to the patio. This creates a confined place where people can entertain out of the circulation paths. I also moved the steps to the patio so they wrap around one side of the lower deck. This provides a path from the table to the grill, which now is sheltered with a pergola. The deck is shifted to the right in this expanded design, creating a slightly wider patio and allowing me to wrap the built-in benches around the fire pit without interrupting circulation. This is a more elaborate design than the others, and it can handle more guests. If budget would allow it, this would be my favorite.
The choice
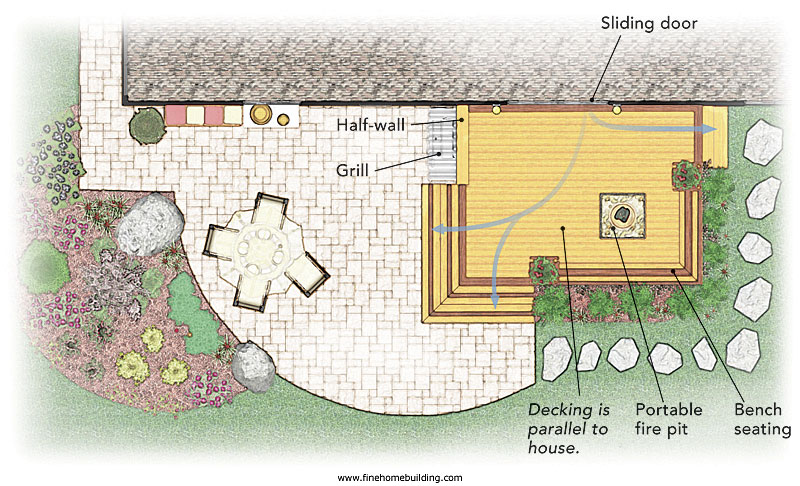
In the end, we returned to the concept of a simple deck. We kept the positioning we had in option 1 to maximize the patio, but traded the paver path for stepping stones. To make framing easier, we chose to run the decking parallel to the house, as in options 1 and 2. I should also mention here that the corner stair treads, at roughly 14-1/2 in. wide, are suitable for seating and potted plants. This type of “stadium stair” is fine if the deck is not higher than 30 in. To dress up the deck a bit, I added a white fascia and stair risers, something that will look particularly nice with the eventual addition of white window and door trim on the house.





Comments
Log in or create an account to post a comment.
Sign up Log in