

I appreciate the cool shade of the towering fir trees in my suburban Portland garden, but my flowers don’t. The roses sprawl toward the east in search of morning sun, and the delphiniums lean longingly toward the light. To support my wandering climbers, I wanted a trellis that would be decorative in both summer and winter. I searched without success through catalogs and nurseries for carefree, long-lasting structures until, finally, I saw what I wanted in a local garden—a simple, but handsome, freestanding, copper trellis.
Copper appealed to me because it is so decorative. After a season in the elements, its bright color weathers to a deep, warm brown that blends nicely into the garden. As the years pass, oxidation slowly burnishes the brown to a soft, muted green.

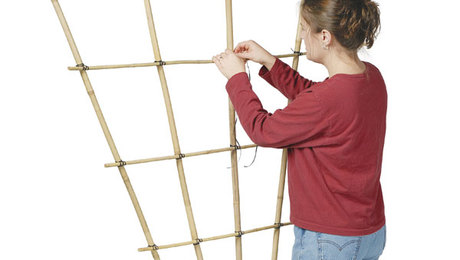
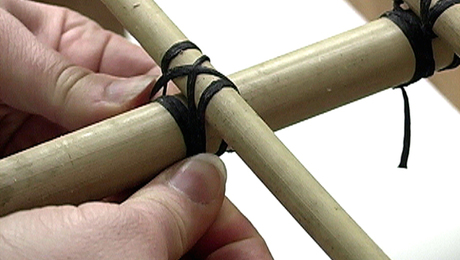
To plan my trellis, I sketched a sample, and used bamboo to build a model. Then I moved on to using copper, and with help from my brother, Terry, I built a trellis large enough—about 20 inches square and 4 feet high—to train a mature rosebush. That was just the start. Now I’m hooked on making copper garden structures. I have several different trellises, an arbor, and lots of ideas. The techniques I learned while building the trellis can be used to create just about anything. But it all started with this simple, basic structure.
Copper is easy to work with, too. A few simple tools—including a pipe cutter and soldering torch—are all it takes. Using soft, easily bendable copper tubing to make curves, assorted lengths of pipe for straight sections, and T-shaped and 90-degree elbow fittings to join pipes together, building a garden structure is as easy as playing with Tinkertoys. My first trellis took just about three hours to build. The materials are inexpensive, too—my homemade trellis cost about $30, excluding tools.
Cut the copper pipe to length
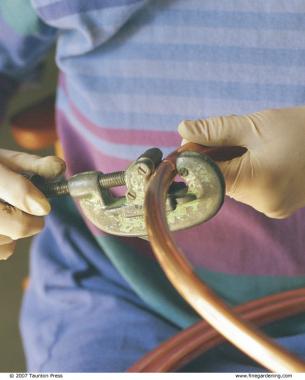
The first step is getting the materials ready, and that means using a pipe cutter to cut the copper pipes to size. Place the pipe between the tool’s cutting wheel and its rollers, so that the cutting wheel hits the pipe where it should be cut. Turn the set screw to put pressure on the pipe. Keep the pressure gentle—too much can crush or crimp the pipe. Rotate the cutter around the pipe twice. This first cut scores the copper. Tighten the set screw a little more, and rotate the cutter twice around the pipe again. Repeat until the pipe has been cut through.
Bend and cut the curves
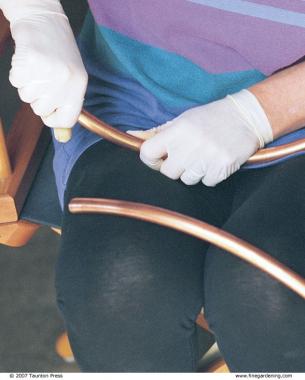
For the curves, I use copper refrigerator coil instead of standard plumbing pipe. It’s softer and bends more easily. It comes in a roll, and I simply uncoil some, measure along the curve and cut off 17 inches. With soft tubing, it’s even more important to make the cuts gently. Don’t straighten out the tubing while measuring or cutting; it may crimp or dent. Once I’ve cut the piece to length, I bend it gently to a shape that is almost a quarter circle. Then I cut and bend three other pieces to match it.
Clean and flux the pipes
After cutting the pipes, I use a nylon or metal cleaning pad to scour away any oxide from the ends of the pipe. Clean at least an inch at each end.
Then, I don a pair of latex or rubber gloves and set up in a well-ventilated, bright work space to avoid fumes from the solder and flux. Brush a thin coat of soldering flux-a substance that helps create stronger bonds when soldering most metals-onto the end of any pipe that is to fit into a T-shaped, elbow-shaped, or other fitting. That means 12 inch of fluxing both ends of most pipes.
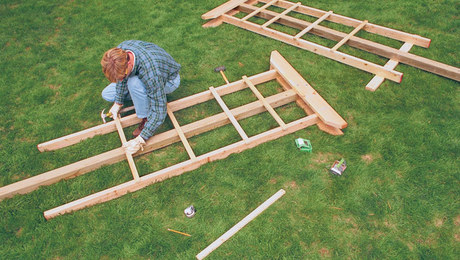
Assemble the base
I start at the bottom of the trellis, fitting the top end of the four longest pipes into a T-shaped fitting. They should fit neatly. I connect shorter, upright pieces to the opposite side of the fitting, creating a pole about 38 inches long, with the T fitting near the middle and an 18-inch, horizontal bar to link two of the poles into H-shaped assemblies. I place reducer-T fittings at the top corners, and connect the two pieces with the second pair of 18-inch, horizontal crossbars. To help align all the pieces, I mark a 20-inch square on the garage floor, and use it as a guide for the base of the trellis. Use the diagram on the facing page to guide assembly.
Add the domed top
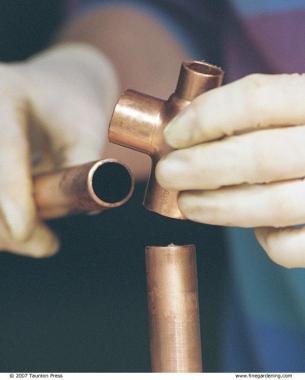
Because the square top is composed of so many short lengths of pipe joined with so many fittings, it’s easier to work on this piece separately on a flat surface. To make the top, I flux the ends of each pipe and assemble four identical pieces, each with two 3-inch lengths of pipe joined by a T fitting in the middle. Then, using the elbow-shaped fittings, I join the four straight pieces into a square. The stem of each T fitting should face out in order to connect to the four curved pieces that link the square to the rest of the structure (see the drawing at right). The other end of the curved piece fits onto the small opening of the reducer T fittings on the base. I don’t worry about making the dome perfect at this point.
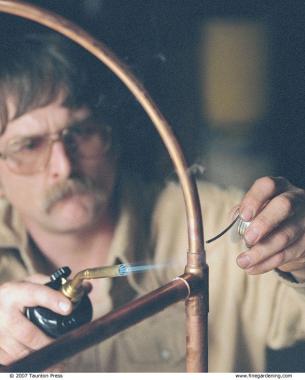
Solder from the bottom up
I usually turn the soldering over to my brother, Terry. He’s an expert. I’ve done enough, though, to know soldering takes practice. I also know this project is very forgiving, and that it is easy to wipe off excess soft solder with a damp, cotton cloth.
Wearing his safety glasses, Terry works from the bottom of the trellis up, squaring or straightening each joint before applying solder. When the joint looks good, he uncoils an 8-inch length of solder; this keeps his hands away from hot pipes and the torch flame.
Then he lights the propane torch and starts heating the area he wants to solder. He moves the torch back and forth evenly across the fitting, never aiming it directly at a joint—it’s too easy to burn off the flux. Flux is essential to a good bond, so if he does burn it away, he lets the joint cool, cleans the parts again with the scouring pad, reapplies the flux, and tries again.
When the flux starts to bubble, the temperature is just about right. He gives it a little more heat, then touches the solder to the joint; it melts on contact and flows smoothly into place. Any excess is wiped away. Pipes should always be handled with care—they can be very hot, even a foot or two from the fitting. The trick is to work slowly until you get the feel for it. It isn’t necessary to make the joints watertight.
Square off the dome
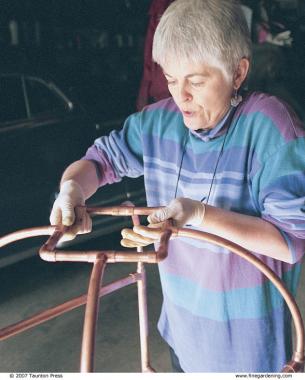
Once the upright and horizontal pieces have been soldered, adjust the curved pieces and the square top. Check by eye to make sure the curved pieces are arranged symmetrically and that the square top is parallel with the ground. After we adjust all the pieces, Terry solders the dome joint by joint, checking to make sure that unsoldered pieces have not shifted. Once he’s finished, I use a stiff wire brush to clean any excess solder and flux off the joints.
I like to let the copper age naturally. But if you cannot wait for the verdigris finish to appear, a faux verdigris paint will give it an aged look.
Move the finished trellis to the garden
Copper structures are easily installed in the garden. I take a 3-foot length of rebar and drive it 18 inches into the ground, then slip the copper pipe over the rebar. That’s all there is to it. There’s no need to pound in a piece of rebar for each of the four legs; two lengths of rebar fitted to two legs of the trellis should easily hold the structure in place.


Comments
The photo does not resize
Log in or create an account to post a comment.
Sign up Log in