
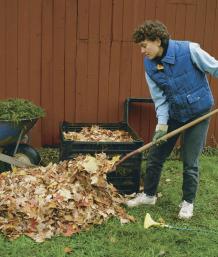
Long before it became a ’90s buzzword, composting was something we just did. On my family’s farm we had to make the most efficient use of all our resources. The vegetable scraps, the rabbit manure and the animal bedding all went into the pile, there to decay naturally into a fine, dark, moist and crumbly substance.
We did not have any rules for how high it could be piled or how much we could add of one thing versus another. Compost just happened, and when it got to the stage where grapefruit rinds and eggshells were no longer recognizable, it was spread out on the flower beds and the two-acre vegetable garden and tilled in. It improved the structure, water-holding capacity and aeration of the soil in which we grew our food. It buffered the garden from freezing and thawing, slowed erosion and supplied our crops with some nutrients. Not bad for a heap of “garbage.”
Composting was easy for us, and it can be for you, too. It’s not rocket science—just a natural process you can coax to make it happen faster. Even if you set it up without the perfect ingredients or conditions, it’s hard to fail.
Starting off
Before you begin composting, you’ll need to create a work space. You’ll want it to be close to where you will use the finished compost and convenient to the raw materials. An ideal site is no more than a hose-length from a water faucet, is out of the wind, is not under trees or within reach of their root systems and has good drainage so the bottom of the pile will not get soggy. It can be in either sun or shade. You’ll also probably want it concealed from sight somewhat, as you would any work area.
The amount of space you’ll need depends on how much “waste” your garden produces. I use about 30 sq. ft. for a 7,500-sq.-ft. (0.2 acre) yard. My lot is a fairly typical size for an urban area, and about half of it is either lawn or garden. As a rule, allow between 60 and 90 sq. ft. of composting work space for a lot up to a half acre in size.
I would recommend construction or purchase of a composting bin. The main purpose of a bin is simply to keep the materials contained, so, it can be almost anything that will hold a minimum of one cubic yard (3 ft. tall, wide and deep) of materials. I’ve found that the simplest and most effective “bin” is a 12-ft. section of galvanized dog fencing (having rectangular 2-in. by 4-in. openings) formed into a circle. Get the heaviest gauge wire you can find. The cost should be less than $10, and you can find fencing at any well-stocked hardware store.
Ingredients

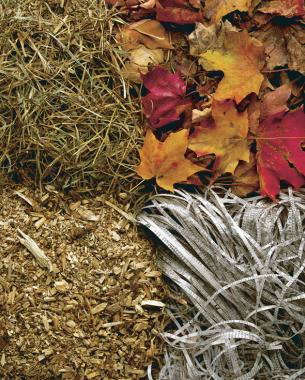
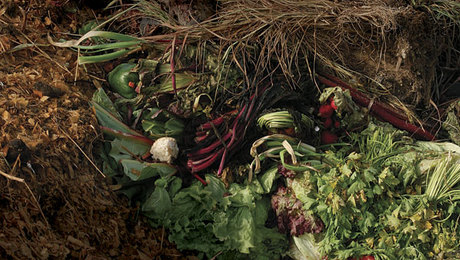
Compost ingredients come in two forms: brown (carbon-rich) and green (nitrogen-rich). “Brown” materials include dried leaves, straw, newspaper, wood chips, sawdust and even clothes dryer lint. Most of them are actually brown in color and dry to the touch. “Green” materials include green yard debris, grass clippings, manure, fruit and vegetable peels and rinds, coffee grounds, and even hair. Many of them are actually green in color and usually have a high moisture content.
The idea with browns and greens is to mix the two together in proportions that provide a balance of carbon and nitrogen. An adequate supply of each is needed by the microbes responsible for decomposition. These microbes occur naturally in the air and soil. To provide them with the balance of foods they require, mix one part green materials to two parts brown materials, measured by volume, not weight. In other words, for each shovelful of greens, you’ll need two shovelsful of browns.
Building the pile
To build a compost pile, assemble the correct proportions of green and brown materials and begin layering them alternately in your bin according to the proportions given above. Wet each layer down with a hose to the point where the materials just glisten or where they become sticky when you put your hand into the pile. Make each layer no more than a few inches thick, and put kitchen scraps at the bottom or center to avoid the problem of animals foraging for food and disturbing the pile.
At certain times of the year, you may not have enough of either browns or greens to build a pile in the “correct” proportions. In the fall, for instance, dead leaves are abundant, but green materials are scarce. One solution is to stockpile brown materials until some greens are available in the spring and then build the pile. I have used this method, piling my leaves in a 6 ft. x 6 ft. crib for the winter. However, you can compost brown materials with little in the way of greens. Make the pile as you normally would, but between the layers of leaves sprinkle a little topsoil. The topsoil settles the pile down, adds more microbes to the mix and helps retain moisture. The pile will decompose, but it will take longer.
In spring and summer, you can find yourself with an overabundance of greens—usually grass clippings. Spread clippings thinly (1 in. thick) on garden beds as a mulch; they’ll quickly decompose. Or practice “grasscycling” by leaving clippings on your lawn.
The process
 Finished compost: Your plants will love it as a potting soil ingredient (after sifting), mulch, or soil amendment.
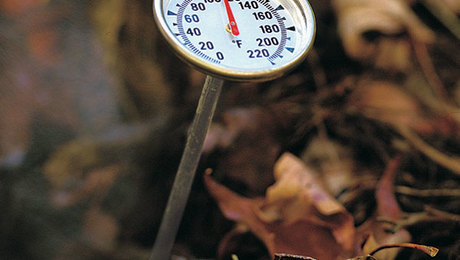
A compost pile “at work” is fascinating. Microbes begin feeding on the wealth of food immediately, causing a noticeable rise in temperature at the center of the pile. After two or three days (if that long), the center of the pile will feel hot to the touch. Temperatures can reach 160°F. Between 140°F and 160°F, weed seeds, insect larvae, and even some microbes will begin to die off. The pile will shrink to perhaps 40% of its original volume.
The balance of nutrients, air, and/or water changes as decomposition progresses, which in turn stops the heating process. After seven to 14 days, the temperature will drop down to below 100°F. For fast decomposition, you will need to turn the pile by mixing the contents with a manure fork or pitchfork. You literally stick the fork in and fluff up the compost-to-be or turn the whole pile over. Turning a pile means work, and I like to leave it optional, depending upon whether you want the process to go faster or slower. If you turn it, you’ll get compost faster, but in either case, compost will happen.
Tips for building a successful compost pile
• Lightly wet down each layer as needed to make it about as moist as a damp sponge; green materials may not need any additional moisture.
• Alternate layers of brown and green materials, making each layer no more than a few inches thick.
• Bury kitchen scraps in the bottom or center of the pile where animals won’t dig for them.
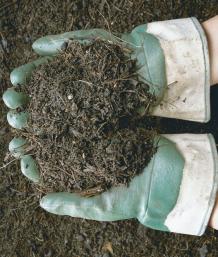
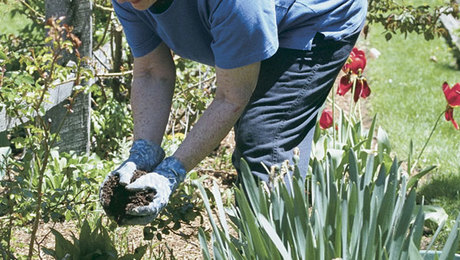
Finished compost is completely safe to touch and not at all yucky. It looks and smells a lot like soil. It makes an excellent amendment for your garden beds. You can sift out the finer particles using a 14-in. screen to get an excellent potting soil additive. Toss the coarse, leftover compost into the next pile to continue breaking down, or use it as a surface mulch.
Fine-tuning
If you feel like going the extra mile and really speeding up the process, try shredding the materials. Smaller particles have an increased surface area for microbes to work on, so the process proceeds much more quickly and generates more heat, which in turn accelerates the process even more. A chipper/shredder is useful to shred garden debris. A lawn mower is effective for leaves and nonwoody waste. Newspaper can be shredded by hand, and kitchen scraps can be cut into small pieces.
To further accelerate decomposition, you can try adding what’s called “compost starter,” a microbe-packed powder sold nearly anywhere you find compost bins and tools. I have yet to see scientific proof that starters are effective in small-scale composting, but some gardeners have apparently had good results, and you may wish to experiment.
Problems
There are really only two problems you might encounter: a pile that smells or a pile that doesn’t heat up. Don’t despair. Just review the basics: Are the proportions of green and brown materials right? Is there too much or too little water or air?
A pile that is unusually odorous can be caused by an excess of green materials, an unmixed deposit of grass clippings or other green materials, or an excessively wet pile. Make sure the mix of brown and green materials is right and that there are no big clumps of greens. Place the pile in a spot that drains adequately so water does not accumulate around the base, and if it does get too wet, fluff it up to bring air in.
A pile that doesn’t heat up is most likely due to brown materials that are too coarse, a pile that is too small, a total lack of water or a lack of nitrogen. To remedy the problem, make sure you have more than just, say, twigs for brown materials, and that the pile is at least one cubic yard in size. Rebuild the pile, following the instructions I’ve given for wetting the pile and for mixing browns and greens, and your pile should start cooking.
Also take into account the outside air temperature. When it’s below 40°F, expect less activity. Assuming everything else remains in order, once temperatures rise, the process of decay will take off.
Tools and gadgets
One of the real attractions of backyard composting is the fact that setup is cheap and recurring costs are small or nonexistent. I’ve tried many approaches and have but one conclusion: The best setup is the simplest. Spend your money on good tools instead of intergalactic bins. Buy a good manure fork and lightweight scoop shovel (a shovel with a deeply curved blade to hold loose materials) to turn and “harvest” the pile. A pitchfork, a hose-end sprinkler with a shut-off control (to make wetting down the layers easy without wasting water) and a machete for chopping are also useful.
Last but not least, buy a long-necked composting thermometer with a good dial for easy reading. That way, for every adjustment made to the pile, in 24 to 48 hours the gauge will indicate if your efforts are a success. Watching your pile hit 120°F when it’s cold outside is guaranteed to charge your composting spirit!


Comments
Composting is great way to reuse yard and kitchen waste. We compost all year round.
Log in or create an account to post a comment.
Sign up Log in