

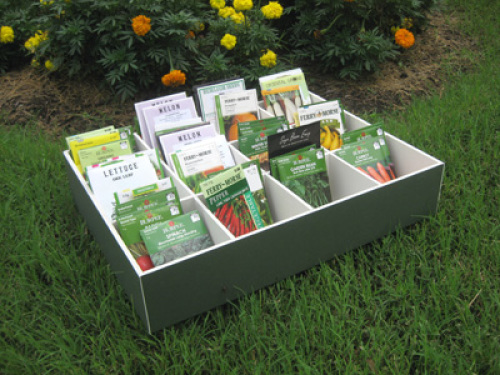
Up until now, I was using the “shoebox” approach to seed packet storage and organization. The shoebox method keeps all of your packets together in one place, but suffers from a major flaw (Photo A). It doesn’t help you when you’re trying to plan–not only what to plant when–but also if you have all that you need. Wouldn’t it be great if you could see a “snapshot” of the year, and organize your seed packets based on when you’re needing them? This design’s measurements will yield a box that is 18.5″ wide by 14″ deep by 3.5″ high. The 12 compartments measure about 4 3/16″ wide by 4 3/8″ deep. This is of course a “custom” design. You may require a larger or smaller size based on your needs. A couple of disclaimers to get out of the way. First, I will apologize for the inconsistent lighting in the photos. Second, the foamboard I used had an adhesive side on it. This was the only type that was available at the time. I would recommend getting the kind that didn’t have an adhesive side to it. The list of things you’ll need: • Two Sheets – 20″ x 30″ x 3/16″ foamboard/foamcore • X-Acto type cutting knife • Pencil or pen • Ruler/straight edge (preferably metal) • Various sizes from your existing seed packets • Cutting board • Craft glue (any type that will work on paper products) • Needles or sewing pins • Pliers • Paint (if you wish to paint it) • Colored Crescent art board (optional) • Labels (made from your PC or a label printer) Skill Level: Intermediate to difficult, depending on your craft and cutting skills. Construction: 1. Measure and mark the lines for the compartments and trim on the foamboard in pencil (note: I marked mine in ink to be seen better in the photo)(Photo B). 2. Cut out the base. 3. If possible, pin down the base to your cutting board or surface. It is crucial that the board not move for the next step. 4. Cut the four outside edge pieces. Apply a bead of glue on the edge piece where it will meet the base. 5. Hold in place until the glue has dried enough to provide some support (Photo C). Here’s cute trick #1: If you cut a small square piece of foamboard and rest it next to the side piece, then pin it to the side piece, it will help hold it at the right angle. 6. The trick in step #5 is only a temporary measure. Once all four sides are attached to the base you can glue them and secure them with pins (Photo D). At this point you’ve got the base and the sides done. It’s starting to look like a seed box… sweet! (Photo E) 7. Now it’s time to cut the inside “vertical” cross pieces. Measure the distance from the inside of the box (very important), as well as the height. 8. Draw those measurements on the foamboard three times and cut the pieces out (Photo F). A quick tip on cutting the foamboard. It’s kinda like cutting glass in that the first “cut” is only to score it. The score must be absolutely correct because the following cuts use it as a guide. Expect to make several smaller cuts in order to remove the piece. Only use new blades if possible. 9. Place the vertical pieces you just cut inside the box and position them using the line guides you drew on the base (Photo G). Make marks on the vertical pieces. These will be the “notches” that secure the vertical and horizontal pieces together (Photo H). 10. Repeat Steps 7, 8 & 9 – this time it will be for the two “horizontal” pieces. 11. Glue the vertical pieces into the box and hold in place until the glue has partially dried and is holding the piece in place on it’s own. 12. Repeat for the horizontal pieces. I would recommend applying a second bead of glue on all of the edges that were glued together. At this point, your seed box is essentially finished (Photo I). All it needs now is a coat of paint and labels for the months. 13. I would recommend a flat or matte model or craft paint or household latex paint. I do not recommend spray painting it (I started to do this and almost ruined it). I used an off-white latex because it was thicker. So choose your color, paint away and allow it to fully dry. 14. Using a label printer or typesetting it on your PC, make the labels for the months (Photo K). I used a Brother P-touch label maker that worked great for this. Voila! Your seed box is ready for active duty (Photo L). Now all you have to do is organize your packets in it. Sounds like a lazy Sunday afternoon activity with snacks and your favorite beverage. |


Comments
Log in or create an account to post a comment.
Sign up Log in