


-
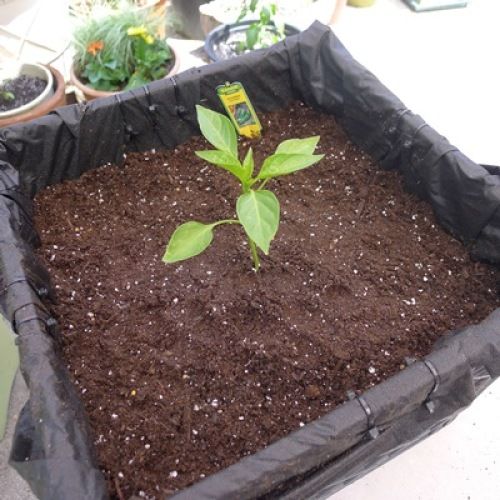
One Anaheim pepper plant is a perfect fit for a milk crate container. Milk crates are another option for planting a square-foot garden.Photo/Illustration: Jodi Torpey
-
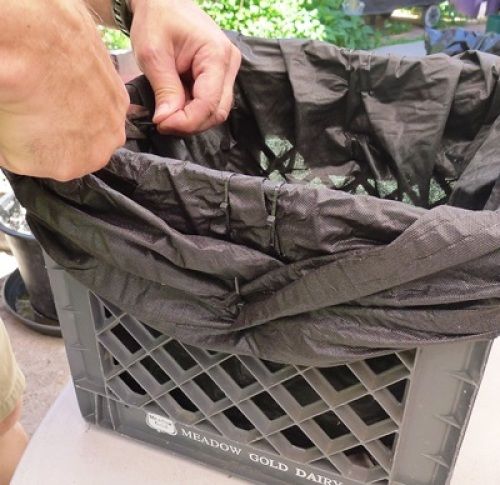
Line the milk crate with a non-woven landscape fabric and secure it in place with zipties.Photo/Illustration: Jodi Torpey
-
Fill the crate with a well-draining potting soil and add a vegetable or herb plant, or plant with seeds.Photo/Illustration: Jodi Torpey
Last winter I read about a garden in New York City that supplied over 100 different crops for the restaurant located next door.
What separates this garden from other gardens that grow fresh produce for restaurants is this one was planted entirely in milk crates. About 3200 of them.
The 1 cubic foot milk crates are the perfect size for growing. Consider it another option for a square-foot garden.
The crates are lined, filled with soil, planted and kept watered with driplines. “Milk crate farmers” say they can grow just about anything edible (except fruit trees) and the crates work well on patios, balconies, rooftops, and even parking lots.
Those milk crate farmers inspired me to give it a try. I just happened to have an old plastic milk crate in the garage, as well as a few other supplies on hand.
Here’s what you’ll need if you’d like to plant a milk crate, too:
Materials
- 1 milk crate
- Non-woven light-weight landscape fabric or other highly permeable drainage filtration fabric
- Well-draining potting soil or compost-based soil
- A sharp awl, zip ties, scissors
- Herb or vegetable plant, or seeds
Instructions
- Line the milk crate with a length of landscape fabric in a single layer. Be sure to fit the fabric into the corners of the crate, leaving plenty of fabric hanging over all four top edges.
- Cut the fabric with the scissors. (NOTE: You could also fill the crate with soil first, then cut the fabric.)
- Use an awl or other sharp tool to make holes in several places near the handle; thread a zip tie through the holes and secure.
- Repeat on all four sides.
- Fill the lined milk crate with potting soil; mix in a slow-release fertilizer and water to thoroughly moisten soil.
- Dig a hole, place the plant in the hole and firm the soil around it.
- Water in to make sure the water drains. If there are drainage problems, simply poke a few holes in the bottom of the crate and through the landscape fabric.
- Keep plant watered and fertilized.
- Harvest a healthy crop to take from crate to your plate!


Comments
Log in or create an account to post a comment.
Sign up Log in