

How to Grow Potatoes in a Tower
This unique method allows you to grow 20 pounds of spuds in an area less than 4 square feet

Potatoes are versatile, delicious, and rich in vitamins. And if you’re able to grow them successfully, the harvest can keep for the entire winter (something not even tasty tomatoes can do).
Despite these positive traits, potatoes have always scared me. Not because they have creepy-looking “eyes” or because my grandma used to say they were poisonous if you ate them raw. Potatoes frighten me because they can be needy when it comes to their growing conditions, they take up a lot of room, and they can introduce a plethora of diseases into your garden without warning; in addition, they’re a favorite delicacy of voles.
For those seeking to grow their own spuds in a small space or in a vole-prone area or for those wanting to keep their crop somewhat contained in case disease strikes, a potato tower is an excellent solution. Ranging from 2 to 4 feet tall, this simple vertical column is comprised of wire fencing lined with straw and filled with compost, saving you from having to deeply till and excessively amend your bed. Simple to build, it also produces a high yield. Here’s how it’s done.
What you need
• Wire cutters
• 3- to 4-foot-tall 14-gauge wire fencing (or one with a sufficient gauge to retain its form and be used for a few years)
• Rebar wire
• One piece of 5-foot-tall rebar
• Straw
• Shovel
• Compost
• Seed potatoes (use a mix of varieties for an attractive effect), 5 pounds for each tower
Step 1: Create a sturdy frame.
![]()
![]() Use wire cutters to snip out a section of wire fencing to create a cylindrical bin, about 1½ to 2 feet in diameter. I prefer to use fencing that is 4 feet tall because I can still reach into the tower to plant it even though I’m only 5 feet 3 inches tall. Use rebar wire to tie the fence ends together (photo, above).
Use wire cutters to snip out a section of wire fencing to create a cylindrical bin, about 1½ to 2 feet in diameter. I prefer to use fencing that is 4 feet tall because I can still reach into the tower to plant it even though I’m only 5 feet 3 inches tall. Use rebar wire to tie the fence ends together (photo, above).
To give the bin extra stability, attach it to a rebar post. Pound the post flush with the back of the inside of the bin, and wire the bin to the post (photo, right). If you have trouble with voles, add a piece of fencing with small holes at the bottom of the container to prevent the critters from burrowing into it.
Step 2: Build a straw “nest.”
![]()
In midspring, lay down a 2- to 3-inch-deep layer of straw in the bottom of the bin, creating a “bird’s nest” inside it. The straw supports itself up the container’s sides as you spread it, leaving a large central area for the compost. The straw helps keep the compost in and reduces water loss due to evaporation. Shovel in some compost. The goal is to have the first layer of seed potatoes about 1 foot above the ground, which will allow plenty of room for the bottom layer of potatoes to form.
Step 3: Add a layer of potatoes, and water thoroughly.
![]()
Place the potatoes about every 5 to 6 inches along the outside edge of the tower, add a thin layer of compost, and water them in; they should be next to the straw, with their eyes pointed out. Potatoes need only one or two eyes per piece to grow, so feel free to cut up large seed potatoes into two or more chunks, making sure each piece is at least as big as a golf ball. The smaller potatoes can simply be planted whole. Aim for cutting the potatoes 24 hours prior to planting, which will allow time for a scab to grow over the cut, reducing disease and rot issues.
Step 4: Continue building the tower.
 Create additional layers comprised of a straw “nest,” compost, and potatoes until you reach 4 inches from the top of the bin. Each layer should be about a foot deep (illustration, above). Finish off the tower with a layer of potatoes spaced evenly across the top. Pour a 5-inch-deep layer of compost over the potatoes, and cover with a few handfuls of straw. These uppermost potatoes will sprout out of the top of the bin.
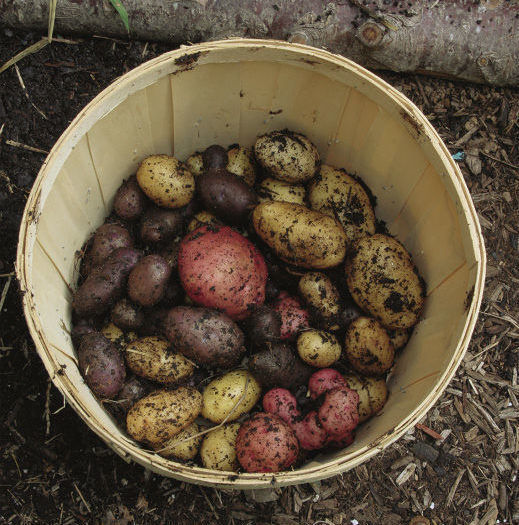
Step 5: Watch it grow, tip it over, and harvest the spuds.
![]()
Keep the tower well watered throughout the season (this is critical for good spud formation). When the plants have significantly died back in late summer, tip the tower over and sift through the compost to find the spuds. If you had no incidence of disease, you can use the leftover straw and compost to amend vegetable or ornamental beds.
 Don’t ever use grocery-store spuds
If you’ve ever forgotten that you had some potatoes in your pantry, you’re familiar with how easily this produce item will sprout. Fight the temptation to plant these happy accidents in your garden. Potatoes can serve as ideal hosts for several nasty diseases, including late blight (which caused the 19th-century Irish Potato Famine). Once introduced into your beds, these diseases can wreak havoc. You should, instead, buy and plant certified disease-free seed potatoes from a reputable source. Three of my favorite hearty varieties are ‘Katahdin’, a waxy white spud; ‘Red Norland’, a great option for long storage; and ‘All Blue’, with its otherworldly color.
Danielle Sherry is a senior editor who grows vegetables—no thanks to herds of deer and slugs—in East Haddam, Connecticut.
Photos, except where noted: Danielle Sherry, Brittany Carlson. Illustration: Carol Collins.


Comments
Log in or create an account to post a comment.
Sign up Log in