

How to Grow Celeriac
Celeriac, also known as celery root, is far easier to grow than celery, its close relative

It’s safe to say that celeriac will never be featured in photos of baskets brimming with luscious, perfect produce. In fact, one look at this knobby, dun-colored vegetable with its messy fringe of rootlets and the description “hit by the ugly stick” might come to mind. However, looks aren’t everything. Celeriac is grown for its knobby root rather than for its leaves. It is easier to grow than celery and has a long storage life and a smooth celery flavor I find useful in the kitchen.
 |
|
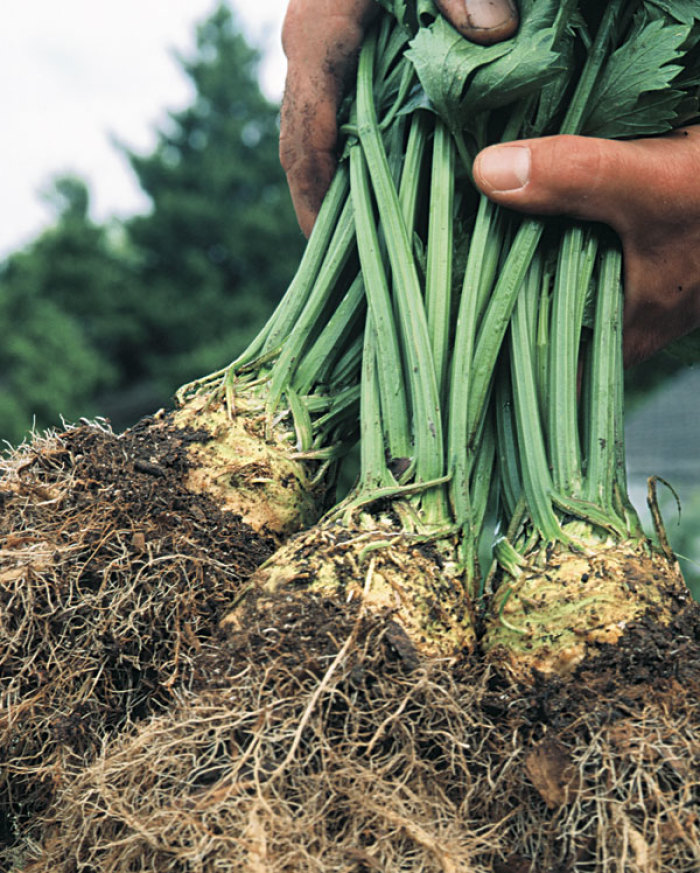
| Celeriac might look like a tangled, inedible mess, but with a little preparation, this mild celery-flavored root moves easily from garden to kitchen. | |
 |
|
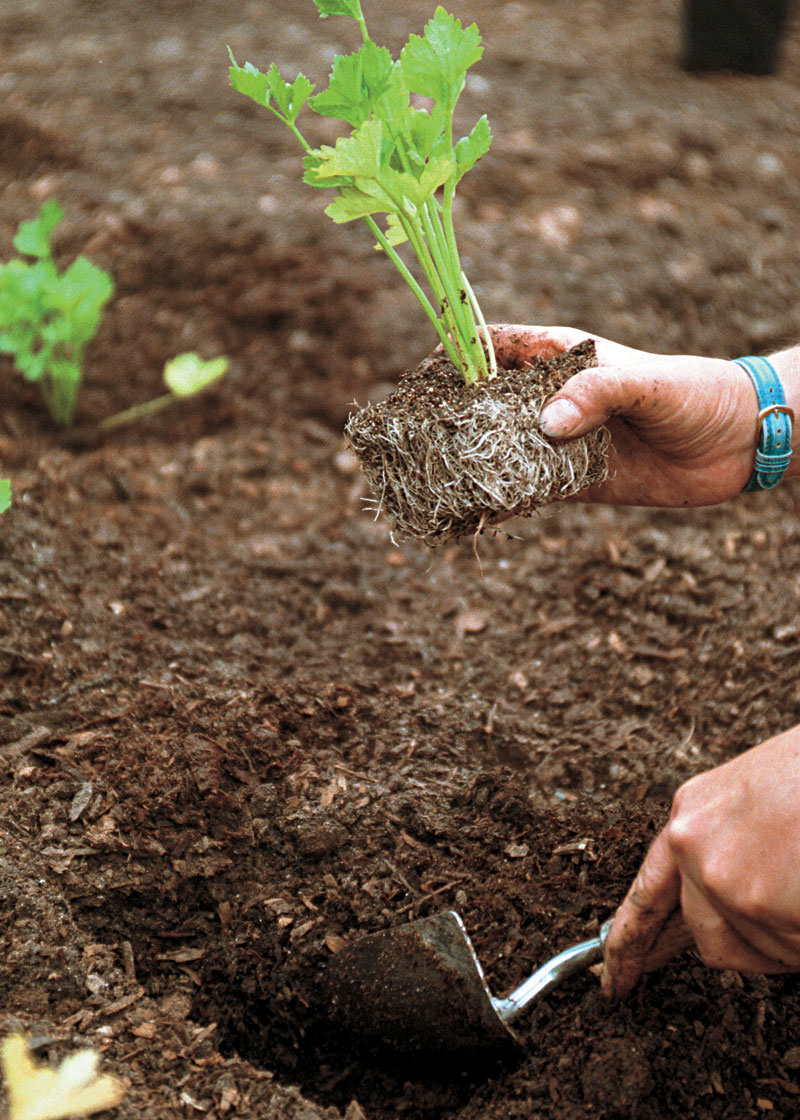
| Celeriac transplants are hard to find in garden centers, so you’ll have to grow your own. | |
 |
|
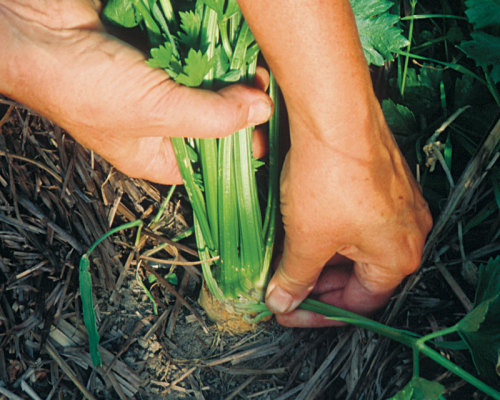
| Throughout the season, remove any lateral and lower shoots to help the root develop a smooth surface. | |
Celeriac, also known as turnip-rooted celery or celery root, offers fine-grained white flesh with a taste that always reminds me of the main ingredients in Waldorf salad: celery, apples, and walnuts. Although a close relative of celery, this lesser-known kin is far easier to grow as long as your summers aren’t dry and hot. Like most fall and winter root vegetables, it is a great keeper and will remain in good condition for four to six months in a root cellar or refrigerator crisper.
Start seeds early
Chances are your local purveyor of vegetable transplants won’t be carrying celeriac, so if you want to grow this European favorite, you’ll have to start it from seed. It requires a long growing season (120 days) and can take two to three weeks to germinate. I start seeds March 1, 10 weeks from the average date of the last frost in my Zone 5a garden.
Like the seeds of parsley, a fellow member of the Umbelliferae, those of celeriac benefit from an overnight soak in water to hasten germination. After drying them on a folded paper towel, I sprinkle the seeds on the surface of a 4-inch pot filled with a sterile potting mix. I press the seeds lightly into the pot and water from the bottom. To keep the soil moist, I attach a piece of clear plastic wrap with a rubber band, punching holes in it for ventilation. Celeriac seed germinates best at 70°F. When the seedlings are about ½ inch tall, I transplant the largest to 1½-inch pots and continue to grow them out under cool (60° to 65°F) conditions.
Hardening off is the next step, and it is here that you must pay close attention to celeriac’s biennial nature. If your seedlings experience 10 consecutive days or more of temperatures under 45°F, they receive the message that they have gone through a summer (during germination) and are now in a winter. When the temperature heats up, the celeriac plants think they are in their second year of growth and will put their energy into flowering instead of into developing a good root. So be sure to harden off your celeriac when days and nights are above 45°F.
Celeriac craves moisture
Another important factor in growing large, fine-textured celeriac is proper soil conditions. The ancestor of both celery and celeriac grew in marshy areas, and the closer your soil is to a rich and moist environment, the happier your celeriac will be. A generous amount of compost or rotted manure worked deeply into the soil before planting helps retain moisture and add nutrients. When the plants are 3 to 4 inches tall, I mulch with straw to conserve the soil moisture as we head into the warmer days of summer.
After hardening off my seedlings for at least a week, I transplant them to the garden sometime in late April or early May, giving each plant a dose of liquid fish emulsion. Since celeriac likes a rich diet, I repeat this dose every two weeks throughout the summer. I grow celeriac with offset spacing, 10 inches apart in beds. They can also be grown 8 inches apart in rows 18 inches from each other. To protect them from any lingering frosts, I cover them with a floating row cover for a week or two.
During the growing season, I monitor the soil regularly to make sure it’s moist. I also check for any lateral leaf shoots. I snap these off to get a smooth crown. Toward the end of July, I remove some of the outer leaves to make the root grow larger and smoother, then I cover it with soil or mulch to keep it blanched and tender.
Harvest after a light frost
Celeriac can be harvested and eaten before it attains its maximum size, but since there is such a bountiful supply of fresh garden vegetables in the summer, I always wait until fall to dig it. Its flavor, like that of other root vegetables, is improved by a touch of frost, which converts some of its starch to sugar.
When first dug, celeriac has a rude, primitive appearance. I shake off as much dirt as possible, roughly whack off the rootlets with a field knife, and remove all but 1 inch of foliage. After cleaning the root further with a stiff jet of water from the hose, I allow the excess water to dry, then put the celeriac in a perforated, food-grade plastic bag and store it in my root cellar. The ideal storage temperature for celeriac is between 35° and 40°F, with high humidity, so a refrigerator crisper also works well for long-term storage. Under these conditions, this vegetable will remain in good condition until late spring.
| Sources for celeriac seed | ||
| Southern Exposure Seed Exchange PO Box 460 Mineral, VA 23117 540-894-9480 www.southernexposure.com |
Stokes Seeds PO Box 548 Buffalo, NY 14240-0548 716-695-6980 www.stokeseeds.com |
Territorial Seed Co. PO Box 158 Cottage Grove, OR 97424 800-626-0866 www.territorial-seed.com |
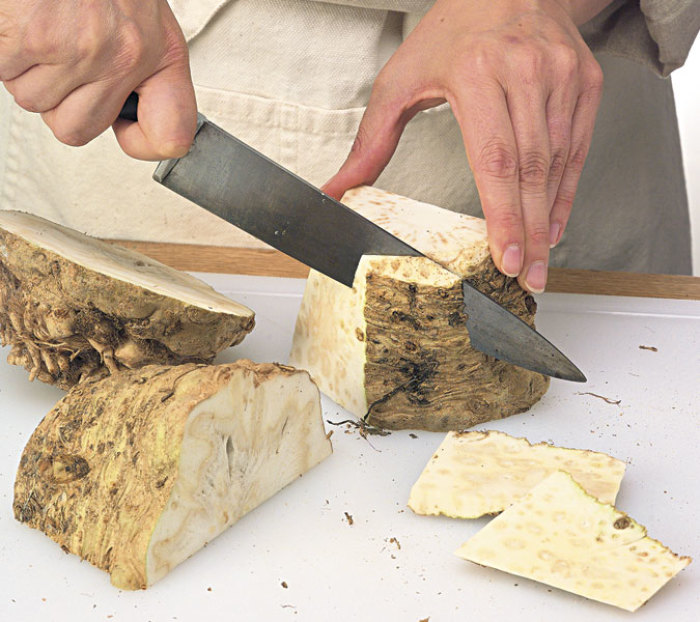
Preparation is straightforward
 |
||
| Prepare celeriac by cutting it in half vertically, slicing off the remaining roots, and paring away the rest of the skin. | ||
|
I have found that the best ways to prepare this unusual vegetable are straightforward and simple so that its fine flavor comes through. The first order of business is to remove the peel and the vestiges of its roots. First, cut the celeriac in half vertically. Place the flat side on a cutting surface and with a chef’s knife slice off the labyrinth of small root remains as well as the stem end. To remove the peel use a paring knife or horizontal peeler, depending on the celeriac’s knobbiness and thickness of skin.
The dense white flesh of celeriac, like that of apples, begins to discolor when exposed to air. To prevent discoloration, cut or slice celeriac into acidulated water (2 tablespoons vinegar or lemon juice to 4 cups water). The root absorbs the soaking liquid, so keep the immersion brief, no longer than 15 minutes. If you are using the celeriac in a dish with an acidic dressing or sauce, treatment with acidulated water is not necessary.
Celeriac is crisp and delicious, and it keeps all winter, but it is definitely not a looker. Once you’ve grown it and tasted its exquisite flavor and texture, however, you’ll realize that ugly is only skin deep.
This article originally appeared in Kitchen Gardener #29.


Comments
Log in or create an account to post a comment.
Sign up Log in