

Nurture Seedlings on a Tiered Growing Stand
This inexpensive, homemade stand holds 20 flats under fluorescent lights
A dozen or so years ago I became frustrated with the range and quality of our local garden center’s plant offerings. I thought that I could start the plants I wanted from seed—if only I had a place to do it.
Learn more: 10 Easiest Plants to Grow from Seed
I’d read in a number of places that all I needed were pots, soilless mix, and a sunny windowsill. It soon became apparent, however, that windowsills aren’t always sunny or warm, and that few are wide enough to hold more than a couple of dozen pots. Not to mention that growing seedlings tends to be rather messy, as the other half of my home’s gardening team very firmly pointed out.
My next thought was that one of the growing stands or racks that I’d seen in garden-supply catalogs over the years might be the answer. When I started comparing and price-shopping, however, it quickly became apparent that the well-built ones are not cheap. One of the sturdier-looking models I saw, with three shelves and three sets of 48-inch fluorescent lights, cost over $500—far more than I was interested in spending.
It was then that I decided to build my own. I asked myself what seeds needed to germinate and grow on. Light, warmth, and water seemed to be the basics. Provide these, and they’ll grow anywhere, I figured, even in an out-of-the-way corner of the basement. That way if things get messy—which they often do—cleanup is no big deal.
So I came up with a design not unlike those in the catalogs that tucks away neatly in a corner of my basement. The rack holds about 160 plants in 2¼-inch peat pots on each of its three shelves, as well as 160 more on top, with a ceiling fluorescent providing the light for the plants on this bonus shelf. That’s a total of 640 plants that I can start and grow to transplant size in an area little more than 5 square feet. And by staggering my plantings and moving cold-tolerant plants out as soon as the weather has settled in early spring, I can start many more plants yet. The money I saved in a single season—by starting from seed rather than buying flats—more than offset the initial cost of the rack (a bit less than $200 for everything—lumber, hardware, lights, fixtures, gang outlet, timer).
The rack is easy to build too. All the pieces are stock 2x2s, and the hardware holding it together is nothing more than screws, nuts, and bolts. All you need to do is cut the 2x2s to length, drill a few holes (OK, quite a few), glue, screw, and bolt the unit together. It consists of six subassemblies: the two sides, three shelves, and a top platform, which provides a place to hang the top light fixture and adds stability to the whole structure. The drawing and notes provide all the dimensions and construction information you’ll need to build the rack.
Each year I fill the rack to overflowing, and its bounty transforms my garden, filling holes, adding accents, and creating dramatic mass plantings—all for less than the cost of three or four flats of annuals. My one regret regarding this rack? That it took me so long to get around to building it in the first place.
Tiered Growing Stand Plans and Materials
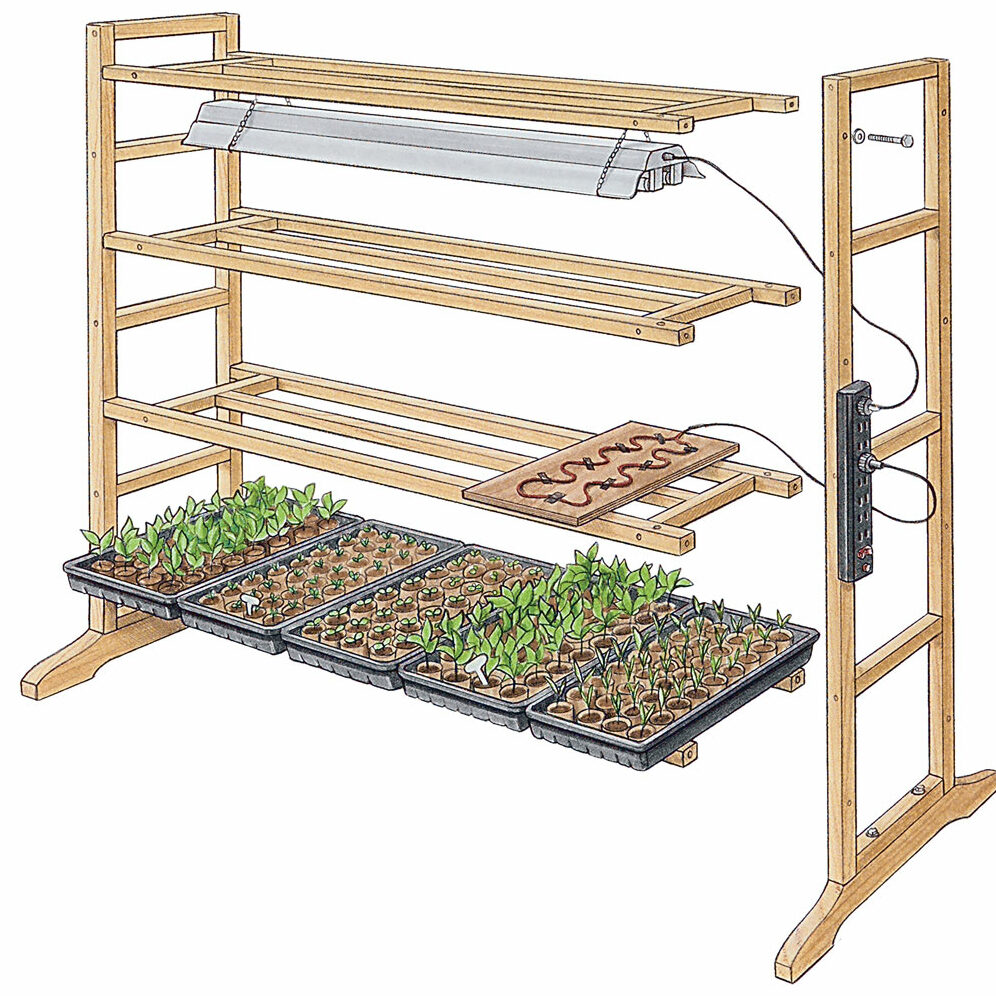
Directions:This rack is made of 2x2s (which are actually 1 & 1⁄2 in. square), 2-in. deck screws, and 3⁄16-in.-diameter carriage bolts (with nuts and washers). Each of the six assemblies that make up the rack—the two sides, three shelves, and the top—are glued and screwed together. The sides are then bolted to the three shelves and to the top, allowing the whole rack to be disassembled if necessary. For easier construction, stock 4x4s could be used in place of the shaped bases.
|
Overall dimensions: 67 in. high, 63 in. long, and 12 in. deep (with a 24-in. deep base) |
|
Individual wooden parts: 4 – 63-in. vertical pieces 8 – 60-in. shelf pieces 18 – 9-in. crosspieces 4 – 51-in. center shelf supports |
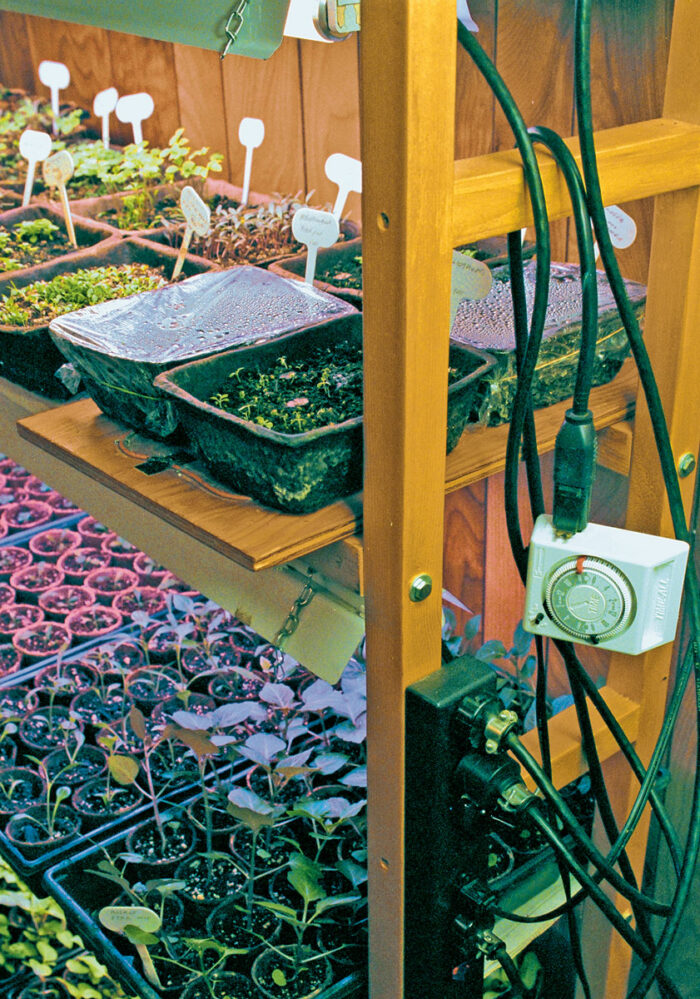
Seed starting, plugged in
Light and warmth, in the proper measure, are the two attributes provided by the electrical equipment on my seed-starting rack. Admittedly, it is a tangle of cords, but the components and their connections are actually quite straightforward.
I use basic, hardware-store-variety, fluorescent shop-light fixtures on this rack, one on each shelf. All three lights plug into a gang outlet screwed to the side of the rack, which is then plugged into an inexpensive timer. I give the seedlings 12 hours of light each day.
In the lights, I use one wide-spectrum bulb with one ordinary, cool white bulb. I’ve had good results with this combination. I replace the tubes after about 2,000 hours, or a few seasons.
For heat, I use inexpensive heating cables (available through many garden-supply catalogs), which I staple carefully and tape (with electrical tape) to plywood. The plywood provides a surface for the brown fiber flats in which I start my seeds, and the cables provide gentle, bottom heat, which really speeds germination. Soon after the seeds have germinated, I remove the cables so the growing medium won’t dry out too quickly and so the seedlings can toughen up a bit. The heating cables, like the shop lights, are plugged into the timer, further mimicking day-night conditions. With both the lights and the heating cables on a timer, all I have to worry about is watering. See how to care for seedlings.


Comments
I can't see the dimensions. The picture does not enlarge when clicking it.
not very clear. What about light fixtures? How long/wide are they? Maybe I'll try a more comprehensive web site.
I made this stand about 6 years ago, and take it apart each May for storage. It supports the standard 4' work light fixtures. It cost me about $50 to make. Worth every penny!
This is just what I need. Thanks!!
Are the side shelves attached using barrel nuts?
Log in or create an account to post a comment.
Sign up Log in