

The Secret to Big Homegrown Onions
The number-one factor for success is being aware of your latitude

Onions tend to bewilder home veggie gardeners. The plants often fail to produce the large firm bulbs we all long for, and they are susceptible to a host of diseases. But knowing a few simple facts could make a big difference in your harvest. It all starts with where you live; that, in turn, determines the varieties you should grow and whether you should start your crop with seeds, sets, or transplants.
Your latitude dictates the varieties of onion you can grow
There are two growing periods in the life of an onion. The first growing period is the growth of the leaves. Each leaf eventually produces an onion ring, or layer; the larger the leaf, the larger the ring will be. The perfect onion has 13 rings, so the goal is to create 13 leaves before the onion starts the second stage of its growing cycle by transferring the carbohydrates that are in the leaves to the rings of the onion (bulbing). Once the bulbing process begins, no more leaves are created. Because the key to producing a large onion bulb is to grow healthy and large foliage, there are critical steps that need to be followed to achieve numerous, healthy, and large leaves. The first is to select the appropriate onion variety for your area.
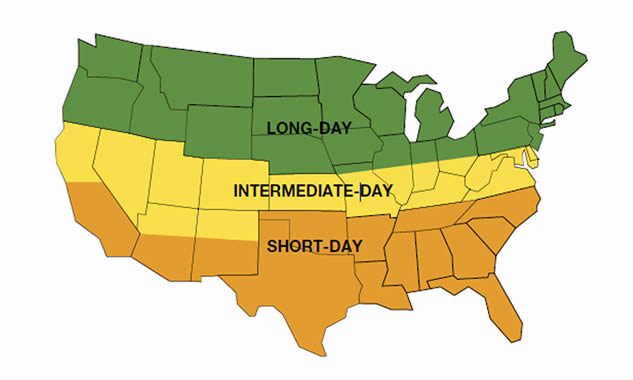
Onions are classified as short-, intermediate-, or long-day types according to the length of daylight hours required for bulbing to begin. The goal is to pick a variety that gives you as long as possible to grow as many large leaves prior to bulbing. The variety, however, must not require so many hours of day length that your area will not reach the bulbing threshold needed to trigger the start of the bulbing process. In the Northern Hemisphere, the farther you are from the equator, the longer the days will be during the summer and, therefore, the longer period that you have to create foliage.
Short-day onions start the bulbing process when the day length reaches 10 to 12 hours. In the southern states, short-day onions are grown during the winter and early-spring months. Commercial growers in Georgia and South Texas plant the onions in November, and the onions grow leaves during the shorter days of the winter months. Growers in the northern states can’t plant in fall or early winter because the ground is too cold to generate growth. By the time they could plant in spring, the short-day onions wouldn’t have enough days to generate enough foliage before the 10- to 12-hour-day length trigger is met.
Intermediate-day onions are some of the most widely adapted onions because they start bulbing when the day length reaches 12 to 14 hours. Almost all areas of the country reach that range of day length. In the South, intermediate-day onions are planted about a month later than short-day varieties and are harvested about a month later. In the northern states, there is adequate time for intermediate-day onions to produce at least 10 to 12 leaves before the bulbing process begins. Long-day onion varieties start bulbing when the day length reaches 14 to 16 hours. If you plant a long-day onion in the South, it will just keep making leaves and never start the bulbing process.
Should you grow seeds, sets, or transplants?
 |
 |
 |
Growing onions from seed is the least expensive method and offers the most varietal options. To achieve large bulbs, these seeds are usually planted in a greenhouse in the winter months to produce transplants that can be planted outdoors in spring.
Onion sets are produced by commercial growers by planting seeds and letting the onions produce a small bulb. The bulbs are stored over winter and sold to gardeners to plant in their gardens in spring. Almost all onions sold as sets are extremely-long-day varieties, and when planted in short- or intermediate-day areas, they will produce only a green onion. Sets have the advantage of being easy to plant and to get established because the bulbs have a large reservoir of carbohydrates to use to get started.
Onion transplants are plants that are started by commercial growers as seeds in winter, pulled when they have four or five leaves, and shipped at the appropriate time for planting. The seeds can be started in a greenhouse or are field-grown by onion-plant growers in southern states.
Any variety of onion that is grown from a seed, set, or transplant will start the bulbing process at approximately the same time. For onion production in short- and intermediate-day areas, the two options are from seed or transplants because long-day sets generally won’t produce large bulbs. Because you can plant the transplants that have a four- or five-leaf head start over seeds at the same time that you can plant seeds, transplants generally start the bulbing process with four or five more leaves than seed-grown onions. Transplants, therefore, will have four to five more rings, which means up to a 2-inch-diameter larger bulb. For long-day areas, sets or transplants will produce large bulbs as long as the correct variety is planted.
Purchasing the right onion variety for your area is the most crucial part of growing onions. If your source is offering the wrong varieties for your area, switch to a merchant who is concerned about your results and not about just selling you a product. Helping people grow their best crop of onions is the most rewarding part of my job. I can’t guarantee them success, but I can make sure that they don’t get a product that will guarantee them failure.
Basics: Ready to get started?

Once you’ve selected the onion variety that’s right for you and have purchased the seeds, sets, or transplants, it’s time to get them into the ground. onions can be sown, set, or transplanted approximately six weeks prior to the last average frost date in your area. Here’s what you need to know about caring for your future crop.
Fertilizing
Onions need phosphorus and potassium for root development during the first two to three weeks after planting. Just prior to planting, apply a balanced fertilizer, such as 10–20–10, close to where the onions will be planted. Three weeks after planting, the root system will be established, and a biweekly feeding of a nitrogen-heavy fertilizer, like 21–0–0, will keep the foliage growing and a deep green color. at this point, a new leaf will emerge every two to three weeks. Once the transfer of carbohydrates, or bulbing, begins (you’ll see the soil begin to crack around where the bulb is forming), the growing cycle is complete. no further application of fertilizer is required.
Watering
Once the foliage starts growing, it must be kept healthy and disease-free. Almost all foliage diseases are caused by leaf wetness. overhead watering is the worst way to irrigate because, every time that the leaves get wet, fungal and bacterial spores attach to the leaves; use, instead, drip irrigation or soaker hoses. Onions do well with consistent moisture but are prone to rot if the soil is overly wet. It is important that your irrigation system applies water uniformly, preferably to a depth of 1 to 2 inches of water a week until bulbing and then 3 to 4 inches per week during bulb ing. mulch to maintain moisture and to control weeds, but remove the mulch when bulbing begins to help cure the bulbs.
Preventing disease
Chances are that bacterial and fungal spores will appear at some point during the growing cycle, especially during a particularly rainy season. The key is to keep the spores from multiplying and spreading. Be proactive by applying a biweekly protective fungicidal spray to the foliage throughout the onion’s growing cycle. If you don’t want to use synthetic fungicides, consider organic options, like oxidate and copper. If you don’t spray and disease takes hold, it will transfer to the rings on the inside of the onion and cause decay in storage.
Harvesting and curing
When the neck of the onion can no longer support the weight of the foliage, the top will fall over, indicating that the onion is reaching maturity. It’s now time to harvest and cure the onions. A properly cured onion begins with a dry root system. Remove the bulbs from the soil, and lay them out in rows to dry in a location exposed to breezes. If this spot is in full sun, cover each onion bulb with the next onion’s foliage to prevent sunburn until the onion has a nice dry outside leaf. once the neck is completely dry (as revealed when rubbed between your thumb and forefinger), clip off the top of the foliage approximately 1 inch above the bulb and trim the roots. This will prevent the bulb from decaying or sprouting during storage.


Comments
Log in or create an account to post a comment.
Sign up Log in