

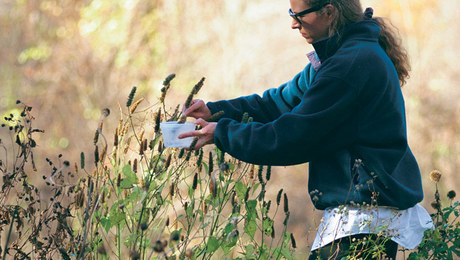
As a professional gardener, I am often called on to move poorly sited woody plants. Sometimes it’s because time considerations were left out of the design process: That once cute little boxwood has become a green behemoth at my client’s back door. Other times it’s a case of right plant, wrong place: Itea virginica in dry shade or Franklinia alahamata in unrelenting sun.
When moving a shrub or small tree, I use the “b&b” method, nursery shorthand for “balled and burlapped.” Simply put, it is the process of digging a root ball from the earth and wrapping it in burlap to hold it together. With this method you can dig a plant out of the ground when it’s dormant and replant it when the timing’s right.
It’s best to dig when plants are dormant
The best time to dig up deciduous shrubs and trees, like lilacs or dogwoods, is when they are dormant; that is, from leaf drop in the fall until bud swell in the spring. With evergreens, the window of opportunity is different. Many evergreens, like yew, arborvitae, nandina, and boxwood, can be dug year-round, but it’s best to wait until new growth is hardened off. Others that are more susceptible to drought, like holly and spruce, should be moved only during cooler weather. When it doubt as to how an evergreen will respond to a mid-summer transplant, it’s best to play it safe and wait.
In the North, freezing temperatures keep plants that are moved in fall from getting on with the task of growing new roots. In the South, however, transplanting in fall is recommended. The milder temperatures allow woody transplants to knit new roots for a good part of the winter.only during cooler weather.
Size a root ball by noting plant height or trunk size

After deciding when to dig, the next thing to consider is how big a root ball should be. For evergreen shrubs and trees, 1 foot of root ball to every 2 feet of height is a good rule of thumb. It’s better to err on the side of generosity, since digging a tree is sort of like cutting hair: Once you sever a root, you can’t go back.
For deciduous shrubs and trees, I calculate the size of its root ball by measuring the trunk’s diameter. Usually, there’s 1 foot of root ball for every inch of a trunk’s diameter. Industry standards dictate that diameter measurement be made at 6 inches above ground level. The best way to measure a trunk’s diameter is with a tree caliper. Your local garden center may offer an inexpensive model. If you cannot locate a caliper, you can measure the circumference of the tree with a piece of string (illustrations, above right), then divide that number by pi (3.14) to get the diameter. Let’s say the trunk’s circumference measures 6 inches. Divide 6 by 3.14 to come up with a diameter that equals 1.91 inches, which, when rounded up, means that the root ball should measure about 2 feet across.
Plants growing in a landscape tend to have fewer and longer roots than fieldgrown nursery stock. So if the perfectly shaped root ball you envision ends up looking more like the head of a golf club once it’s out of the ground, don’t worry. A root ball doesn’t have to be picturesque for a plant to thrive.
Tie up branches before digging a trench

When digging out a root ball, you need room to work. It’s easier to work around the base of the shrub if the branches are tied up with twine first. To tie up branches, start at the base of the plant and work up, one round of twine at a time, looping the end of the twine through the previous round to pull the branches snug.
Next, take your spade and mark in the soil an outline of the proposed root ball. Then draw another concentric circle a foot or so outside the first circle. The area between these two circles marks the trench you will dig around the root ball (top left illustration, p. 38). To dig the trench, alternate between cuts against the side of the ball and cuts around the outer side of the trench. Do not pry the rootball with the head of your spade, as that would crack and damage the ball. Instead, keep the back of the spade toward the root ball as you pull the soil up and out of the trench (top center illustration, p. 38). This motion leaves the root ball virtually undisturbed. Of course, in the process of shaping the ball, you will run into some roots. Most of these can be cut with the spade. Larger roots (1/2 to 1 inch thick) will require a set of loppers.
When the trench around the ball is about two-thirds as deep as the ball’s diameter, cut under the plant by pushing the spade underneath the ball with your foot. Sometimes it takes just a few cuts to free the ball completely, but taproots can be difficult. When you encounter tenacious taproots, tip the ball to one side to make it easier to cut the hold-out roots with the head of the spade (illustration, above right). With bigger plants, a crowbar may be needed to reach hard-to-get-at roots.
Protect roots by wrapping them in natural burlap
To keep the root ball secure until you have a new home ready for your transplant, wrap the root ball in what my grandfather, a retired nurseryman, calls a burlap diaper. Wrapping holds the soil in place and protects roots after the plant has been unearthed.
There are several kinds of burlap on the market. One type, made of synthetic fibers, resists rot and should be avoided. Burlap that’s been treated with insecticide, which is usually green, can take a couple of years to break down. It’s acceptable if it’s all that’s available. The best choice is untreated, natural burlap that rots quickly and allows for good root penetration. Nurseries usually carry it in 3-foot-wide rolls. Each roll contains 300 feet of burlap. If that seems like a lot, most garden centers will sell you a few squares at a time.
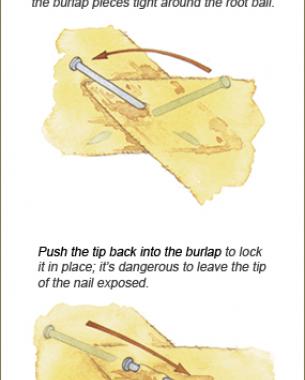
Burlap can be tied in place around the root ball with rope and pinned in place with 2-inch-long pinning nails. I use nails because they keep the burlap snug. As the name implies, these nails are slender and sharp and designed to slide easily through the rough burlap. If you are unable to find pinning nails, 6d common nails, which are available at most hardware stores, work just as well.
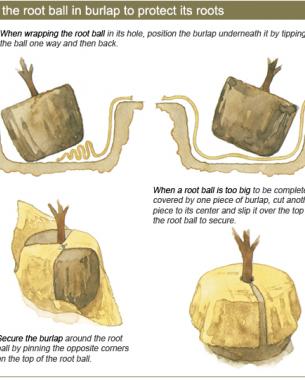
Use pinning nails to secure the burlap in place
A root ball can be wrapped while it is still in its hole, or, if it’s intact, lifted out of its hole and wrapped. The second option is easier, but for a root ball that is cracked or breaking apart, or for one that’s especially large, it’s best to wrap it while it is still in the hole. Position the burlap underneath a root ball still in its hole by tipping the ball to one side and stuffing half the burlap square underneath the ball. Then tip the ball back onto its opposite side and pull the burlap so it’s lying flat on the bottom of the hole. For a root ball that seems to be intact, lift it out of its hole and place it onto a square of burlap to wrap.
The next step is to pull the opposite corners of the burlap up around the root ball and pin them into place on either side of the trunk with a single nail. Note that pinning does not mean just sticking a nail through the two pieces of burlap and into the root ball. That kind of pinning lasts about 20 seconds.
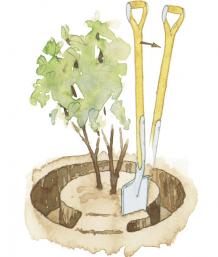
For wide-spreading shrubs, tie up the branches with twine before digging to give yourself more room to work.
Instead, stick the nail about a third of its length through the two pieces of the burlap and crank the head of the nail away from you toward the trunk of the tree (illustrations). This action tightens the burlap around the root ball. With the nail lying flat on top of the root ball, slip the tip of the nail through the burlap back towards you. As tip begins to show, push it down through the burlap and into the root ball, thereby locking it in place. Do the same with the other two corners. With the four corners secured, finishing the job is simply a matter of drawing together and pinning any loose flaps of burlap that remain.
For large root balls that can’t be completely covered by a single sheet of 3-foot-square burlap, slit a second piece of the same size to its center and fit it around the trunk of the plant (illustration, above). With this arrangement, it’s a little harder to pin the burlap pieces in place, so be careful to smooth out all the wrinkles as you go; otherwise, the root ball may not be secure.
A balled and burlapped plant can be held out of the ground for several weeks as long as it is sufficiently watered. For periods longer than that, it’s best to temporarily heel the root ball into a soil or sawdust bed. But even that situation should be temporary. After about two months, untreated burlap begins to decay. At that point, you have to wrap the ball again to keep it intact. Also, if you see roots pushing through the burlap, there’s no need to worry. That’s just a sign that your woody plant is healthy but eager to get back into the ground.


Comments
Log in or create an account to post a comment.
Sign up Log in